Was this content helpful?
How could we make this article more helpful?
System Overview

Enclosures shipped with hard drives feature Seagate's NAS HDD. For more information, go to NAS HDD.
New or replacement hard drives must meet the following requirements:
- SATA I or higher
- 3.0Gb/s or higher
- Spin up to 7200 RPM
In case of disk failure or, the need to expand storage capacity, each individual hard drive is hot-swappable and field replaceable. When adding hard drives to the enclosure, consider using Seagate NAS HDD.
Seagate NAS OS
The 4-bay Rackmount NAS is managed by Seagate NAS OS. Written to all drives within the enclosure, NAS OS helps you to create volumes with RAID protection. Direct attached storage (DAS) can be connected to the enclosure's external ports for NAS backup. However, it is not possible to expand volumes using DAS.
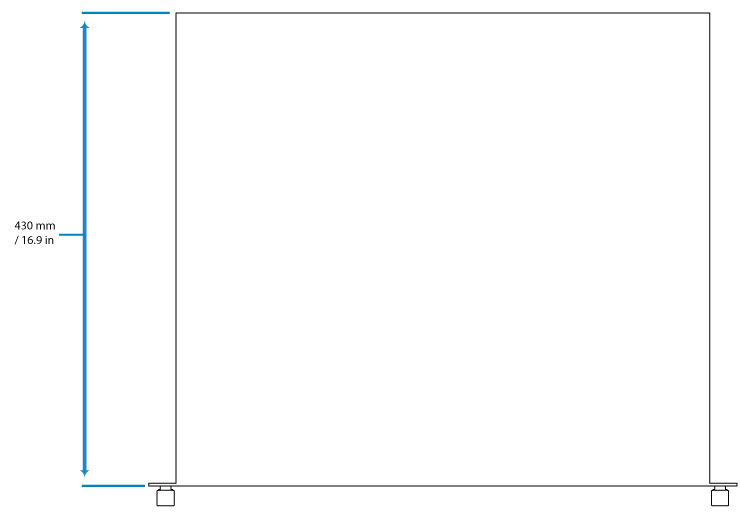
4-bay Rackmount NAS dimensions
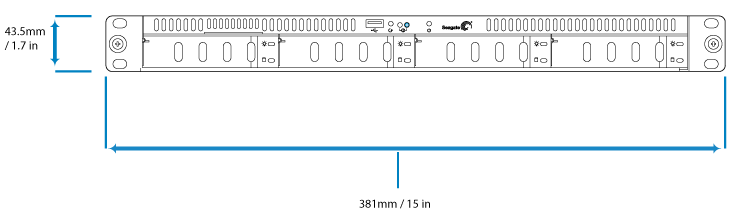
Front panel view
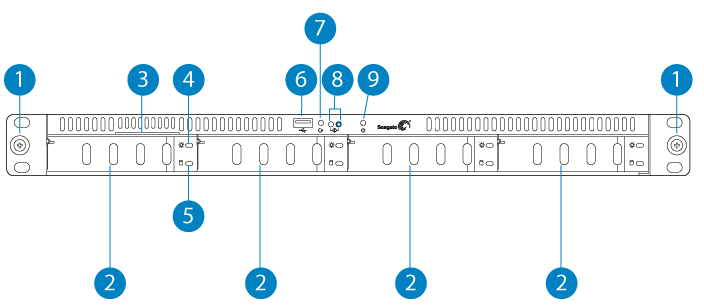
- Rackmount Bracket: Attaches the Seagate 4-bay Rackmount NAS to a standard 19-inch computer equipment rack. See Setting Up.
- Disk trays (x4): Install up to four disks.
- MAC Address Label: Slide the label toward you to view the MAC addresses for the Ethernet ports.
- Disk Power LED: The LED turns solid blue when the NAS receives power.
- Disk Activity LED: The LED blinks to indicate activity for the drive.
- Hi-Speed USB 2.0 Port: Connect compatible USB devices to the port.
- Reset Button: Used to tell the NAS to boot from a NAS OS Rescue USB key (included with your device).
- Status LEDs: Indicates that the device is powered on and provides status signals (see System LEDs).
- Power Button: Used to turn the system on and off (see Operation).
For details on LED behavior, see System LEDs.
Rear panel view

- Power Input: Plug in the AC adapter supplied with the drive. See Setting Up.
- VGA Video Port: Connect a VGA display for maintenance.
- SuperSpeed USB 3.0 Ports (x2): Connect direct-attached storage (DAS) or USB devices such as a mouse and keyboard.
- Gigabit Ethernet Ports (x2): Connect Ethernet cables from the device to your network. See Setting Up.
- Hi-Speed USB 2.0 Ports (x2): Connect direct-attached storage (DAS) or USB devices such as a mouse and keyboard.
- eSATA Port: Connect direct-attached storage (DAS).
- Ventilation: Keeps your NAS's power supply unit cool during operation. Be sure not to block the fan exhaust when using the product.
USB and eSATA ports
The 8-bay Rackmount NAS has three USB 2.0 ports, which lets you connect DAS or other USB devices:
- Storage devices connected to a USB port should be formatted using one of the following file systems: FAT32, NTFS, HFS+, EXT2, EXT3, EXT4, and XFS. Other storage formats will not be recognized by the NAS. No capacity limitations apply.
- You can connect any USB keyboard, USB mouse, or USB accessories.