Was this content helpful?
How could we make this article more helpful?
NAS OS Rescue And Repair
The NAS OS Installer is available on the USB key shipped with your NAS OS device. In addition to installing NAS OS, it can act as a bootable rescue tool to help you troubleshoot technical problems. The Installer includes three recovery options:
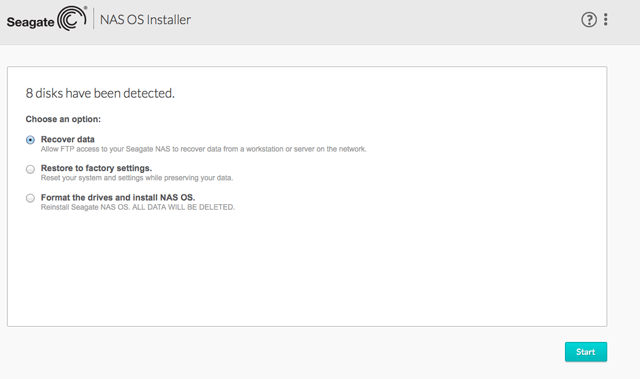
- Recover data: Enable FTP Access to the data on your NAS OS device. Once enabled, you can use FTP client software or a web browser to back up the data stored on your NAS.
- Restore to factory settings: Reset your NAS OS device to its factory default while attempting to preserve the shares and data. Seagate cannot guarantee that all your data will be saved. Factory default includes the reversion of all NAS OS parameters (e.g. Users, General, Network, etc.) to their original states.
- Format the drives and install NAS OS: The Installer will format the NAS's hard drives before reinstalling NAS OS. Since all data will be deleted during the format, Seagate highly recommends that you back up your files before selecting this option.
Prepare for a Rescue and Repair
To connect to the Installer, you will need:
- The NAS's MAC address. Your NAS OS device has two MAC addresses, one for each LAN port (see the hardware user manual for your device). You may use either MAC address for the Installer.
- The NAS's IP address or Seagate Network Assistant
You have multiple options for finding the addresses:
- MAC address: Check the MAC address label on the NAS OS device.
- MAC and IP addresses: Connect a VGA monitor to the NAS's VGA port.
- MAC and IP addresses: Launch Seagate Network Assistant to review MAC and IP address information (see Seagate Network Assistant).
VGA Monitor
While not obligatory, you can connect a compatible monitor to the NAS before following the Rescue Steps. Doing so will help you confirm that the NAS boots from the USB key. You can also review the device's IP and MAC addresses.
The VGA signal reverts to energy saving mode within a few minutes. If the monitor appears to be receiving a signal but no image is present, try to connect a USB keyboard to one of the NAS's USB ports. Tap on one of the keys to view the NAS's VGA signal.
Rescue and Repair steps
Step 1: Update the USB key
The included USB flash drive allows you to boot the NAS OS device and run the NAS OS Installer. However, before using the USB key, it is highly recommended that you download a more recent version of the Installer as it may have been updated since you received your NAS.
Note on download: The software that you download is not the NAS OS. Rather, it is a utility to install the NAS OS Installer onto the key so that you can install or repair the NAS OS.
To update the USB key:
- Insert it into a USB port on a computer with a connection to the Internet.
- Launch an Internet browser and enter the following address: http://www.seagate.com/naskey.
- Follow the on-screen directions to update the software on the key.
- Eject the key from your computer.
Step 2: Back up and power off the NAS OS device
The NAS OS Installer will attempt to repair or reset the NAS OS. To guarantee that data stored on the NAS is preserved, Seagate highly recommends that you back up all shares before moving forward with the Installer. If you cannot access the NAS volumes, the Rescue provides an option to retrieve data via FTP.
Following the backup (if applicable), turn the NAS off. If you have access to NAS OS, use the power icon on the upper right of the window to select Shutdown. Otherwise, apply a short push to the power button.
Step 3: Connect the USB key and boot the NAS
- Connect the USB key to one of the USB ports on the NAS.
- Push the power button to boot the NAS.
Step 4: Launch the NAS OS Installer
- Go to Seagate Network Assistant to select Web access to the NAS OS. If the NAS does not appear in Seagate Network Assistant, enter the IP address in your browser's address bar (URL). For example, http://192.168.10.40.
- Enter one of the MAC addresses in the available field. It is not necessary to include the colons.

- At the prompt, select your preferred type of repair and follow the on-screen instructions.
The NAS OS Installer may perform a file system check (fsck) to determine if the device was improperly powered off or crashed, causing an inconsistent state for the NAS OS. The fsck will attempt to repair or recover damaged system files.