Was this content helpful?
How could we make this article more helpful?
System Overview
The 4-bay NAS is a disk drive enclosure. It houses up to four 3.5-inch hard drives in its front chassis and a single USM hard drive (see illustration below) in the USM slot. Supported drives are 3.0 Gb/s SATA that spin up to 7200 RPM. Each individual disk drive is swappable and field replaceable.
Windows Storage Server 2012 Workgroup is written to a partition on the first drive in the enclosure (far left). Disks, volumes, RAID, and all other drive management features are managed within the operating system. Seagate recommends that only users with Windows Server training and experience administer the 4-bay NAS.
NAS dimensions


Front panel view

- USM Slot: Insert a compatible USM disk into the slot.
- LCD Display: Use the up/down buttons to browse through the menu to review the device's general settings. See LCD Display for details.
- Power Button: Used to turn the system on and off. A LED will turn on once the button is pushed. When the product is operating, a short push of the on/off button will turn the 4-bay NAS off or, place the 4-bay NAS into deep sleep mode if the option has been configured in NAS OS. A long push of more than four seconds will cut the power from the NAS, forcing it to shut down immediately. A long push is not recommended as it may result in data loss. See Operation for details.
- Status LED: Indicates that the device is powered on and provides status signals. See System LEDs for details.
- Ethernet LEDs: The LED for the respective Ethernet port will turn on when it is connected to an active network. See System LEDs for details.
- SuperSpeed USB 3.0 Port: Connect compatible USB devices to the port.
Interior (Disks)
Open the front door to reveal the disks.
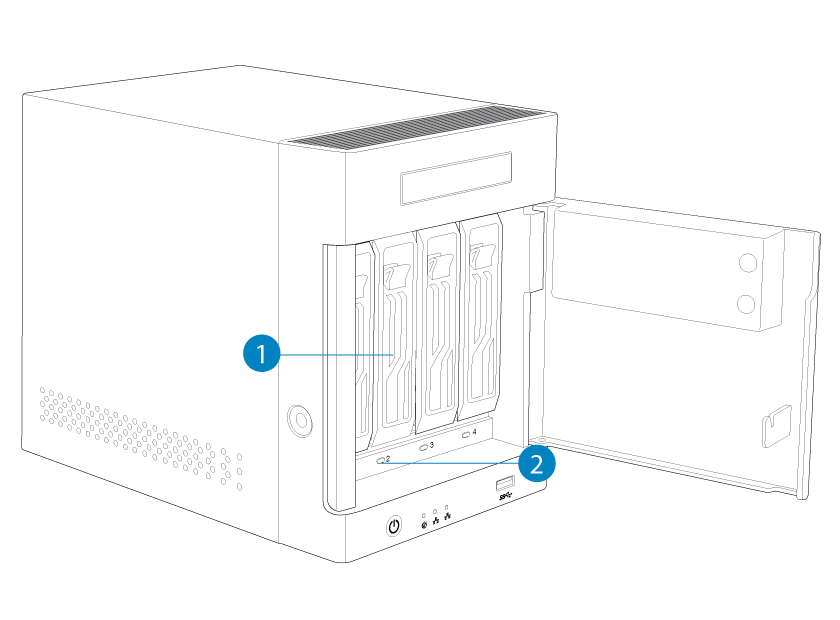
- Disk tray handle: Lock the drive in place or remove it using the handle.
- Disk LED: Indicates the status and activity for the drives in the enclosure. See System LEDs for details.
See Drive and Hardware Maintenance for details on disk installation.
Rear panel view
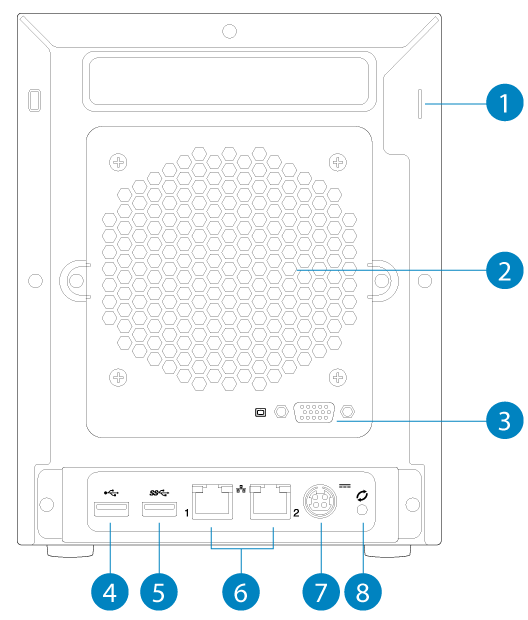
- Kensington lock: Secure the NAS to a desk using a compatible cable.
- Ventilation: Helps to keep your NAS's power supply units cool during operation. Be sure not to block the fan when using the product.
- VGA Video Port: Connect a VGA display for maintenance.
- Hi-Speed USB 2.0 Port: Can be used for direct-attached storage (DAS) or USB devices such as a mouse and keyboard.
- SuperSpeed USB 3.0 Ports: Can be used for direct-attached storage (DAS) or USB devices such as a mouse and keyboard.
- Gigabit Ethernet Ports: Connect Ethernet cables from the device to your network. See Setting Up for details.
- Power Input: Where you plug in the AC adapter supplied with the drive. See Setting Up for details.
- Recovery Button: Push this button in tandem with the power button on the front of the device to force the NAS to boot from a USB device. Use this option to repair or reinstall the operating system.
USB ports and USM slot
The 4-bay NAS has one USB 3.0 port and one USM slot on the front. It also features one USB 3.0 port and one USB 2.0 port on the rear. You can add capacity to the NAS by connecting compatible storage devices to the USB ports and USM slot. Storage connected to the NAS must be formatted using one of the following file systems: FAT16, FAT32, exFAT, NTFS, or ReFS. Other storage formats will not be recognized by the NAS. Capacity limitations are based upon the disk drive's format.
The USB ports may be used to connect compatible USB devices such as a mouse, keyboard, etc.
See Drive and Hardware Maintenance for instructions on how to insert a USM disk into the USM slot.