




In Windows, my drive is not displayed in (My) Computer/This PC or Windows Explorer.
New internal Seagate brand drives are not partitioned or formatted from the factory. Only external drives are sold pre-formatted.
If your additional drive is new or completely erased, then to be visible in (My) Computer/This PC, it must be partitioned. In Windows you may use the Disk Management Utility to partition the drive.
Here is the order of actions, and we will expand on these below.
• Connect and install secondary drive.
• Boot into Windows.
• Open Computer Management and select Disk Management.
• Initialise, Partition and Format the drive.
• Boot into Windows.
• Open Computer Management and select Disk Management.
• Initialise, Partition and Format the drive.
Note: Even though you can see the drive in Disk Management it will not be visible in Windows Explorer until it has been initialised and partitioned.
Initialising and partitioning a drive:
1. On your keyboard press the Windows key ( ) + R
) + R
2. Type compmgmt.msc and press enter.
3. The Computer Management window will open.
4. Choose Disk Management under the Storage category.
) + R2. Type compmgmt.msc and press enter.
3. The Computer Management window will open.
4. Choose Disk Management under the Storage category.
Note: Windows will normally see the uninitialised drive when you open Disk Management and start the wizard to initialise the disk for you. In case the “Initialise Disk” wizard doesn’t start you may follow the instructions to manually initialise your disk:
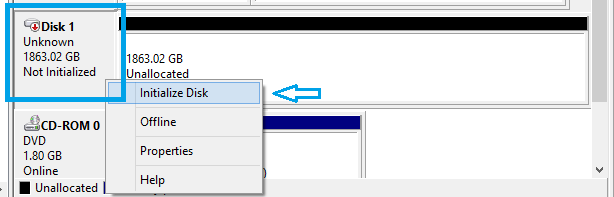
5. Right-click on the Disk that needs to be initialised.
6. From the menu select Initialise Disk.
6. From the menu select Initialise Disk.
7. Select the appropriate partition style, MBR or GPT.
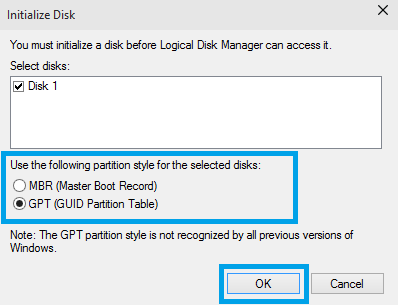
Note: The MBR Partitions can define a disk drive capacity up to 2.2 TB. Windows operating systems that boot from an MBR are therefore limited to 2.2 TB per MBR. The MBR Partitions can define a disk drive capacity up to 2.2 TB. Windows operating systems that boot from an MBR are therefore limited to 2.2 TB per MBR. GUID Partition Tables (GPT) can define drives larger than 2.2 TB.
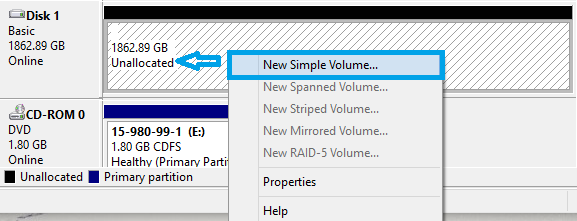
8. Once the disk is initialised, the partition will show Unallocated.
9. Right-click somewhere on the Unallocated partition.
10. From the menu select New Simple Volume.
9. Right-click somewhere on the Unallocated partition.
10. From the menu select New Simple Volume.
11. The New Simple Volume Wizard will prompt.
12. Click Next.
13. Specify Partition size in MB and click Next.
12. Click Next.
13. Specify Partition size in MB and click Next.
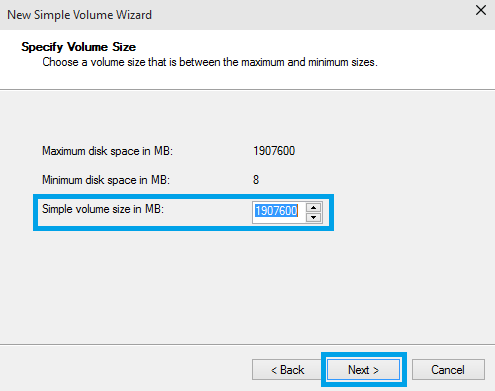
Note: If you want to create multiple partitions, change the Simple volume size in MB to the size of the partition you'd like to create.
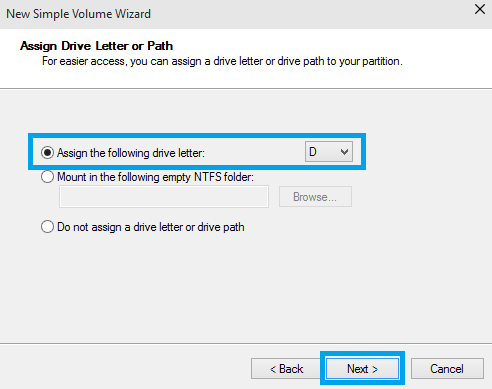
14. Assign a Drive Letter then click Next.
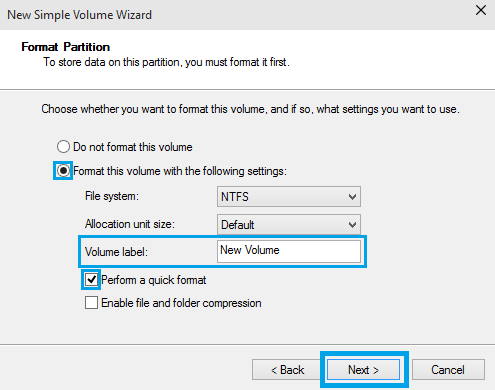
15. Specify the formatting options you want to use:
15. Specify the formatting options you want to use:
• File System
• Volume label
• Volume label
16. Click Next.
17. Confirm that the options selected are correct, and then click Finish.
18. Once you have clicked on the Finish button, the New Partition Wizard will close. In a few seconds, the "Unallocated" partition will say "Formatting". When the drive has completed formatting it will display as a healthy drive with the size and type of partition below the volume name and drive letter.
18. Once you have clicked on the Finish button, the New Partition Wizard will close. In a few seconds, the "Unallocated" partition will say "Formatting". When the drive has completed formatting it will display as a healthy drive with the size and type of partition below the volume name and drive letter.
Additional information about Drives beyond 2.2 TB:
Most legacy systems built before 2011 have a traditional PC BIOS. This type of BIOS uses a Master Boot Record (MBR). The MBR Partitions can define a disk drive capacity up to 2.2 TB. Windows operating systems that boot from an MBR are therefore limited to 2.2 TB per MBR. A 3 TB boot drive in a legacy BIOS and Window system will lose access to the full capacity of a 3 TB drive because of the MBR limitation.
UEFI BIOS desktop systems are new since 2011. Windows 11/10/8/7 and Vista 64-bit operating systems support booting from UEFI and GPT without the MBR limitation. This is the Windows native solution for booting a 3 TB drive to a single partition.
GUID Partition Tables (GPT) can define drives larger than 2.2 TB. You can use GPT today on any Windows 11/10/8/7 and Vista system as a non-booting data drive. Windows can only boot a GPT partition on a new type of BIOS called UEFI.


