


iSCSI stands for "Internet Small Computer Systems Interface". iSCSI is an extension of the standard SCSI storage interface that allows SCSI commands to be sent over an IP based network. It enables computers to access iSCSI Targets over a network the same way they would access a drive that is directly connected to a computer.
The Microsoft iSCSI Initiator will be used to connect to an iSCSI target from a Windows 7, 8, or other Windows PC. The iSCSI Initiator can connect to an iSCSI target by the Seagate NAS Host Name or by IP Address. If it has been decided to connect by IP address, it is suggested the NAS be setup with a Static / Manual IP Address in advance.
Go to the Network section of the NAS Administrative page to setup a Static IP Address.
Access the administrator's page of the Seagate NAS by launching the Seagate Network Assistant and pressing the “Web access to the NAS OS Dashboard” button, or by typing the IP address or Hostname of the device in the address bar of a web browser.
The ISCSI protocol is available on NAS OS 4.0 products, but with some restricted functionalities:
-
A LUN can be only mapped to a single Target.
-
LUN file mode only, created on volume.
-
LUN block mode not supported.
A LUN file is always attached to a target : You create a target and consequently a LUN file is created. LUN files cannot exist without a target.
Creating the iSCSI Target
-
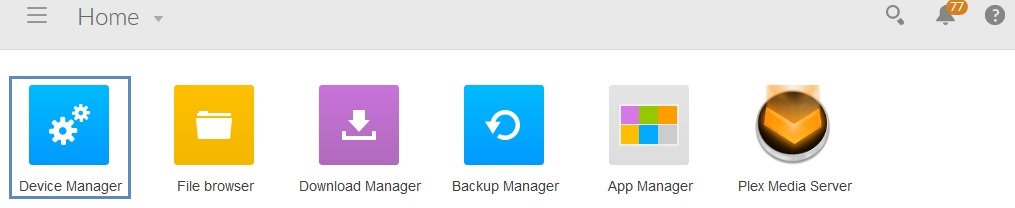
Log in to the NAS Welcome page as admin or a user with administrative privileges.
-
On the Home page click the Device Manager icon.
-
In the list of choices on the left click Volume located under Storage.
-
Click the “Add iSCSI” button under Associated iSCSI targets.
-
Select “Create new” and click Next.
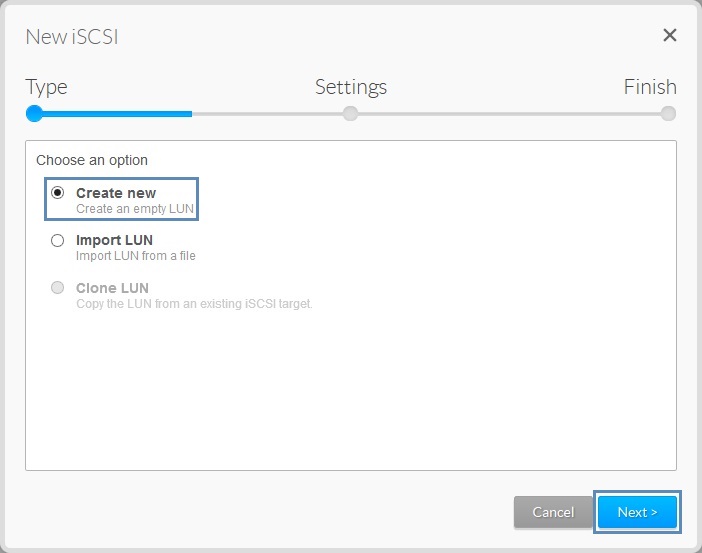
-
Set the capacity and Advanced parameters (optional) and click Next.
iSCSI target capacity is limited to 8TB total or to the available free space of the NAS.
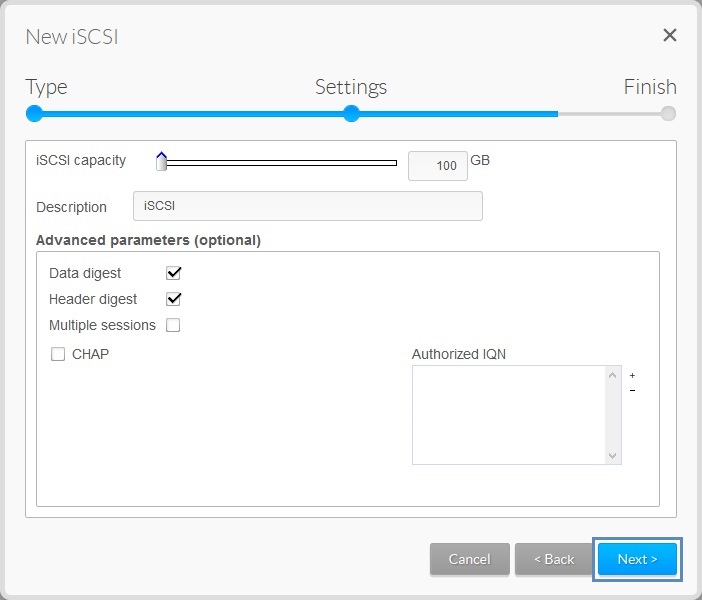
A note on iSCSI "Advanced parameters (optional)":
Header Digest - Increases data integrity. It ensures the validity of the header portion of the protocol data unit.
Data Digests - Increases data integrity. Validate the data segment of the protocol data unit.
Multiple Sessions - Is for multiple connections to a single iSCSI Target. To avoid data corruption or loss, make sure you operating in a cluster environment.
CHAP (Challenge Handshake Authentication Protocol) - Allows one-way and Mutual CHAP to authenticate with the Microsoft iSCSI Initiator and the target.
Authorized IQN - IQN stands for (iSCSI qualified name). The IQN Identifies a particular iSCSI element, regardless of its physical location. The IQN can be found in the iSCSI Initiator in the Windows OS that will be using the iSCSI target.
If an IQN from a Windows Server or Workstation is assigned as an Authorized IQN, only that system will be able to connect to the iSCSI Target. -
Click Finish to confirm the selections.
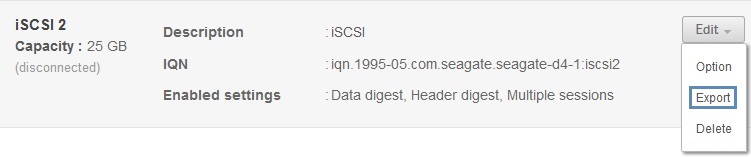
When the iSCSI Target has been created, it will show as disconnected. An Edit dropdown menu is available to Delete the iSCSI Target, Edit Options, or Export.
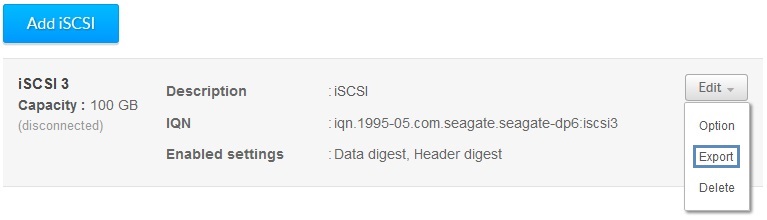
Option allows for changing the Name, IQN, Description, enable or disable Multiple sessions, CHAP, and adding or removing Authorized IQN’s.
The Export option exports the iSCSI Target as a backup.
Delete removes the iSCSI Target.
Connecting to the iSCSI Target
-
Move to a Windows Workstation on the local network that will connect to the new iSCSI Target. Open the Control Panel, select Administrative Tools, and open the iSCSI Initiator.
In this example we will use the iSCSI Initiator from a Windows 8 Workstation to connect to a iSCSI Target by the NAS Host Name. -
Enter the NAS Host Name in the Target: field and click Quick Connect…
-
The Quick Connect window will open and display as Connected.
-
Click Done and OK to exit the the Initiator.
-
Windows may prompt that "You need to format the disk in drive..." Click Format disk.
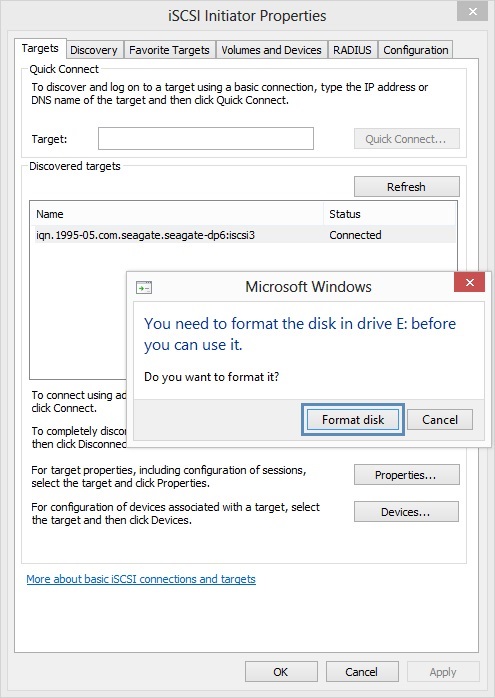
A note when connecting to the iSCSI Target the first time, by default it will be a GPT partition and will need formatting.
Windows Diskpart can be used to clean the iSCSI drive. It can be re-initialized in Disk Management to MBR if needed.
The iSCSI drive is now ready to use.
Using the Export LUN Option
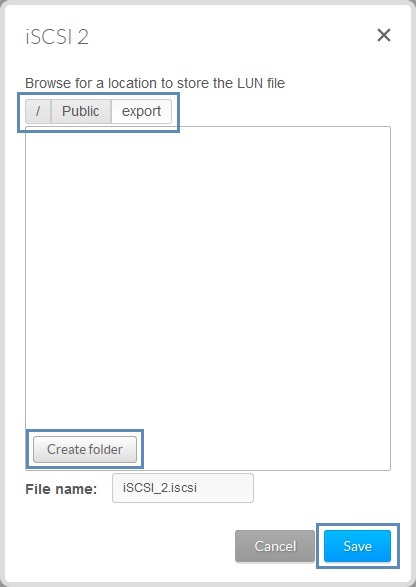
This action allows admin users to export the content of a LUN file attached to a specific target.
If an 8TB iSCSI target is created but only has 25GB of data on it, the entire 8TB LUN file will still be Exported. This is a long process..
-
In the NAS Device Manager page under Storage and Volume, click the Edit button next to the iSCSI Target and click Export from the drop-down.
A box will open listing shares on the NAS including any USB drives connected to the NAS. -
Browse for a location to store the LUN file then click Save. The screenshot shows the Public folder was selected and a folder called export was created to be used for Exporting the LUN.
-
A prompt will report that the iSCSI target will be available in read-only mode until the operation is complete. Click Continue.
The iSCSI target will show with a progress indicator. When the Export completes it can be Imported back at a later time as needed..
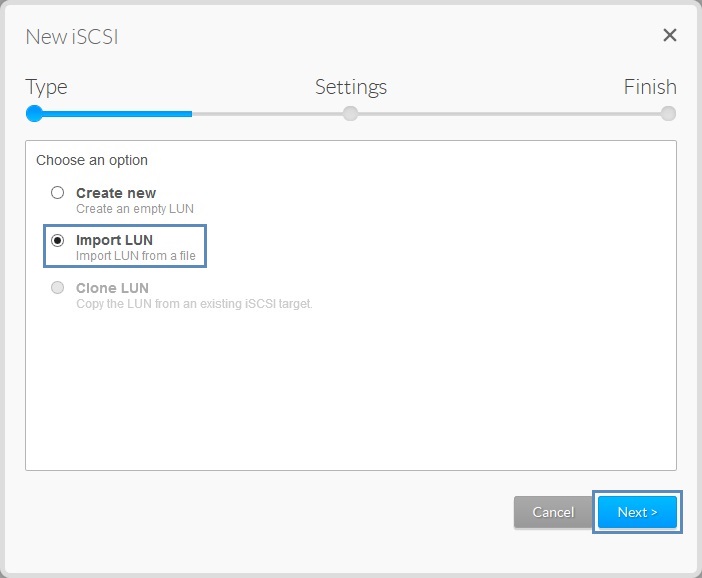
Using the Import LUN Option
This action allows admin users to import LUN files that have been previously exported.
-
Under Associated iSCSI targets click the Add iSCSI button.
-
Select Import LUN and and click Next.
-
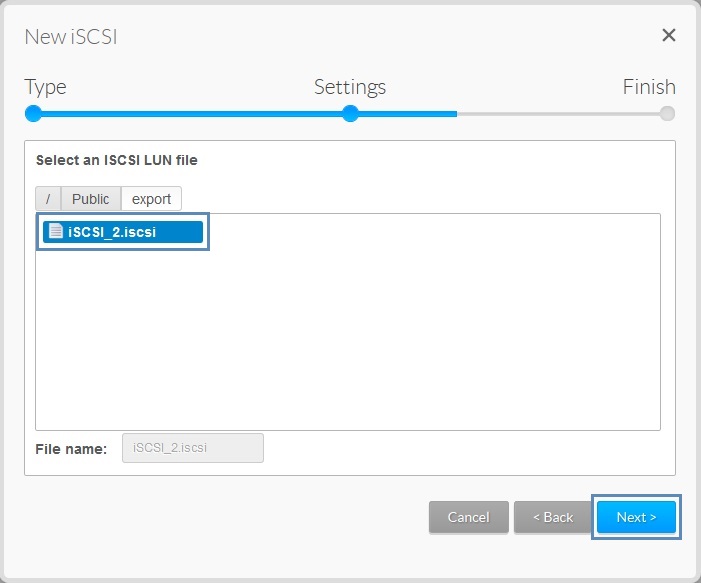
Select an iSCSI LUN file and click Next.
-
Enter a Description and Advanced parameters (optional) and click Next.
-
Click Finish to confirm your selections.
The LUN / iSCSI target will be imported. This is a long process.
After the LUN Import has completed its Target is available to be connected to by other Workstations.
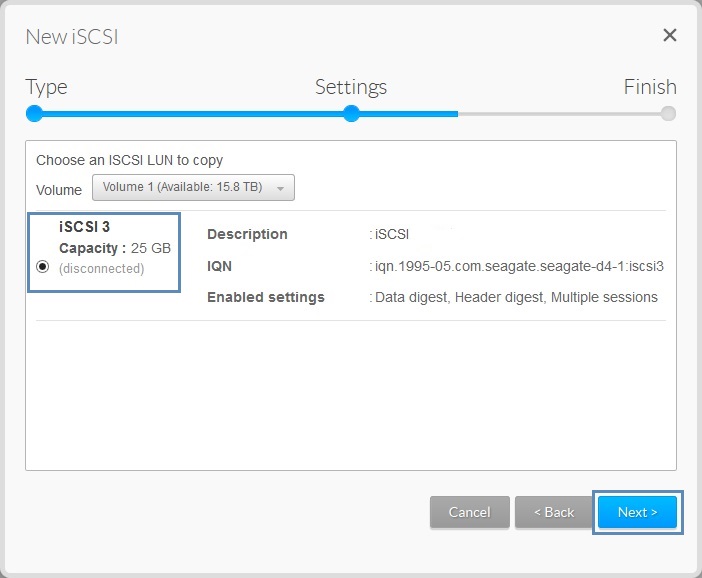
Using the Clone LUN Option
This action allows admin user to clone the content of a LUN file currently attached to a target.
-
Under Associated iSCSI targets click the Add iSCSI button.
-
Select the Clone LUN option and click Next.

-
Choose an iSCSI LUN to copy and click Next.
-
Enter a Description, Advanced parameters (optional) and click Next.
-
A prompt will report that the iSCSI target will be available in read-only mode until the operation has completed. Click Continue.
An iSCSI progress indicator will be shown.
Information about the Microsoft iSCSI Initiator can be found at:
www.microsoft.com