Was this content helpful?
How could we make this article more helpful?
Device Manager
The Device Manager app is the heart of NAS OS management. Use Device Manager to configure important settings such as users, shares, storage, and much more.
Launch Device Manager
Launch Device Manager from the Home page by choosing its app icon.

Device Manager navigation

The left pane lists the NAS OS management pages. Choose a page to manage its settings. The central pane changes to reflect the selected page.
For example, click Network to review or revise settings for the Ethernet ports, port forwarding, MyNAS, and more. Upon choosing Network, the central pane changes to the interface for the page.
Overview is the default page when first launching Device Manager. It gives you a summary of the NAS’s health and shortcuts to important settings.
- Review the storage capacity, health and processor/RAM consumption.
- Get quick summaries of the settings Shares, Users, Groups, Network, Services and Power.
- Click on a summary to go to its page. You can also add Shares, Users, and Groups from the Overview page by choosing +Add at the applicable setting.
Toggle to another app
On the upper left of the window, click the menu icon (three horizontal lines) and then choose Device Manager or the down arrow > [App name].
Shares
Your NAS's storage is divided into shares, also known as network folders. The Shares page allows you to create new shares, assign access rights to users and groups, and to adjust services by share. By default, your NAS OS device has two shares, admin and Public. You can begin working with these shares immediately and create new shares as needed.
Note on the admin share name: The name of the share admin will update automatically if the administrator changes the login name from the default admin. For example, if the administrator used her name, Sally, during the installation, admin becomes Sally.
Important info: In text fields, you can enter 1 to 20 characters using letters, numbers, hyphens, and underscores. No other symbols, special characters, punctuation, or spaces may be used. Do not begin or end with a hyphen or underscore.
Shares, Users, and Groups
Allotting storage and network permissions for multiple departments and users in a branch office or corporate network can be complicated. It takes forethought and planning to configure which user is part of what group with access to how many shares. For this reason, the settings Shares, Users, and Groups are closely related in NAS OS. The cross-functionality between these three settings allows the administrator to add users to groups in the Users or Groups settings as well as shares to users and groups in the Users and Groups settings. The wizard for each setting prompts the administrator to choose shares, users, and groups. Additionally, users and groups can be added to a new share when following the Add share wizard.
However, creating a new share, user, or group requires that the administrator use its respective setting. For example, the administrator must choose the Shares setting to add a new share and the Users setting to add a new user. Though each setting can be revised at any time, it is highly recommended that the administrator plan ahead when first adding shares, users, and groups to NAS OS. With a map of users, groups, and shares, the administrator can simplify access rights. See the example below.
Sample setup: Shares, Users, and Groups
An administrator has mapped permissions for 40 shares, 20 users, and 10 groups.
To get started, the administrator adds the 20 shares using the Add share wizard on the Shares page. The administrator ignores the prompts to add users and groups to each share since new users and groups have yet to be created.
Next, the administrator adds the 20 users using the Add user wizard on the Users page. The administrator ignores the prompts to add users to shares and groups since new groups have yet to be created.
Finally, the administrator adds the 10 groups using the Add group wizard on the Groups page. In this step, the administrator will assign:
- Each user to a specific group
- Share permissions for each group
The Groups setting is the last step since it can cover more users at one time rather than assigning share permissions for each new user.
The generic sample setup may not apply to all environments. However, NAS OS gives the administrator free reign to configure permissions on the Shares, Users, and Groups pages.
Public and private shares
The following table shows the differences between private and public shares:
| Type | Accessibility | Login | Availability | Default share |
|---|---|---|---|---|
| Private | Login and password required | Password-protected | Computers on the network and remote access (must be enabled) | admin or user defined |
| Public | Available to any user on the network | None | Computers on the network and remote access (must be enabled) | Public |
Existing shares
Shares are organized in a table:
- Click on the text in the Name column to change the share name.
- Click on the empty space or text in the Description column to add or revise details for the share (optional).
- The number in the Groups column (two silhouettes) shows how many groups have access to the share. Click on the number to view and edit the group. Public indicates that the share is available to everyone on the network.
- The number in the Users column (one silhouette) shows how many users have access to the share. Click on the number to view and edit user access. Public indicates that the share is available to everyone on the network.
- Click on the text in the Services column to add or remove services. Only active services are available. See below for instructions on how to adjust services on a share and Services for details on how to enable and disable services in NAS OS.
- To review and edit the options for a share, pass the cursor to the far right of its row to make the Edit pull-down menu visible. Most of the options are explained above. Additional options include changing network access (public or private) and deleting the share.
Add share
Choose Add share and follow the wizard to completion. Consider the following when creating your share:
- The Add share wizard features four steps: name the share, Set group permissions, Set user permissions, and Summary.
- Name the share: A share must have a name from 1 to 20 characters using letters, numbers, hyphens, and underscores. Do not begin or end with a hyphen or an underscore.
- Name the share: If your NAS OS device has more than one volume, a pull-down menu allows you to select the volume for the share.

- Name the share: Checking the box next to Public gives everyone on the local network access to the share.
- Set group permissions/Set user permissions: The administrator can skip these steps if permissions will be assigned in the Users or Groups settings. Choose Next to reach the Summary.
- Set group permissions/Set user permissions: When adding groups or user permissions, you must drag selected items to the Read access column or the Read+write access column. To add multiple items, make all your selections before dragging them to a column.

- Set group permissions/Set user permissions: If a user or group is mistakenly dragged to the Read access column or Read+write access column, you can drag it back to the No access column.
- Set user permissions: Checking the box next to Enable Read access to guests on the network allows all users on the network to view files on the share. However, they cannot modify files or write data to the share.
Add remote share: distributed file system namespaces (DFS-N)
During the course of a day, a user may access multiple files stored on many shares connected to your local area network (LAN). To find all the shares and volumes spread about the network, a user can hunt through a long list of NAS devices and servers.
NAS OS DFS-N allows administrators to add compatible shares to a single NAS OS device. Accessing shares on a single device simplifies data management for the administrator and the user. Similar to creating a new share, the administrator adds remote shares from other NAS OS devices or servers on the LAN. The other NAS OS device or server is called the Host.
NAS OS DFS-N supports NAS OS shares and SMB shares/volumes. SMB or, server message block, is a standard protocol for sharing network volumes. It is native to Windows and supported on Mac OS.
Add remote share
Choose Add remote share and follow the instructions below for your Host type:
NAS OS Host
- The wizard searches the local network for NAS OS devices. Select the host NAS OS device for the shares you want to add and choose Next.
- Enter your credentials for the host NAS OS device and choose Next. In most instances, you will use a login with administrator rights. You can choose Guest when adding public shares.
- Select the shares to add and choose Next. If you do not see the shares you want to add, make certain that the credentials you entered in step 2 have access rights to the shares on the host NAS OS device.
- Review the Summary page and choose Finish.
Third party NAS or server Host
- Enter the IP address for the host in the empty field and choose Next. Though an IP address is generally more reliable, you can also enter the NAS’s/server’s network name.
Important info: Even if you succeed in adding the share/volume using the Host’s name, you can experience problems when attempting to access the volume on a PC/Mac. This may be due to the network’s naming service. Should you encounter issues with the network name, it is recommended that you try again using the IP address.
- Enter the name of the share on the host NAS/server and choose Next.
- Review the Summary page and choose Finish.
Adding remote shares on offsite networks
NAS OS gives you the option to add shares/volumes from NAS OS and third party NAS/server devices that are located outside the LAN (offsite network). When choosing the Host NAS, follow the instructions for Third party NAS or server Host, even if you want to access a NAS OS device. When choosing the NAS, you must enter its public IP address and use the proper credentials.
Seagate cannot guarantee the stability and performance of remote shares/volumes from offsite networks. There are many factors that can affect the connection including, but not limited to: firewalls, security settings, routers, Internet service providers, and administration.
Share tabs
Adding remote shares to the NAS changes the Shares page. There are two tabs:
- Local: Access all shares created on the NAS.
- Remote: Access all shares added from other NAS devices.
Managing remote shares/volumes
The host NAS/server manages its shares. Only the administrator for the host NAS device can adjust the remote shares’ credentials, access rights, quotas, etc.
To avoid potential conflicts with accessing remote shares, administrators should use the same credentials on the NAS OS device and the host NAS/server. For example, Logan is a user on the NAS OS device Seagate-DP6. The administrator for Seagate-DP6 has added a remote volume called Data. The host server for Data is called Seagate-DWSS4, a Windows server. The administrator for Seagate-DWSS4 must create a login and password for Logan. To make the login experience to Data easier for Logan, the administrators for Seagate-DP6 and Seagate-DWSS4 agree to use the same credentials on both NAS devices.
The administrator for the NAS OS device can revise how the name appears on the Shares page and users on the network:
- Choose the Remote tab
- Locate the remote share you want to rename and click on the words in its name column.
- Enter the name in the field.
Accessing remote shares/volumes
Accessing remotes shares is similar to accessing shares created on the NAS OS device. There are minor differences that administrators should consider before authorizing users to access remote shares. Review the information below before adding remote shares to your NAS OS device.
The host NAS/server manages the remote share/volume. Since management includes credentials, make certain that applicable usernames and passwords have been added to the host NAS/server. For example, Logan is a user on the NAS OS device Seagate-DP6. The administrator for Seagate-DP6 has added a remote volume called Data. The host server for Data is called Seagate-DWSS4, a Windows server. The administrator for Seagate-DWSS4 must create a login and password for Logan. To make the login experience to Data easier for Logan, the administrators for Seagate-DP6 and Seagate-DWSS4 agree to use the same credentials on both NAS/server devices.
SMB is native to Windows. Users with Windows computers can access remote shares/volumes using the operating system or Seagate Network Assistant. For further details, see Shares: Access and Transfer Files. When first accessing the remote share, the user will be prompted for the username and password created on the host NAS/server.
SMB is supported on Mac OS. The native protocol for Mac OS is Apple File Protocol (AFP). Each time that a Mac user attempts to access a network drive, it will automatically use AFP rather than SMB. Therefore, a Mac user cannot access remote shares with Seagate Network Assistant since the application uses the operating system’s default network settings. Mac users should follow the instructions below when accessing a remote share/volume:
- Go to Finder > Go > Connect to server.
- In the Server Address field, enter smb://[name of NAS OS device] and choose Connect. Entering smb is very important since it tells the operating system to use the SMB protocol when searching for shares/volumes on the NAS.

- The user is prompted for a Name and Password. As recommended above, the administrators for the NAS OS and host devices should use the same credentials for users. Enter the username and password created on both devices. Choose Connect.

- The remote share/volume is ready to use.
Revise share settings

To revise a share’s settings, pass the cursor to the far right of its row to make the Edit pull-down menu visible. Options on the Edit pull-down menu differ for public and private shares:
- Public: Change to private share, Services, and Delete
- Private: Users, Groups, Change share to public, Services, and Delete
Since public shares are available to everyone on the network, there is no need to manage user and group access.
Important info regarding remote shares: Settings for remote shares can be revised on the host NAS/server.
Users/Groups: change access rights
From the Edit pull-down menu, choose Users or Groups. The pop-up window includes three tabs for Users, Groups, and Overview.
- Select the tab you wish to manage.
- The left-hand column lists the users or groups with No access to the share. Select the user or group to be granted access and drag it to the Read access column or the Read+write access column. You can enable read access for everyone on the network by checking the box next to Enable Read access to guests on the network.
- Choose Close to confirm the changes.
Private and public: change the share’s network status
Select the applicable setting to:
- Change a public share into a private share
- Change a private share into a public share
Services: change the services for a specific share
File protocols and service applications can be enabled and disabled on the Services page. A service is available to all shares when it is enabled and not available when it is disabled. However, an administrator may want to enable a service for certain shares but turn it off for others.
Example 1: The administrator creates a share called Time Machine to use as the backup destination for a Mac on the network. Since the Mac runs Time Machine® for its backups, the share must have Apple File Protocol (AFP) and Time Machine services. Both services can be enabled on the NAS’s Services page. However, all other computers on the network are PCs. Therefore, the administrator disables AFP and Time Machine on all other shares.
Example 2: A doctor’s office wants to use a share called Entertainment to store media files. A player in the waiting room that is UPnP/DLNA compatible will access the media files. All other shares store patient information and office files. The administrator knows that enabling UPnP/DLNA on all shares can tax the processor. It will also slow down Re-Indexing the media. Therefore, the administrator disables UPnP/DLNA on all shares except Entertainment.
Enable/Disable a service on a specific share
- Pass the cursor to the far right of the share's row to make the Edit pull-down menu visible.
- Choose Services.
- Perform one of the following:
- Deselect the check box next to the service you want to disable
- Select the check box next to the service you want to enable
- Choose Save.
Important info: Services must be enabled on the Services page for them to appear on a share.
Delete
- Pass the cursor to the far right of the share's row to make the Edit pull-down menu visible.
- Choose Delete.
- Confirm in the dialogue window.
Users
Choose the Users page to add and manage user accounts.
Shares, Users, and Groups
Allotting storage and network permissions for multiple departments and users in a branch office or corporate network can be complicated. It takes forethought and planning to configure which user is part of what group with access to how many shares. For this reason, the settings Shares, Users, and Groups are closely related in NAS OS. The cross-functionality between these three settings allows the administrator to add users to groups in the Users or Groups settings as well as shares to users and groups in the Users and Groups settings. The wizard for each setting prompts the administrator to choose shares, users, and groups. Additionally, users and groups can be added to a new share when following the Add share wizard.
However, creating a new share, user, or group requires that the administrator use its respective setting. For example, the administrator must choose the Shares setting to add a new share and the Users setting to add a new user. Though each setting can be revised at any time, it is highly recommended that the administrator plan ahead when first adding shares, users, and groups to NAS OS. With a map of users, groups, and shares, the administrator can simplify access rights. See the example below.
Sample setup: Shares, Users, and Groups
An administrator has mapped permissions for 40 shares, 20 users, and 10 groups.
To get started, the administrator adds the 20 shares using the Add share wizard on the Shares page. The administrator ignores the prompts to add users and groups to each share since new users and groups have yet to be created.
Next, the administrator adds the 20 users using the Add user wizard on the Users page. The administrator ignores the prompts to add users to shares and groups since new groups have yet to be created.
Finally, the administrator adds the 10 groups using the Add group wizard on the Groups page. In this step, the administrator will assign:
- Each user to a specific group
- Share permissions for each group
The Groups setting is the last step since it can cover more users at one time rather than assigning share permissions for each new user.
The generic sample setup may not apply to all environments. However, NAS OS gives the administrator free reign to configure permissions on the Shares, Users, and Groups pages.
Existing users

User data is organized in a table.
- The icons in the far left column indicate a user's rights:
- Blue user with plus sign: Administrative privileges.
- Blue user: Standard user privileges.
- Grey user: The user was imported from an active directory with no administrative privileges.
- Choose the text in the Login column to change the user name.
- Choose the text in the Password column to change the user's password. A password is created during the setup for the first administrator and in Manage users for additional users.
- Passwords can only be changed for users created on the NAS. Contact the administrator for the active directory to change settings for imported users.
- Passwords that are linked to Seagate Access accounts can be changed for signing into the NAS. However, changes to the password on the NAS are not taken into account by the user’s Seagate Access account. Therefore, users must continue to enter the original password that was created for the Seagate Access account. It is highly recommended to keep passwords as consistent as possible.
- The email address can be filled in automatically when associating a user with a Seagate Access account. With or without a Seagate Access account, the administrator can click the text in the Email column to change a user's email address. However, if a user is associated with a Seagate Access account, it is highly recommended to keep the email address unchanged.
- The light in the Seagate Access column is green if the user is associated with a Seagate Access account. It is grey if the user does not have a Seagate Access account.
- Click a green light to log out of the Seagate Access account.
- Click a grey light to create a Seagate Access account for a user.
- The number in the Shares column (folder icon) indicates how many shares the user can access. Choose the number to view the assigned shares.
- The number in the Groups column (double silhouette icon) shows to how many groups the user belongs. Choose the number to view the groups.
- To set a storage capacity limit for a user, click on the white circle in the Quota column. Once the quota is set, the white circle will turn green.
Add a user
Choose Manage users and follow the wizard to completion. You can:
- Invite users: invite local and remote users to join your NAS and to create a Seagate Access account. Use this option for users who require remote access to the NAS. You must enter an email address for a user to create a Seagate Access account. The user receives the invitation via email with instructions on how to complete the account.
- See invites: review pending user invitations.
- Create user: create a user for local access to the NAS. You can create a local user and add the Seagate Access account later.
Consider the following when completing the fields in this step:
- A login can have from 1 to 20 characters using letters, numbers, hyphens, and underscores. Do not begin or end with a hyphen or an underscore.
- A password can have from 4 to 20 characters and is case-sensitive.
- An email address is optional when creating a local user. It can be helpful for quota notifications and password recovery.
- To give the user administration privileges to the NAS, check the box next to Administrator.
- Set group permissions: To add a user to a group, drag the group name from the No access column to the Access column. To add the user to multiple groups, make all your selections before dragging them to the Access column. The administrator can skip the group membership step if membership will be assigned in the Groups settings.
- Set share permissions: To give the user access to a share, drag the share to the Read access column or the Read+write access column. To give access to multiple shares, make all your selections before dragging them to one of the columns. If a share is mistakenly dragged to the Read access column or Read+write access column, you can drag it back to the No access column. The administrator can skip this step if access will be assigned in the Shares or Groups settings.
User: access to shares and rights
A user can access NAS shares that have been assigned to him by the administrator (see Shares ). When accessing the shares for the first time, the user is prompted for the password created by the administrator on the Users page (see Shares: Access and Transfer Files). In addition, a user can log on to NAS OS using his login and password, which is very helpful with Seagate MyNAS remote access. However, NAS OS management rights are limited for standard users.
Access the Filebrowser app to upload, download, and share files via the Internet (see Filebrowser).
An administrator has access to all NAS OS management features, including the ability to revise a password that has been changed by a user.
Revise user settings
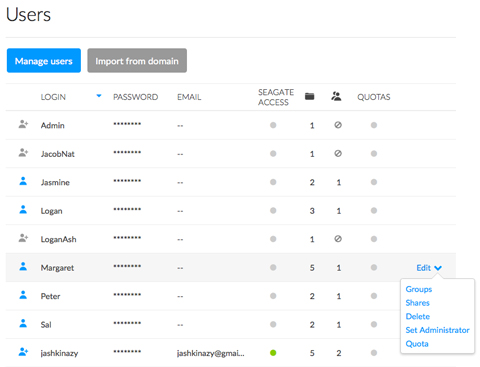
To revise a user’s settings, pass the cursor to the far right of its row to make the Edit pull-down menu visible. Options on the Edit pull-down menu differ for users and administrators:
- Users: Groups, Shares, Delete, Set Administrator, and Quota
- Administrator: Groups, Shares, and Quota
Groups/Shares: change groups and access rights
From the Edit pull-down menu, choose Groups or Shares. The pop-up window includes three tabs for Shares, Groups, and Overview.
Edit access rights to shares
- Select the Shares tab.
- The column No access lists the shares that the user cannot open.
- Add access to shares: Select the applicable shares in the No access column and drag them to the Read access column or the Read+write access column.
- Remove access to shares: Select the applicable shares in the Read access column or the Read+write access column and drag them to the No access column.
- Choose Close to confirm the changes.
Edit group membership
- Select the Groups tab.
- The column No access lists the groups that the user has not joined.
- Add a user to groups: Select the applicable groups in the No access column and drag them to the Access column.
- Remove a user from groups: Select the applicable groups in the Access column and drag them to the No Access column.
- Choose Close to confirm the changes.
Delete a user
- Pass the cursor to the far right of the user's row to make the Edit pull-down menu visible.
- Choose Delete.
- Confirm in the dialogue window.
Change NAS OS management rights: administrator and user
An administrator can be changed to a standard user and a standard user can be elevated to an administrator.
- Pass the cursor to the far right of the user's row to make the Edit pull-down menu visible.
- Select the applicable setting to:
- Set Administrator
- Set local user
Important info on the first administrator: The original administrator who configured the NAS OS device remains an administrator. It is not possible to delete or change the original administrator.
Set storage quotas
Limit the user’s storage capacity by following the steps below:
- Pass the cursor to the far right of the user's row to make the Edit pull-down menu visible.
- Choose Quota.
- Click on the text in the Quota column.
- Choose the radio button next to Set limit and enter the quota in gigabytes (GB).
- Choose Save.
Importing users from an active directory
If you have successfully connected to an active directory domain, you will see a button on the Users page labeled Import from domain. Go to Settings for instructions on how to join your NAS OS device to an active directory.
To add users from the active directory:
- Choose Import from domain.
- At the prompt, type a few characters in the text field to find the users you want to import.
- Hold down the control key (Windows users) or command key (Mac users) to select multiple users.
- Choose Import.
- The imported users will appear in the table. You can identify users imported from the domain by their grey icons.
Managing users imported from an active directory
The administrator of the original domain manages users imported from an active directory. For example, passwords, email accounts, and groups are all determined within the original domain. See Settings for instructions on synchronizing changes from an active directory to NAS OS.
The administrator of the NAS OS device can adjust the following settings for imported users:
- Access rights to shares on the NAS OS device
- Delete an imported user from the NAS OS device
- Set quotas for storage capacity on NAS OS volumes
Groups
Administrators can use Groups to set access rights for many users at once rather than individually.
Shares, Users, and Groups
Allotting storage and network permissions for multiple departments and users in a branch office or corporate network can be complicated. It takes forethought and planning to configure which user is part of what group with access to how many shares. For this reason, the settings Shares, Users, and Groups are closely related in NAS OS. The cross-functionality between these three settings allows the administrator to add users to groups in the Users or Groups settings as well as shares to users and groups in the Users and Groups settings. The wizard for each setting prompts the administrator to choose shares, users, and groups. Additionally, users and groups can be added to a new share when following the Add share wizard.
However, creating a new share, user, or group requires that the administrator use its respective setting. For example, the administrator must choose the Shares setting to add a new share and the Users setting to add a new user. Though each setting can be revised at any time, it is highly recommended that the administrator plan ahead when first adding shares, users, and groups to NAS OS. With a map of users, groups, and shares, the administrator can simplify access rights. See the example below.
Sample setup: Shares, Users, and Groups
An administrator has mapped permissions for 40 shares, 20 users, and 10 groups.
To get started, the administrator adds the 20 shares using the Add share wizard on the Shares page. The administrator ignores the prompts to add users and groups to each share since new users and groups have yet to be created.
Next, the administrator adds the 20 users using the Add user wizard on the Users page. The administrator ignores the prompts to add users to shares and groups since new groups have yet to be created.
Finally, the administrator adds the 10 groups using the Add group wizard on the Groups page. In this step, the administrator will assign:
- Each user to a specific group
- Share permissions for each group
The Groups setting is the last step since it can cover more users at one time rather than assigning share permissions for each new user.
The generic sample setup may not apply to all environments. However, NAS OS gives the administrator free reign to configure permissions on the Shares, Users, and Groups pages.
Existing groups
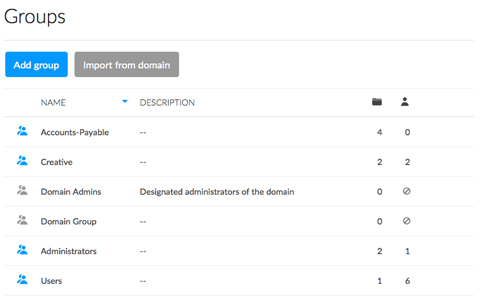
Group data is organized in a table.
- A blue icon on the far left indicates that the group has been created in NAS OS.
- A grey icon on the far left indicates that the group has been imported from a domain.
- Choose the text in the Name column to change the group name. The name of a group from a domain cannot be changed in NAS OS.
- Choose the empty space or text in the Description column to add or revise details for the group (optional).
- The number in the Shares column (folder icon) shows how many shares the group has access to. Choose the number to view the shares.
- The number in the Users column (user icon) shows how many users belong to the group. Choose the number to view the users.
- To review settings for the group, pass the cursor to the right of the group's row to make the Edit pull-down menu visible.
Add a group
NAS OS provides two default groups, Administrators and Users.
- All Administrators are automatically added to the Administrators group.
- All users are automatically added to the Users group.
To create a new group, choose Add group and follow the wizard to completion. Consider the following when creating a user:
- The Add group wizard features the following steps: name the group, set share permissions, set user membership to the group, set app permissions and Summary.
- Name the group: A group name can have from 1 to 20 characters using letters, numbers, hyphens, and underscores. Do not begin or end with a hyphen or an underscore.
- Set share permissions: The administrator can skip this step if access will be assigned in the Shares or Users settings. To skip the step, choose Next.
- Set share permissions: To give the group access to a share, drag the share to the Read access column or the Read+write access column. To give access to multiple shares, make all your selections before dragging them to the one of the columns.
- Set share permissions: If a share is mistakenly dragged to the Read access column or Read+write access column, you can drag it back to the No access column. The administrator can skip this step if membership will be assigned in the Users settings. To skip the step, choose Next.
- Set user membership to the group: To add a user to the group, drag the user’s name from the No access column to the Access column. To add multiple users to the groups, make all your selections before dragging them to the Access column.
- Set app permissions: Drag the apps that the group can access.
Revise group settings

To revise a group’s settings, pass the cursor to the far right of its row to make the Edit pull-down menu visible. Options on the Edit pull-down menu include:
- Users
- Shares
- Delete
Users/Shares: change user membership to the group and access rights to shares
From the Edit pull-down menu, choose Users or Shares. The pop-up window includes two tabs for Shares and Users.
Edit user membership to the group
- Select the Users tab.
- The column No access lists the users that are not members of the group.
- Add a user to groups: Select the users in the No access column and drag them to the Access column.
- Remove a user from the group: Select users in the Access column and drag them to the No Access column.
- Choose Close to confirm the changes.
Edit access rights to shares
- Select the Shares tab.
- The column No access lists the shares that the group cannot open.
- Add access to shares: Select the applicable shares in the No access column and drag them to the Read access column or the Read+write access column.
- Remove access to shares: Select the applicable shares in the Read access column or the Read+write access column and drag them to the No access column.
- Choose Close to confirm the changes.
Delete a user
- Pass the cursor to the far right of the user's row to make the Edit pull-down menu visible.
- Choose Delete.
- Confirm in the dialogue window.
Importing groups from an active directory
If you have successfully connected to an active directory domain, you will see a button on the Groups page labeled Import from domain. (Go to Settings for instructions on how to join your NAS OS device to an active directory.)
To add users from the active directory:
- Choose Import from domain.
- At the prompt, type a few characters in the text field to find the users you want to import.
- Hold down the control key (Windows users) or command key (Mac users) to select multiple users.
- Choose Import.
- The imported users will appear in the table. You can identify users imported from the domain by their grey icons.
Managing groups imported from an active directory
The administrator of the original domain manages groups imported from an active directory. For example, passwords, email accounts, and users are all determined within the original domain. See Settings for instructions on synchronizing changes from an active directory to NAS OS.
The administrator of the NAS OS device can adjust the following settings for imported users:
- Access rights to shares on the NAS OS device.
- Delete an imported group from the NAS OS device.
Settings
Configure your NAS’s basic settings on the Settings page.
General
-
Device name: The device name identifies the Seagate NAS OS device on your network. You can change it from the default by passing the cursor to the right of the name. Choose the pencil icon when it appears and enter a new name.
The device name is limited to 15 characters and is case-sensitive. Use alphanumeric characters without spaces or hyphens. Do not begin or end the name with a hyphen.
If a NAS OS device is connected to the network with a name that already exists, an alternate name is automatically created to avoid conflicts. For example, a second Seagate 8-bay Rackmount NAS on your network will automatically be called Seagate-R8-1 if Seagate-R8 is present.
- Language: Pass the cursor to the right and choose the pencil icon to change the NAS OS language.
- Temperature unit: To change the unit, pass the cursor to the right and choose the pencil icon.
Time
You can set the time manually or, synchronize with a local or network time server.
- Synchronization: Use the slider to turn time synchronization on or off. It also enables a pop-up window to choose a time server or enter your own.
- On: If synchronization is on or off and you want to change the time server, click on the slider. The Synchronization pop-up window includes a pull-down menu in Registered and a field for Custom. Use the Registered pull-down menu to select a popular time server. For a local time server or a network time server that is not on the Registered pull-down menu, enter the URL in the Custom field. Choose Save to update the time server.
- Off: Click on the slider and choose Cancel in the Synchronization pop-up window.
- Date/Time: The date and time are set automatically if you assign a time server in synchronization. If a time server is not selected, you can change the date and time by passing the cursor to the right and choosing the pencil icon.
- Zone: Pass the cursor to the right and select the pencil icon. You can choose your time zone from the drop-down window.
Workgroup/Domain
Your NAS can join a Windows Workgroup or a Windows Active Directory:
- Workgroup: Select the radio button for Workgroup and choose the pencil icon to type its name (use from 1 to 15 alphanumeric characters).
- Domain: Select the radio button for Domain to join a Windows Active Directory on your network (see the next paragraph for instructions on entering your Active Directory credentials). Joining an Active Directory allows the administrator to import existing users and groups, foregoing the need to re-enter credentials.
Active Domain Troubleshooting: The information below provides general information on joining and leaving a domain. For additional information, see Getting Help.
Connect to an Active Directory
- Select the Domain radio button.
- At the prompt, fill in the Fully-qualified domain name, Administrator login, and Administrator password. For more complex network configurations, choose the Advanced Criteria arrow and fill in the Server name and Server IP fields.

- Once connected, you can import users and groups from the domain. See Users and Groups for details.
Synchronize Users/Groups
Except for access rights to shares on the NAS OS device, the domain’s administrator manages all users and groups imported from the domain. If a user's/group's account has been changed by the domain administrator within the Windows Active Directory server (e.g. password revision, deleted from the domain, etc.), you can update the account in NAS OS by choosing the button Synchronize imported users/groups. The button only appears once you have joined a domain.
Leave the domain
To remove the NAS's connection to a domain:
- Choose the Leave button.
- Authenticate by entering the domain administrator's username and password.
- Users and groups that were imported may still be listed on the Users and Groups pages. To remove all imported users and groups from the NAS, choose the button Remove the imported users/groups (this button replaces Synchronize imported users/groups once you leave a domain).
NAS OS
This section of the Settings page provides basic hardware and software information. NAS OS automatically checks for updates to the software. You can change the frequency by passing the cursor to the right and choosing the pencil icon. To manually check for an update to NAS OS, choose Check now.
Services
The Services page provides a list of file protocols and application services available to the NAS OS device. Based upon the needs of computers on the network, the administrator can choose to maintain certain services while leaving others turned off.
Examples:
- The administrator may wish to turn AFP (Apple Filing Protocol) off if there are no Apple computers on the network.
- The administrator can enable the FTP service in order to provide access to the NAS via a third-party FTP application. See FTP for details.
Status colors
The Status column provides details on the state of the service.
| Color | State |
|---|---|
| Green | Started |
| White | Stopped |
| Orange | Ready for use |
Service options: start/stop, share access, advanced parameters

Options for a service are available in the Edit pull-down menu. Service options can include: Start/Stop, Share access, and Advanced parameters. Some services have options specific to its features. For example, the iTunes and UPnP services include Re-Index to take inventory of media files.
To enable the Edit pull-down menu, pass the cursor to the far right of a service.
Start/Stop a service
- Pass the cursor to the far right of its row to make the Edit pull-down menu visible.
- Choose Start or Stop.
Share access: services for a specific share
A service is available to all shares when Start is selected and not available when Stop is selected. However, an administrator may want to enable a service for certain shares but turn it off for others.
Example 1: The administrator creates a share called Time Machine to use as the backup destination for a Mac on the network. Since the Mac runs Time Machine® for its backups, the share must use the Apple File Protocol (AFP) and Time Machine services. Both services can be enabled on the Services page. However, all other computers on the network are PCs. Therefore, the administrator disables AFP and Time Machine on all other shares.
Example 2: A doctor’s office wants to use a share called Entertainment to store media files. A player in the waiting room that is UPnP/DLNA compatible will access the media files. All other shares store patient information and office files. The administrator knows that enabling UPnP/DLNA on all shares can tax the processor and slow down Re-Indexing the media. Therefore, the administrator disables UPnP/DLNA on all shares except Entertainment.
The administrator can enable or disable services on specific shares on the Services page or the Shares page. For details on managing services on the Shares page, see Shares .
Follow the directions below to enable/disable an active service on specific shares:
- Pass the cursor to the far right of the share’s row to make the Edit pull-down menu visible.
- Choose Share access.
- Select an option below:
- Enabled on all shares: Click on the radio button next to Enabled on shares by default and choose Save.
- Enabled on specific shares: Click on the radio button next to Specific shares. In the window, click on the check boxes next to the shares that will use the service. Choose Save once you have selected the shares.
Services summary
Review the types of services below.
File services
- SMB: SMB (server message block) is enabled by default since it is native to Windows and supported on Mac OS.
- NRB: Deleting data on a share permanently removes all associated files. By enabling the NRB (network recycle bin) service, deleted files will be moved to the share’s recycle bin. This can be very helpful if a user accidentally removes data that a co-worker is using on a project. The data is easily recovered from the recycle bin rather than desperately searching through the last NAS backup. NRB is only compatible with shares that use SMB and it appears as a folder on the share.
- AFP: AFP can be started manually for computers running Mac OS. AFP must be started if the Time Machine service will be enabled.
- NFS: See NFS.
- FTP/SFTP: See FTP.
- WebDAV: WebDAV (Web-based distributed authoring and versioning) is a standard format for collaborative workflows and data sharing. You can give local and remote servers access to shares by enabling the WebDAV service on your NAS OS device.
Application services
- Seagate Access: See Remote Access
- Time Machine: See Backup: Seagate NAS and PC/Mac
- UPnP/DLNA: See Media Server
- iTunes: See Media Server
- Network Backup: See Backup Manager. Note: Activating Network Backup server will disable SFTP.
- Download machine: See Download Manager
SSH Access
Administrators with advanced networking skills can log in to NAS OS using secure shell (SSH), an encrypted protocol used for communication between devices. Using a command-line interface, the administrator can automate data management and backups as well as review the NAS’s settings. The administrator also has the right to access data stored on the NAS via SSH.
Printer server
Printer server is enabled by default. An orange light means that NAS OS does not detect a printer connected to one of the NAS’s USB ports. The light will turn green once a compatible printer is found. Follow the directions below to share a printer on the network via the NAS OS device:
- Connect your printer to a USB port on your NAS.
- Pass the cursor to the far right of the printer row to make the Edit pull-down menu visible and choose Start.
- Check the status of the Printer server.
Computers on your network may require specific drivers to use the printer. See your printer’s user manual for details.
Important info: For multi-function printers, only the print feature is supported. If your printer has a scan feature, it will not work when connected to the NAS. In addition, only PostScript printers are supported. If your printer does not appear in the printer service, it is likely that it does not support PostScript printing. This is frequently the case with multi-function and photo printers. Seagate cannot guarantee that your printer supports the proper protocols to make it a networked printer.
Network
The Network page features four tabs to manage the NAS’s network settings.
- Connections: Review or change settings for the LAN ports; link aggregation; and IPv4 or IPv6 addresses.
- Proxy: Assign a proxy server for Internet access.
- Remote access: Configure remote access using Seagate MyNAS or DynDNS. Details on Seagate’s remote access solutions are available at Remote access.
- Port forwarding: Review and adjust the router’s port numbers for select services.
Connections tab
IPv6 mode
You can turn on IPv6 addressing by clicking on the IPv6 mode slider.
Connections table
The Connections table lists the general network settings for the LAN ports. The number of LAN ports depends upon your NAS model.
- Star icon: The star appears on the primary LAN. See the note below regarding the primary LAN.
- Name: The default names for the LAN ports are LAN 1, LAN 2, etc. Click on the name to enter a new name for the LAN port.
- Type: The type of cable attached to the LAN port.
- IP address: This column shows the NAS’s IPv4 addresses. If your network is DHCP-enabled for IPv4, the LAN ports are automatically assigned IPv4 addresses.
- IPv6 address: This column shows the NAS’s IPv6 addresses. If IPv6 is turned on and your network is DHCP-enabled, the LAN ports are automatically assigned IPv6 addresses.
- Status: A green circle means that the LAN port is connected to an active network. A white circle shows there is no connection to a network.
- Speed: The speed of the network.
Icons representing the LAN ports sit below the Connections table. An icon will become highlighted when the cursor is passed over the port’s row. The icons also indicate the following:
- Connected Ethernet end: The port is connected to a network.
- Disconnected Ethernet end: The port is not connected to a network.
LAN Edit menu
To review or modify settings for a LAN port, pass the cursor to the far right of its row to make the Edit pull-down menu visible. Available settings in the pull-down menu differ based upon the NAS’s LAN connections. Specifically, Define as primary will only appear if the NAS has more than one LAN connection

LAN Edit menu: Edit
Choose Edit to review and update important settings on the LAN port.
- Name: Type a new name in the LAN port's Name field.
- IPv4 tab: The default IP configuration setting for the LAN port is Automatic (DHCP). To use a static IP, click on the pull-down menu and choose Manual. For the static IP address to take effect, all fields (including Default gateway and DNS server) must be completed before choosing Save. Check the box next to Default gateway to enter or revise the gateway address. The LAN port will revert to automatic if a field is left blank.
- IPv6 tab: This tab is available when the IPv6 slider is turned on. The default IP configuration setting for the LAN port is Automatic (DHCP). To change the LAN port’s address, click on the pull-down menu and choose Manual. For the new address to take effect, complete the Global IPv6 address and IPv6 default gateway fields before choosing Save.
- Advanced tab: Click on the pull-down menu to adjust the frame size for your NAS. Note: Changing the size of the frames can affect the NAS’s performance. It is highly recommended that administrators confirm that the router and other network devices support jumbo frames before choosing a higher frame size on the NAS.
Important info on static IP addresses: Changes to the IP address must be consistent with the values of the router and network. You can lose contact with your NAS by typing addresses that are not available on your network.
LAN Edit menu: Define as primary
- A star next to the LAN’s name marks it as the primary Ethernet port. The primary Ethernet port:
- Carries the data when the NAS is configured for fault tolerance.
- Acts as the gateway to the Internet when the NAS is bridged across two separate networks.
- You can reassign the role of primary port.
- Pass the cursor to the far right of the secondary LAN port (no star) to make the Edit pull-down menu visible.
- Choose Define as primary.
- The star icon will move to the port to reflect the change.
The primary LAN and Seagate Network Assistant: If you experience problems with Seagate Network Assistant, confirm that LAN 1 is connected to the network and that it is the primary LAN.
LAN Edit menu: Disable/Enable
- Turn the LAN port off/on.
Port aggregation and linking LAN ports
Seagate NAS OS supports port aggregation for NAS devices equipped with two or more LAN ports. Review the instructions below to learn how to configure your NAS for port aggregation.
Important info on connecting multiple LAN ports: When connecting both LAN ports to one or more routers, make certain to configure your NAS OS device for multiple networks, load balancing, or fault tolerance. Leaving all ports active without creating a bridge or bond can create problems with the NAS OS device’s network identification, potentially losing its IP address.
Port aggregation: Bridge the data on your NAS OS device between two networks
Two separate networks can share the NAS. Connect LAN 1 to the router on the first network and LAN 2 to the router on the second network.
Both LANs should have green circles in the Status column. If one of the LAN ports is not active, try to enable it in the Edit menu.
With a bridged connection, each LAN port should have its own unique IP address to reflect separate networks. You can confirm the bridge by checking the subnets of the IP addresses. The subnet is the third segment of numbers in an IP address. For example, the subnet of the address 192.168.3.20 is 3.
Port aggregation: Enhance your NAS’s performance with load balance
Configure both Ethernet ports to act together for speeds up to 1.5 times faster than a single LAN connection. You also get added security should one of the Ethernet cables or ports fail.
Before following the directions below, make certain that your switch or router supports link aggregation.
- Connect LAN 1 and LAN 2 to the same switch or router.
- If one LAN is listed as inactive:
- Confirm that it is securely connected to the device and to your router.
- Pass the cursor to the far right of the LAN port to make the Edit pull-down menu visible. If the option is available, choose Enable.
- With both LANs enabled, choose Link.
- Select Load balancing and choose Next.
- Check the boxes next to each LAN port and choose Next.
- You can give a unique name to the load balance bond in the Name field. This type of Ethernet bonding will create a unified IP address (DHCP or static). To use a static address, choose Manual in the IPv4 or IPv6 pull-down menus and complete all the fields. The manual IP address must be consistent with the values of your network.
- Choose Finish.
The two LAN ports are listed as one on the Connections tab. Note that the number in the Speed column has also changed.
Break the load balance bond:
- Pass the cursor to the far right of the LAN’s row to make the Edit pull-down menu visible.
- Choose Remove link and Continue at the prompt.
- Removing the link can disable the secondary LAN interface. Pass the cursor to the far right of the disabled LAN port to make the Edit pull-down menu visible and choose Enable.
Port aggregation: Failover protection using fault tolerance
Configure fault tolerance to keep your NAS connected to the network even if one Ethernet port or cable fails. Before following the directions below, make certain that your network switch or router supports link aggregation.
- Connect LAN 1 and LAN 2 to the same switch or router.
- If one LAN is listed as inactive:
- Confirm that it is securely connected to the device and to your router.
- Pass the cursor to the far right of the LAN port to make the Edit pull-down menu visible. If the option is available, choose Enable.
- With both LANs enabled, choose Link.
- Select Fault tolerance and choose Next.
- Check the boxes next to each LAN port and choose Next.
- Fault tolerance automatically switches to the secondary LAN if it cannot detect the primary LAN. In this step, click on the pull-down menu and choose the type of fault detection for the bond: Physical (e.g. a bad Ethernet cable or Ethernet port) or Logical (e.g. contact with another IP address). For logical fault tolerance, enter the IP address that the NAS OS device will ping to confirm the stability of the primary LAN, as well as the frequency of the ping. The IP address should target a separate server, a computer on the network, or another device that can manage the task.
- Choose Next.
- You can give a unique name to the fault tolerance bond in the Name field. This type of Ethernet bonding will create a unified IP address (DHCP or static). To use a static address, choose Manual in the IPv4 or IPv6 pull-down menus and complete all the fields. The IP address must be consistent with the values of your network.
- Choose Finish.
The two LAN ports are listed as one on the Connections tab.
Break the fault tolerance bond:
- Pass the cursor to the far right of the LAN’s row to make the Edit pull-down menu visible.
- Choose Remove link and Continue at the prompt.
- Removing the link can disable the secondary LAN interface. Pass the cursor to the far right of the disabled LAN port to make the Edit pull-down menu visible and choose Enable.
Port aggregation: LAN failover for load balancing versus fault tolerance
Both bonding and fault tolerance can save you from losing productivity should a single LAN fail (e.g. NAS port, router port, or cable). In the event of LAN failure in a load balance bond, it can take a few minutes for the NAS to switch to single LAN mode. Fault tolerance will make the switch instantly, allowing for uninterrupted communication with the NAS.
Proxy tab
A proxy server is used to connect network devices to the Internet. If necessary, your NAS can be configured to use a proxy server.
- Click on the Internet access pull-down menu and choose Proxy server.
- Complete the fields for the proxy server's IP address, port, and optional authentication information.
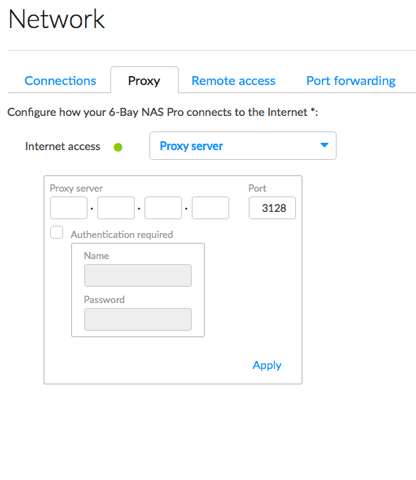
- Choose Apply.
Remote access tab
See Remote Access.
Port forwarding tab
Use this tab to manage the port forwarding rules for your NAS.
Port numbers on the NAS and the network router are used to direct traffic for diverse features such as Internet access, file services (e.g. SMB, AFP, NFS), and application services (e.g. remote access, Download Manager, etc.). Automatic port forwarding is turned on by default and the port numbers are the same for both the NAS port and Router port columns.
In most instances, automatic port forwarding should help you access services on the NAS. However, enterprise-level network security or port availability on a router can prevent access to ports. Therefore, it may be necessary to change the router port numbers manually for one or more services. Before adjusting numbers in the port forwarding table, confirm that the ports are available on your router. For example, if you intend to change download machine to router port number 8800, you must make certain that port 8800 is available on your router and assigned to your NAS. Additionally, your router must be compatible with UPnP-IGD/NAT-PMP protocols. See your router's user manual for details.
To change the router port for a service on the NAS, choose its value in the Router port column.
To disable port forwarding for a service, pass the cursor to the far right of its column to make the Edit pull-down menu visible and choose Disable.
Power
Use the Power page to review and change settings for:
NAS power management
The NAS OS Power page provides two levels of energy economy:
- Power conservation
- Power saving mode
Power conservation
During periods of inactivity, NAS OS spins down the hard drives. In addition to conserving energy, spinning down the hard drives when they are not in use can help to extend their life spans.
The default period of inactivity before spinning down the hard drives is 20 minutes. To revise this time, click on the pull-down menu for Turn off the hard drives.
Power saving mode
Many work environments may not require the NAS to be active all hours of the day or even the entire week. The administrator can take advantage of anticipated down time by scheduling the NAS to power off and power on as needed.
While in power saving mode, the NAS suspends all activity, including spinning down the hard drives and turning off its fans and LEDs. All processes enabled in NAS OS, including downloads and backups, will be terminated. Since the shares are not accessible and the device cannot be managed via NAS OS, power saving mode should be used when no one is accessing the NAS's data.
Example 1: The six employees of a small printing company arrive at the office no earlier than 6:00 AM and all activity stops after 10:00 PM. To save power and extend the life of the NAS’s hardware, the administrator schedules the NAS to power on at 5:00 AM and power off at 11:00 PM.
Example 2: The 50 employees at a branch office require 24-hour access to the NAS Monday through Friday. However, the branch office manager prefers that employees do not work during the weekend. Therefore, the administrator decides to schedule the NAS to power on Monday at 6:00 AM and power off Friday at 11:00 PM.
Schedule power saving mode

- Click the slider for Power saving mode to enable the schedule.
- Set the time of day that the NAS will wake from power saving mode. Click on the day of the week in the Power on column.
- In the pop-up window, choose the radio button next to Scheduled and set the time.
- Choose Save.
- Set the time of day that the NAS will enter power saving mode. Click on the day of the week in the Power off column.
- In the pop-up window, choose the radio button next to Scheduled and set the time.
- Choose Save.
Wake the NAS from power saving mode
To wake the NAS from power saving mode, apply a short press to the power button. You can also use the Wake on LAN function in Seagate Network Assistant (see Wake on LAN (WOL)).
UPS management
NAS OS supports three types of UPS (uninterruptible power source) management:
- Single NAS device: Direct connection to a UPS
- Multiple NAS devices A: One NAS OS device takes the role of Network UPS server
- Multiple NAS devices B: The UPS connects directly to the router and acts as the Network UPS server
Important info: Seagate cannot guarantee that all UPS devices are compatible with NAS OS UPS management.
Important info: Make certain to review the UPS’s documentation before connecting it to your NAS devices.
Single NAS: Direct connection

Follow the directions below when connecting a single NAS OS device to a UPS.
- Confirm that no one is accessing the NAS OS device and power it off.
- Connect the NAS to a supported UPS via power and USB cables. The USB cable is required for the UPS management information.
- Power on the NAS and go to the Power page. The UPS should appear in the UPS management section.
Battery threshold level refers to the percentage of power available to the UPS’s battery. In the event that a working environment loses power, the NAS automatically powers off when the UPS reaches the threshold level. Without the UPS’s threshold level, power is suddenly cut off to the NAS, potentially causing the loss and corruption of data.
The administrator can adjust the threshold by clicking on the pencil icon.
Multiple NAS devices A: A NAS OS device is the network UPS server

The instructions below suggest adding all NAS OS devices to the UPS at once. However, you can connect each NAS OS device as required by your working environment.
- Confirm that no one is accessing the first NAS OS device and power it off. This NAS will become Network UPS server.
- Connect the first NAS to a supported UPS via power and USB cables. The USB cable is required for the UPS management information.
- Power on the first NAS and go to the Power page. The UPS should appear in the UPS management section.
- Check the box next to Network UPS server.
- Confirm that no one is accessing the other NAS OS devices on the same network and power them off.
- Connect the other NAS devices to the UPS via power cables only and power them on.
- For each NAS OS device, go to the Power page and choose Add a network UPS server.
- In the pull-down menu for Network UPS type, select Seagate NAS UPS server.
- Select the first NAS and choose Save.
Battery threshold level refers to the percentage of power available to the UPS’s battery. In the event that a working environment loses power, the NAS devices automatically power off when the UPS reaches the threshold level. Without the UPS’s threshold level, power is suddenly cut off to the NAS devices, potentially causing the loss and corruption of data.
The administrator can adjust the threshold on the first NAS by clicking on the pencil icon. Unlike the first NAS, the other NAS devices cannot adjust the battery threshold level.
Remove the network UPS server
Choose Remove the network server to disconnect a NAS from the network UPS server.
Multiple NAS devices B: The UPS is the network UPS server

The following configuration requires a UPS with an Ethernet port to connect to the same router as the NAS OS devices. Additionally, the UPS must support SNMP to communicate with the NAS OS devices on the network. Refer to your UPS’s documentation for further details.
The instructions below suggest adding all NAS OS devices at once. However, you can connect each NAS OS device as required by your working environment.
- Connect the UPS to a power source and the network router according to the instructions provided in the UPS’s documentation.
- Confirm that no one is accessing the NAS OS devices and power them off.
- Connect the NAS OS devices to the UPS via power cables only and power them on.
- For each NAS OS device, go to the Power page and choose Add a network UPS server.
- In the pull-down menu for Network UPS type, select SNMP UPS.
- Enter the UPS’s IP address and, if applicable, SNMP community. Refer to the UPS’s administration tool for its IP address.
- Choose Save.
NAS OS cannot adjust the battery threshold level when connecting to a UPS server via the network. Check the documentation for your UPS to learn more on how to manage the device.
Remove the network UPS server
Choose Remove the network server to disconnect a NAS from the network UPS server.
Security
Use the Security tab to prevent potential attackers from reaching your NAS OS device. You can also control access to your NAS OS device using Ban and White lists.
Auto Block
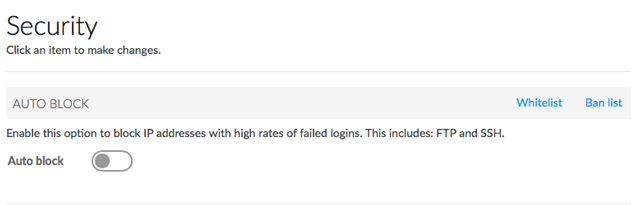
Enable auto block to block IP addresses that have made numerous failed attempts to log into the device and automatically add them to the Ban list. IP addresses on the ban list are prevented from accessing your NAS OS device.
Click the switch to enable auto block. See below for the default settings for auto block:
- Maximum failed logins: 3
- Failed logins within (minutes): 2
- Block for (minutes): 2
The settings can be changed when auto block is enabled.
To prevent users from losing access due to failed logins, add their IP addresses to the Whitelist. Click Whitelist and then enter the IP addresses.
Auto block is optimized for FTP and SSH protocols. You can manage the ban list by clicking Ban list and manually entering or removing IP addresses.
Certificate

An SSL Certificate is a data file with an encrypted key targeted for use by your company or organization. While your NAS OS device’s default certificate offers high security, you can create a unique certificate for use with your NAS OS device. Costs for SSL Certificates vary by third-party provider.
Custom SSL Certificates can be uploaded to your NAS OS device to replace the default certificate. To take advantage of the security provided by an SSL Certificate, make certain to choose Switch to HTTPS at the NAS OS login page.
DDOS
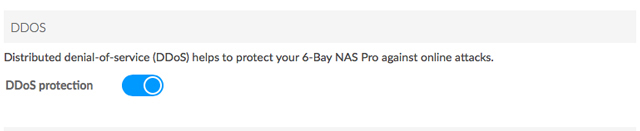
Distributed denial-of-service (DDoS) is a type of attack in which multiple devices target a single device. The multiple devices can attack from local and wide area networks or via the Internet and are often infected with a Trojan. The end result is a denial of service for the target device. You can improve your NAS OS device’s chances of avoiding such an attack by clicking the switch to enable DDoS protection.
Services on LAN Ports

Enable or disable select services on one or both of your NAS OS device’s LAN ports.
Monitoring
Monitoring provides a summary of the NAS OS device's hardware and the health of its components.
System tab
System details will vary based upon your NAS OS device. For example, an enclosure with a single Ethernet port can only list one LAN. Also, NAS OS devices with audible alarms include the option to turn the sound on or off.
When reviewing the System tab, place your cursor over the charts and graphics on the page for additional readings. Moving the cursor over the graphic for the fan shows its current revolutions per minute (RPM). Additional readings are available with RAM, CPU, and Network.
Upper pane: General health, temperature, and fans

- A green check mark on the upper left indicates that your hardware is operational and there are no problems. A red "X" alerts you to potential problems with the hardware. It is accompanied by an error message, such as the device has reached a critical temperature.
- The running time below the check mark indicates consecutive hours and minutes of operation. The clock will restart each time the device is powered on, restarted, or wakes up from power saving or deep sleep modes.
- The temperatures of the device's CPU and casing are located on the upper right

Upper middle pane: Casing (select NAS OS devices only)
- Click on the ID light slider to make the identification LED blink. This is helpful when locating a rackmount NAS on a rack with many devices.
- Click on the Sound slider to enable or disable the audible alert.
- Casing: A green circle means that the enclosure’s top cover is closed. Check the cover if the circle is not green.
- Power: A green circle indicates that the power supplies are working as expected. Check the power supplies if the circle is not green.

Middle pane: Resources
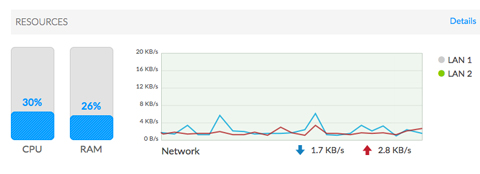
- The Resources pane shows dynamic graphics of the demands placed upon the CPU and RAM. To the right, a real-time graph offers constant updates on the NAS’s network transfer rates. For an expanded look at CPU, RAM, and network performance, click Details in the Resources pane.
- A green circle next to the LAN means that it is connected to the network. A white circle means that the LAN is not connected to the network.
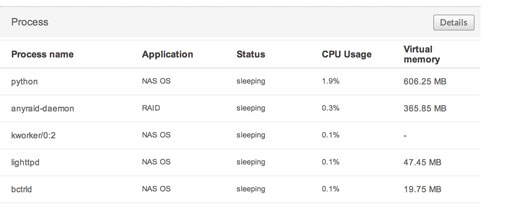
Lower pane: Process

- The Process pane lists the five processes that are placing the highest demands upon the CPU. Click on Details in the Process pane to see the full list of processes.
Temperature and fan warnings
- Temperature error: Check the placement of your NAS to make certain that it is not receiving an abnormal amount of heat from external sources (e.g. sun from a window, heating duct, exhaust from other electronics, etc.). If the problem persists, see Getting Help for links to contact customer support.
- Fan error: Check the fan performance line graph to determine if the fans are running too high or not at all.
- Drive error: Select the Drive tab to review the status for the NAS's hard drives.

Drive tab

Review basic information for each hard drive in the enclosure, including the model number, capacity, temperature, and SMART status. SMART stands for Self-Monitoring, Analysis and Reporting Technology. SMART status should be used for informational purposes only, specifically when diagnosing hard drives. It lets you know if the hard drive is reporting or experiencing errors. If a hard drive has an error, run a SMART test by selecting the Autotest button.
Additional notes on the Drive tab:
- Acceptable Temperature values may differ based upon the make and model of the hard drive.
- The dynamic photo of your NAS will highlight the hard drive selected in the hard drive table.
- Choose SMART status to review the full SMART report on the selected hard drive.
Notifications
Use the Notifications page to manage how the administrator receives updates on the health of the NAS OS device. The page has two tabs:
- Notifications: NAS OS alerts and activity
- SNMP: Monitoring and managing the NAS using the Simple Network Management Protocol
Notifications tab
Email notifications
NAS OS can send important activity updates to the administrator via email. See the table below for events that trigger email notifications.
Email notification triggers
| Event identifier | Description | Recipient |
|---|---|---|
| Capacity | The total available capacity is less than 10% | Administrator |
| Quota | The user has reached 90% of his storage quota | Administrator |
| Download | A download job has completed or a download job error has occurred | Administrator |
| Backup | A backup job has failed | Administrator |
| Fan | The fan has stopped | Administrator |
| Temperature | The product has remained at maximum temperature for at least one minute | Administrator |
| Password recovery | A user has recovered his/her password | Administrator or user, depending on who made the request |
Turn Email notifications on or off by clicking on its slider. The default server for email notifications is Seagate, a secure email system.
Administrators have the option to use an alternative email server. Pass the cursor over Seagate and click on the pencil icon. Choose Custom in the pull-down menu and complete the fields in the pop-up window:
- Enter the SMTP address for your email server. You can use an in-house SMTP server or third-party providers such as Gmail, Outlook, and Yahoo.
- You have the option to enable SSL by checking its box.
- If your email server requires verification, check the box next to SMTP authentication to enter the username and password.
- Test the connection by checking the box next to Send a verification email.
Recent activity
Review the events for the NAS OS device. To parse the events list into categories and sub-categories, choose Filter.
The events list is important when troubleshooting the NAS OS device with Seagate technical support. A full log of events is available for download by choosing Download System Log.
To purge all events from the log list, choose Clear logs.
SNMP tab
Administrators with advanced networks that include SNMP can add the NAS OS device as an agent. NAS OS supports SNMP versions v1/v2 and, for enhanced security, v3.
Turn on the SNMP agent by clicking on its slider. To make changes to the SNMP configuration, pass the cursor over a setting and click on it.
Storage
The information below identifies and explains the functions on the Storage page. For directions on how to configure RAID for your NAS OS device, go to RAID.
NAS OS volume and RAID management
NAS OS supports multiple volumes, each with its own level of RAID. The maximum number of supported volumes depends upon the amount of disks in the NAS's enclosure. For example, a NAS OS device with eight hard drives can have up to eight volumes.
Enhanced data protection: NAS OS SimplyRAID
No matter the capacity of your hard drives, NAS OS SimplyRAID will prepare the storage for immediate use as well as future expansion. SimplyRAID allows you to:
- Install disks of varying capacities
- Replace smaller capacity hard drives with larger capacity hard drives
- Upgrade storage capacity without deleting or moving data
- Protect data without compromising performance
When using hard drives of varying capacities, SimplyRAID will attempt to optimize available storage for your data.
Standard disk configuration: Manual RAID
While the benefits of SimplyRAID are highly recommended, the Storage page also gives you the option to manually configure your hard disks as:
- JBOD
- RAID 0 (minimum two hard drives)
- RAID 1 (minimum two hard drives for data protection)
- RAID 1+Spare (minimum three hard drives)
- RAID 5 (minimum three hard drives)
- RAID 5+Spare (minimum four hard drives)
- RAID 6 (minimum four hard drives)
- RAID 6+Spare (minimum five hard drives)
- RAID 10 (minimum four hard drives)
- RAID 10+Spare (minimum five hard drives)
Storage overview
Choose Storage > Overview to:
- Review the list of the NAS's volumes and their current state.
- Configure new hard drives added to the NAS.
Manage

The Manage button is available when the enclosure has new or unused hard drives. Choose Manage on the Storage Overview page to create a new volume. For further information, see RAID.
Internal and External volumes
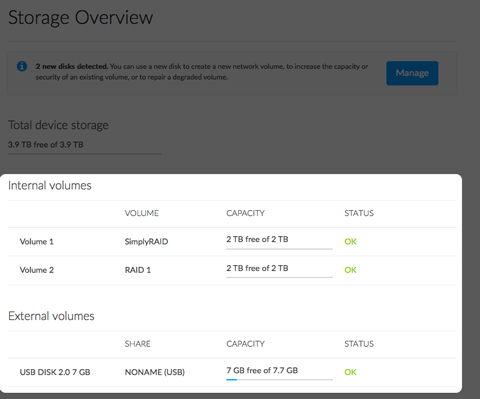
Internal volumes are the volumes created from the disks inserted into the NAS’s enclosure. External volumes are storage devices connected to the USB or eSATA ports. Click on a volume to review and adjust its settings.
Volume settings

Choose a volume’s name on the left to view the tools to manage it.
Name
The default name for the first new volume is Volume 1. The number will rise incrementally when adding new volumes, Volume 2, Volume 3, etc. To change the name:
- Pass the cursor over the name of the volume and choose the pencil icon.

- Type the new name in the pop-up window
- Choose Save.
Due to the high level of security, an encrypted volume retains its default name.
Manage
Choose Manage on the volume page to:
- Add hard drives to the volume.
- Add a spare hard drive to the volume.
- Repair the volume.
- Expand the volume’s storage capacity.
- Change the encryption settings (if applicable).
- Upgrade the volume from single-disk security to double-disk security.
- Format the volume (delete all data without deleting the volume).
- Delete the volume (permanently remove the volume and all of its data).
Capacity
A quick reference of the volume's:
- Total storage capacity.
- Available storage capacity.
An i tooltip appears in the capacity row following the creation of an iSCSI target. Pass the cursor over the tooltip to view the amount of storage assigned to the volume's iSCSI target.
Status
Status gives you immediate feedback on the health of the volume's RAID configuration:
- OK. The RAID is operational and no problems have been detected.
- No data protection. Data is intact but one or more hard drives are missing or reporting errors. The amount of hard drives that can fail before this message appears is contingent upon the level of RAID.
- Protected if one disk fails. RAID configurations with double-disk security will see this message if a single hard drive is missing or reporting errors.
- Broken. The RAID is broken resulting in a loss of data.
- Synchronizing. The system is synchronizing data across all the hard drives in the volume.
- The volume is available for use while the RAID is synchronizing but NAS performance may be affected.
- RAID data protection will be available once synchronizing is complete.
- Choose the tooltip next to Synchronizing for details on its progress.
Mode
Mode lists the volume's RAID level. Pass the cursor over the tooltip for details on the RAID's level of data protection.
Storage graph
A multicolor circle shows how the RAID distributes the volume's storage.
- Dark blue: Storage capacity for your data.
- Light blue: Protection in case one or two hard drives fail. The light blue indicator will vary in size depending upon single or double disk protection.
- Green: Disk capacity that spans beyond the level of RAID. This space is reserved for expansion should you add new or, larger capacity hard drives.
Factors that determine the storage capacities for data, protection, and expansion:
- The amount of hard drives in the enclosure.
- The storage capacity of each hard drive (see note below on mixed capacities).
- RAID mode
- Single-disk or double-disk security
Examples:
- RAID 0 with five hard drives. The only color is dark blue for data capacity since RAID 0 has no protection.
- SimplyRAID with two hard drives of equal capacity. Dark and light blue for data and protection, respectively.
- RAID 6 with five hard drives of mixed capacities. All colors are represented since the RAID 6 uses double-disk security and the hard drives are of mixed capacities.
Volume list and dynamic photo
Review the hard drives’ capacities and status. The dynamic photo of the NAS highlights:
- The hard drives associated with the volume.
- Hard drives available for a new or existing volume.
- Empty slots available for expansion.
- Failed or missing disks.