Products
Knowledge Base
Support Downloads
Articles
suggested searches


Leaders in Mass-Capacity Storage
From gaming, travel, to creative pursuits, treat Dads & Grads to storage suited to their lifestyle. Get 15% off when you buy two of the same drive* + free shipping sitewide! Exclusions apply.

Introducing Mozaic 3+, our breakthrough hard drive platform, delivering unprecedented areal densities of 3TB/disk and beyond.
Instantly expand your peak speed and capacity with the Seagate Storage Expansion Card, the first ever 4TB expansion card for Xbox Series X|S.

From gaming, travel, to creative pursuits, treat Dads & Grads to storage suited to their lifestyle. Get 15% off when you buy two of the same drive* + free shipping sitewide! Exclusions apply.
Introducing Mozaic 3+, our breakthrough hard drive platform, delivering unprecedented areal densities of 3TB/disk and beyond.
Breakthroughs in application development are leading to extraordinary data generation. Data that must be captured, replicated, and preserved at scale to ensure continued innovation and trust. In an age of unprecedented creation, Seagate stores infinite potential.

People and machines will create in more ways at a faster pace than ever as AI proliferates, producing massive volumes of data.

AI improves in a virtuous feedback loop of consuming data, generating new content, and learning from its performance.

It takes multiple storage solutions to enable AI, but delivering on AI at scale requires high-capacity hard drives.

Seagate is optimizing storage for AI, making unprecedented leaps forward in capacity to support efficient data center architecture and buildout.
A breakthrough hard drive platform for sustainable, scalable storage.
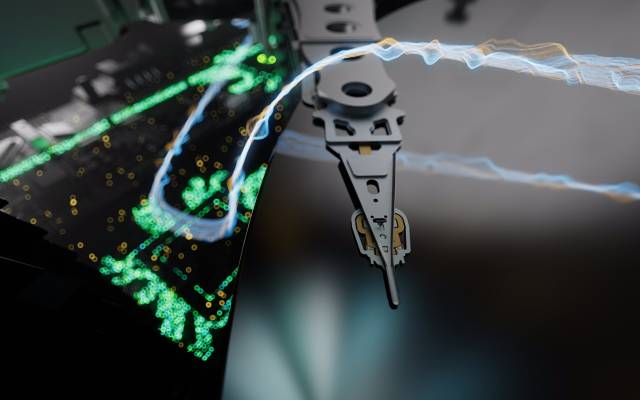
Mozaic 3+™ is a hard drive platform that incorporates Seagate’s unique implementation of HAMR to deliver mass-capacity storage at unprecedented areal densities of 3TB per platter and beyond, enabling data center efficiency like never before.
Discover how we use a precision-engineered laser to enable HAMR in a fraction of a second.
This highly tailored servo-processor chip is the operational heart of Mozaic-enabled hard drives.
We built the industry's smallest, most sensitive magnetic field sensor to facilitate higher data densities than ever before.
To combat magnetic instability, we designed a superlattice structure to enable high-fidelity data inscription.
Accelerating trustworthy application innovation through scalable, mass-capacity data storage.
Global Employees
Storage Innovation
FY2024 revenue

Understand the solutions to data center sustainability challenges in the AI era.
An examination of the claim that flash will replace hard drives in the data center.

Learn how Seagate’s areal density enhancements produce TCO savings.
Future-proofing data management for mass storage, migration, and movement.
The figure shown in the bytes shipped counter is an approximation based on Seagate’s quarterly average runrate of exabytes shipped.
Exos CORVAULT receives overall customer rating of 5 out of 5 on Gartner Peer Insights as of May 2023. Distribution based on 5 ratings.
Gartner and Peer Insights™ are trademarks of Gartner, Inc. and/or its affiliates. All rights reserved. Gartner Peer Insights content consists of the opinions of individual end users based on their own experiences, and should not be construed as statements of fact, nor do they represent the views of Gartner or its affiliates. Gartner does not endorse any vendor, product or service depicted in this content nor makes any warranties, expressed or implied, with respect to this content, about its accuracy or completeness, including any warranties of merchantability or fitness for a particular purpose.
*Promotion Terms & Conditions available at https://www.seagate.com/legal/sales-and-promotion/fy25q4-dads-and-grads-promo/