




Some features in Toolkit require a special driver to work with your external drive. On macOS, you must grant permission for the driver to be installed and enabled. The process varies depending on your macOS version and whether your Mac uses an Intel processor or Apple Silicon (M1, M2, or later).
Before you begin, check the following:
- Your macOS version: Find out which macOS your Mac is using
- Whether your Mac uses Apple Silicon or Intel: Mac computers with Apple Silicon
Jump to your version:
macOS 15 Sequoia or later
You must enable the Toolkit driver.
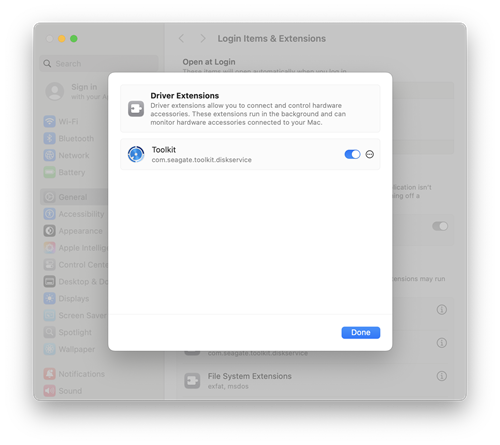
Click the button below to open your settings and view your driver extensions:
Locate the Toolkit extension and enable the driver.
Alternatively, you can use the Apple menu to navigate to your driver extensions:
- Click the Apple menu.
- Click System Settings
- Navigate to General > Login Items & Extensions.
- In the Extensions section, click the Info icon.
- Locate Toolkit and enable the driver.
macOS 13 Ventura or macOS 14 Sonoma
You must click ‘Allow’ to enable the driver.

Click the button below to open your settings and to approve the driver:
Locate the Allow button approve the driver.
Alternatively, you can use the Apple menu to approve the driver:
- Click the Apple menu.
- Click System Settings.
- Click Privacy & Security.
- Scroll down to the Security section.
- Click Allow for Toolkit.
macOS 12 Monterey or earlier
- Apple Silicon Macs: You must enable system extensions before the Allow button appears.
- Intel Macs: You can click Allow directly without enabling system extensions.

Click the button below to open your settings and approve the driver:
Locate the Allow button to approve the driver.
Alternatively, you can use the Apple menu to approve the driver:
- Click the Apple menu.
- Click System Preferences.
- Click Security & Privacy.
- Click the General tab.
- (Apple Silicon Macs only) Enable system extensions.
- Click Allow for Toolkit.


