Was this content helpful?
How could we make this article more helpful?
Configure and Manage Arrays
Use RAID Manager to view, create, delete and maintain RAID arrays.
Before you begin
- Back up your data first. Actions such as deleting an array, changing RAID configuration, and formatting can permanently remove files.
- Make sure the device is detected in RAID Manager. You should see the device name at the top of the screen.
View arrays
Use the Home screen to review the configuration and health of configured arrays.

- Device card
- Array card
- Status bar
- Drive card
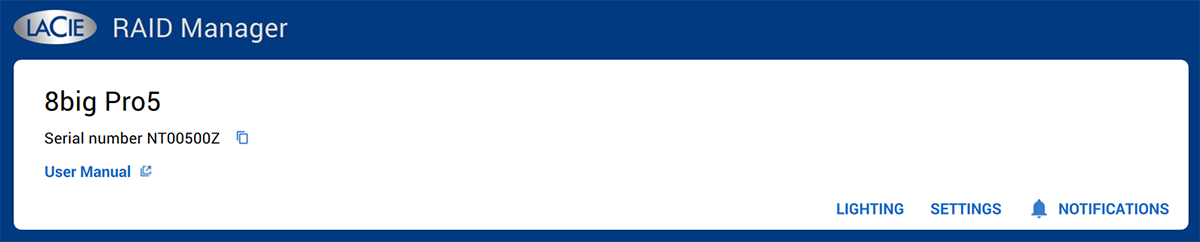
Device card
The device card identifies the connected device by serial number and provides device-level configuration controls.
| Attribute | Description |
|---|---|
| SerialNumber | The device's serial number. Select the Copy icon if you need to copy the serial number to your clipboard. |
| User Manual link | Select the link to open the device's user manual in a web browser. |
| Actions | Available device-level actions include LIGHTING, SETTINGS and NOTIFICATIONS. |
Array card
The array card identifies an array (by number) and its RAID configuration. The array card will display an array tab for each array configured on the device.

| Attribute | Description |
|---|---|
| Capacity | Usable storage capacity available on the array. |
| Parity | Capacity reserved for redundancy (shown for parity-based RAID levels). |
| Drives | Number of drives included in the array. |
| Spares | Number of spare drives assigned to the array, if any. |
| Format | File system format shown for the array: None — The array has not been formatted with a file system, or it has been formatted with a file system that is not recognised by the computer's operating system. APFS — The array is formatted as APFS (macOS). NTFS — The array is formatted as NTFS (Windows). exFAT — The array is formatted as exFAT. This format appears only if the array was formatted outside of RAID Manager. HFS+ — The array is formatted as HFS+. This format appears only if the array was formatted outside of RAID Manager. Multiple — The array is composed of at least two partitions with different formats. |
| Status | Overall health of the array. Possible states include: Healthy — The virtual drive operating condition is good. All configured drives are online. Partially Degraded — The array is operating with reduced redundancy but can still tolerate another drive failure. This state typically occurs in a RAID 6 configuration after one drive has failed. Performance may be reduced, but data remains protected. Degraded — The array's performance is degraded. The array has lost its redundancy and can no longer tolerate an additional drive failure. This state typically occurs in a RAID 5 configuration after one drive has failed, or in a RAID 6 configuration after two drive failures. Performance is reduced, and data is at risk until the failed drive is replaced and the array is rebuilt. Offline — The array is not currently available or array data is lost. Note — With unexpected host connections (for example, viewing a volume on an operating system that does not support its file system), RAID Manager may display an incorrect or generic format designation. |
| Actions | Available array-level actions (depending on array state) include FORMAT and DELETE. |
Status bar
The status bar displays system messages related to the connected device, such as array conditions, drive changes and RAID Manager operations.

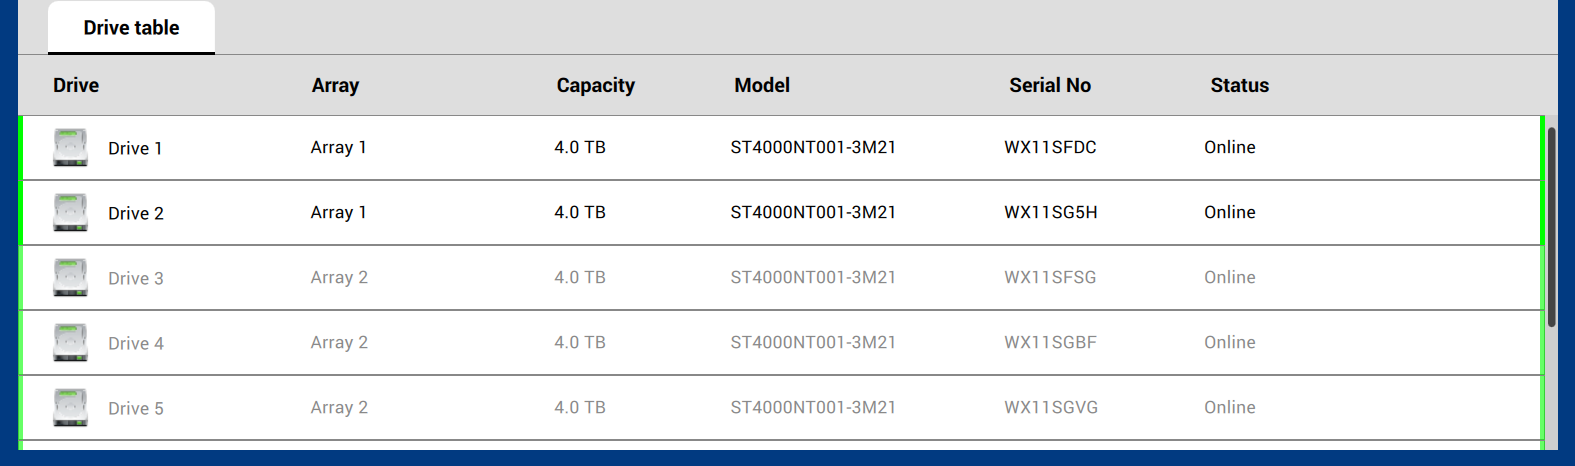
Drive card
The drive table tab lists each drive in the device and shows drive-level identifiers and health.
| Attribute | Description |
|---|---|
| Drive | Drive number (for example, Drive 1). |
| Array | Drive's relationship to an array. Possible values: Array (number), Array (number) spare, or Global spare. |
| Capacity | Drive capacity as recognised by RAID Manager. |
| Model | Drive model identifier. |
| Serial No | Drive serial number. |
| Status | Drive health/availability state. See Drive status values below. |
Drive status values
| Value | Description |
|---|---|
| Copying data | RAID Manager is copying data from a spare back to the replaced drive to restore the array to its original configuration. This occurs after the rebuild to a spare has completed and the failed drive has been replaced. |
| Failed | Drive was online or configured as a spare, but the firmware detects an unrecoverable error. |
| Missing | Drive was online but is no longer detected in its bay. |
| Offline | Drive is part of an array, but contains data that is invalid for the RAID configuration. |
| Online | Drive can be accessed by the RAID controller and is part of the array. Drive is operating normally. (This status can also appears for dedicated and global spares.) |
| Rebuilding | Data is being written to the drive to restore full redundancy for an array. |
| Diagnostic in progress | An interim state of a physical drive for diagnostic operations. |
| Unconfigured bad | Firmware detects an unrecoverable error on the drive. The drive was originally Unconfigured Good or the drive could not be initialised. |
| Unconfigured | Drive is functioning normally but is not configured as a part of an array or as a spare. |
| Unconfigured (Foreign) | Drive is functioning normally and contains RAID configuration information from an existing array that is not currently recognised by RAID Manager. For example, the drive was moved from another system or the drive is part of an array but was removed from its bay and reinserted while the device was powered on. |
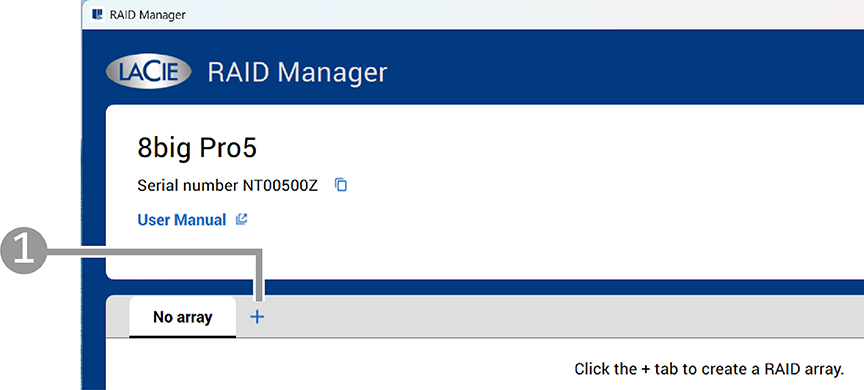
Create an array
You can choose a different RAID level to optimise performance or for additional data protection, depending on your working environment. Before creating an array, review RAID Levels to determine which RAID level best suits your needs.
RAID Manager provides a guided flow to create a new array and select a RAID level.
- On the Home screen, in the array card, select the Add (+) button.
- Select the tab with the RAID level you want to create.
- Select the drives to include in the array.
- Select CONTINUE.
- In the confirm configuration dialog, select the initialisation type. (Available options depend on the selected RAID level. See below.)
- (Optional) Select the checkbox to have RAID Manager format the drives. By default, RAID Manager formats as APFS on macOS and NTFS on Windows.
- Select CONFIRM to start the operation.
RAID levels requiring initialisation
In RAID Manager, initialise refers to a RAID‑level operation required only when creating or changing parity‑based RAID configurations.
Initialisation is required for parity-based RAID levels, such as:
- RAID 5
- RAID 6
- RAID 50
- RAID 60
These RAID levels must be initialised using background or foreground initialisation.
The following RAID levels do not require initialisation:
- RAID 0
- RAID 1
- RAID 10
Foreground and background initialisation
For parity-based RAID levels, you can choose between two initialisation methods:
- Foreground initialisation is potentially faster than a background initialisation, but the device must be disconnected from the host computer while the initialisation runs. The device cannot be accessed during the foreground initialisation.
- Background initialisation is typically slower than a foreground initialisation but allows the device to be accessed and used while the initialisation runs.
The table below shows estimated foreground initialisation times based on array capacity. These estimates assume no user activity, since the device must be disconnected from the host computer during a foreground initialisation. Estimates are provided for general guidance only — actual times may vary.
| Capacity | Estimated Foreground Initialization Time |
|---|---|
| 32 TB | 6 hours |
| 64 TB | 12 hours |
| 128 TB | 24 hours |
| 192 TB | 30 hours |
| 256 TB | 40 hours |
Background initialisation typically takes longer because the device remains connected and available for use. During this time, priority is given to user activity, such as accessing or transferring files, and the initialisation runs in the background. As a result, the overall duration depends on how actively the device is used while the initialisation is in progress.
The availability of foreground or background initialisation depends on the selected RAID level and configuration.
Foreground initialisation
When starting a foreground initialisation, RAID Manager prompts you to disconnect the device from the host computer. Foreground initialisation can only be performed when the device is not connected to the host.
- Reconnecting the device to the host computer while a foreground initialisation is in progress cancels the initialisation sequence. The initialisation must be restarted from the beginning.
- Ensure that the device is connected to a reliable power source during the entire process. If power is lost during a foreground initialisation, the initialisation must be restarted from the beginning.
The LEDs indicate foreground initialisation activity:
- System LED: Green/Off, breathing
- Drive LEDs: Green/Off, breathing
When the foreground initialisation completes:
- System LED: Light Blue, steady
- Drive LEDs: Light Blue, steady
Background initialisation
During a background initialisation, the device remains usable with some limitations:
- The device can be safely ejected from the host computer and continues initialising as long as it remains powered on.
- The device can be disconnected and reconnected to the host computer while background initialisation is in progress.
- If the device is powered off during a background initialisation, the process resumes from where it left off when power is restored.
During background initialisation, expect reduced performance until the process completes.
The LEDs indicate background initialisation activity:
- System LED: Blue/Dark Blue, breathing
- Drive LEDs: Blue/Dark Blue, breathing
Format the storage
Select the FORMAT checkbox to have RAID Manager format the drives. RAID Manager uses the same operating system formatting mechanisms as the operating system’s native disk management utilities.
See Format the storage below.
Delete an array
- On the Home screen, in the array card, select DELETE.
- A confirmation dialog appears. Review the warning and select CONFIRM.
Format the storage
Format the storage with RAID Manager
Select FORMAT on the array card to have RAID Manager format the drives. RAID Manager uses the same operating system formatting mechanisms as the operating system’s native disk management utilities.
Format the storage with a host computer disk utility
You can also format the array using a disk utility on the host computer:
- Disk Utility on macOS
- Disk Management on Windows
For instructions on formatting your drive, see How to format your drive.
When formatting is required
Formatting is required whenever the structure of the storage array changes or when you want to apply a different file system. Common scenarios include:
- Changing the RAID level
- Replacing all drives in the array
- Preparing the device for use with a different operating system
Changing the RAID level deletes all data on the array and requires formatting before the array can be used again. Parity-based RAID levels will require initialisation before formatting.
Assign a spare drive
You can assign an available drive as a spare so it can automatically rebuild an array to maintain data redundancy. While a spare drive is very helpful for immediately replacing a failed drive, it remains in reserve and cannot be used to store data. As a result, a spare drive is optional and must be explicitly created.
| Spare | A spare drive dedicated to a single array. |
| Global spare | A spare drive that can be used by any array on the device. Recommended for devices with multiple arrays. |
- On the Home screen, select the Drive table tab.
- In the row for the available drive you want to use as a spare, select the More icon (three vertical dots).
- Select one of the following options:
- Assign as spare
- Assign as global spare
Unassign a spare drive
You can unassign a spare drive and return it to the available pool.
- On the Home screen, select the Drive table tab.
- In the row for the spare drive, select the More icon (three vertical dots).
- Select Unassign drive.
Run a consistency check
Consistency check verifies the accuracy of the data in virtual drives that use RAID levels 1, 5, 6, 10, 50 and 60. RAID 0 does not provide data redundancy. For example, in a system with parity, checking consistency means calculating the data on one drive and comparing the results to the contents of the parity drive.
While this operation is generally safe, there is a risk that some or all of your data can be lost, since repairing sector errors requires making changes to the array.
Array performance will be degraded while the consistency check is in progress.
A consistency check is not available when:
- Another disk activity is in progress.
- The array is degraded, broken, or only partially optimised.