This month only – get free shipping with no minimum purchase! Order early to avoid holiday shipping delays. Shop now
Find the perfect storage for your loved ones with our holiday gift guide! Shop now
Open

How to Securely Erase Your Hard Drive

Seagate Instant Secure Erase (ISE) is designed to protect data on hard disk drives by instantly resetting the drive back to factory settings and changing the encryption key so that any data remaining on the drive is cryptographically erased. This means all data on the drive is permanently and instantly unreadable.

Table of Contents

How to ISE Your Drive

Seagate Instant Secure Erase (ISE) is designed to protect data on hard disk drives by instantly resetting the drive back to factory settings and changing the encryption key so that any data remaining on the drive is cryptographically erased. This means all data on the drive is permanently and instantly unreadable. Learn more about Seagate Instant Secure Erase Deployment Options.

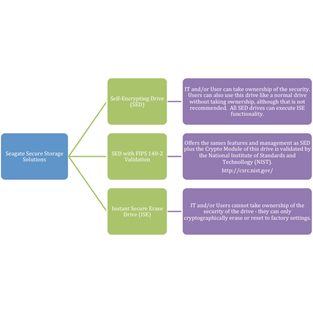
To perform the ISE function, you must have a Self-Encrypting Drive (SED) with or without FIPS validation. SEDs let you take ownership and manage your active drive security through passwords, fingerprints, or other authentication means, as well as instantly cryptographically erase drives with their ISE functionality when they are ready to be retired or repurposed.

What You Need to ISE Your Drive

  • A Seagate Self-Encrypting Drive with or without FIPS Validation.
  • A computer running Windows XP, Vista,Windows 7, or Windows 8
  • A copy of SeaTools™ for Windows (version 1.2.0.6 or greater), found here: http://www.seagate.com/support/downloads/seatools
  • Click the Downloads tab.
  • Under Utilities, click Select an OS in the SeaTools for Windows box and select your OS from the dropdown menu.
  • Click the Downloads button.
  • A SATA-to-USB cable for laptops or an internal SATA- to-SATA connector if you choose to connect to your motherboard in a desktop environment.

Performing an ISE

  • Unplug the drive you want to erase from your system and attach it to a computer using a SATA-to-USB cable. Note: SeaTools will not let you execute an ISE on your boot drive.


  • Install and run the SeaTools for Windows application. You may be asked to install Microsoft.NET 4.0 if not already installed on your system. This download is available on the Microsoft website. As it is loading, accept the ability to make changes to your computer and accept the license agreement.
  • There is more information on the SeaTools application and prerequisites on the SeaTools site (http://www.seagate.com/support/downloads/seatools/) and under the Downloads tab.

  • Once SeaTools is open, you will see the drives available for erasing, including their respective serial and model numbers. Select the drive you want to erase.
    WARNING: You are making completely unreadable all data on the drive, so make sure you select the correct drive. By default, SeaTools will not allow you to erase your primary or boot drive.
  • Select the Basic Tests tab and scroll down to Advanced Tests. This will bring up a warning box asking you to confirm your request by pressing the F8 key.
    WARNING: Advanced Tests are functions that could delete all the data on your disk drive. Seagate Technology LLC is not responsible for lost user data. If you are certain you have selected the correct drive, press the F8 key.
  •  

  • Select the Advanced Tests menu, then select SED Crypto Erase. If you do not see this option, verify that you have an SED. Note: If you do not have an SED, you can select the Overwrite Erase option, and SeaTools will perform a write of zeros across the entire drive to sanitize it. This process can take several hours depending on the drive size.
  •  

  • The SED Crypto Erase dialog box will be displayed. Enter the 32-character PSID number found at the top of the drive label. You can type in the number or enter it using a 2D barcode reader.
  •  

  • Press F8 to begin the Crypto Erase. The dialog box will temporarily disappear. If the number has been incorrectly entered, you will get a FAIL status. Note: the PSID number may include zeroes, so be careful not to confuse these with “O”s. If entered correctly, the drive status listing will change to SED Crypto Erase – Pass in just a few seconds.
  • Otherwise, within about one minute the drive status listing will change to SED Crypto Erase – Pass.

    The drive has now been reset to factory settings and any existing data rendered permanently unreadable. The drive may be safely retired, reused, or returned for warranty repair or lease expiration.