Heeft deze informatie u geholpen?
Hoe kunnen we dit artikel nog verbeteren?
Onderhoud aan harde schijf
Volg de onderstaande aanwijzingen om een defecte harde schijf in uw Seagate Personal Cloud 2-bay te vervangen. Neem contact op met Seagate customer support voor het vervangen van een harde schijf als de garantieperiode van uw apparaat nog niet is verlopen.
Uw content op een defecte harde schijf
De beschikbaarheid van uw content op een defecte harde schijf is afhankelijk van de configuratie van het apparaat.
- Maximale bescherming: Uw content is veilig op de gezonde schijf. De content moet worden gekopieerd voor gegevensspiegeling nadat de defecte harde schijf is vervangen.
- Maximale capaciteit: Helaas is alle content op de defecte schijf verloren gegaan. Daarnaast moet het apparaat worden geconfigureerd nadat de defecte harde schijf is vervangen.
Voorzorgsmaatregelen
- Het uitvoeren van onderhoud aan de hardware in de behuizing, met uitzondering van het vervangen van een harde schijf, wordt niet ondersteund. De garantie op uw product kan hierdoor vervallen.
- Tijdens gebruik moeten de harde schijven met het oog op een optimale luchtstroming op hun plaats zitten.
- Volg alle gebruikelijke ESD-voorzorgsmaatregelen op tijdens het werken met de onderdelen van de Personal Cloud 2-Bay. Vermijd contact met componenten en moduleconnecties, etc. op de achterzijde.
- Vervang een bestaande of defecte schijf door een harde schijf met dezelfde of grotere capaciteit.
- Plaats de harde schijven op een zacht oppervlak wanneer u werkzaamheden verricht.
Een harde schijf vervangen
Haal de stekker van het apparaat uit het stopcontact voordat u een harde schijf verwijdert.
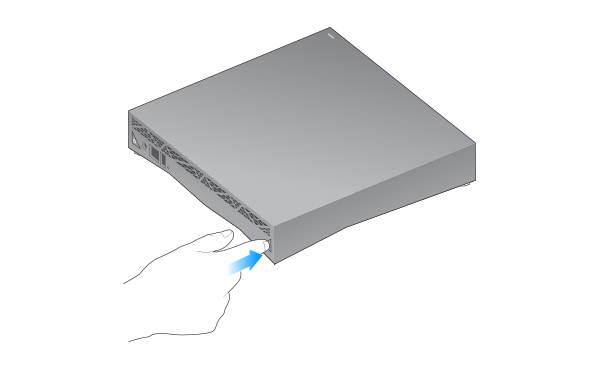
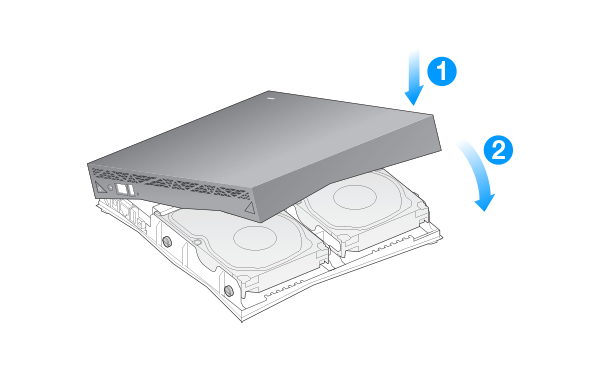
- Druk op de knop aan de achterzijde van de Personal Cloud 2-Bay.
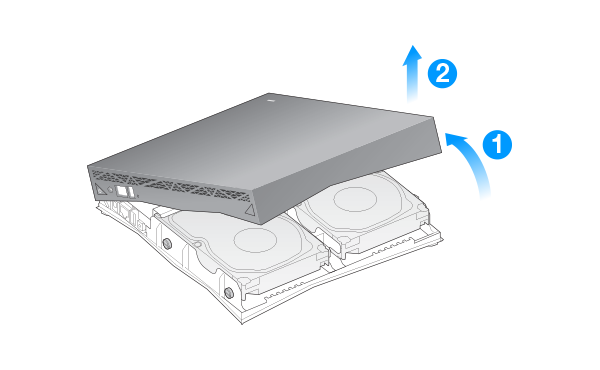
- Haal de kap van de behuizing.
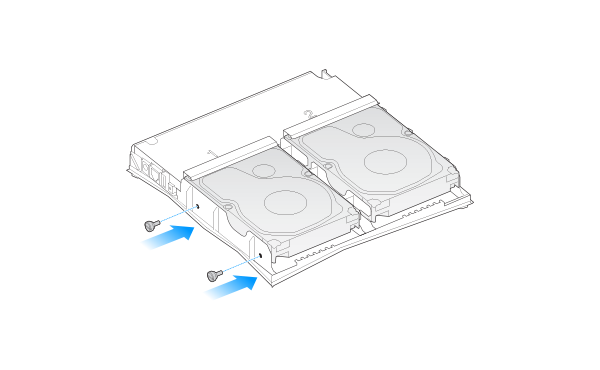
- Verwijder de twee schroeven waarmee de harde schijf op zijn plaats wordt gehouden.
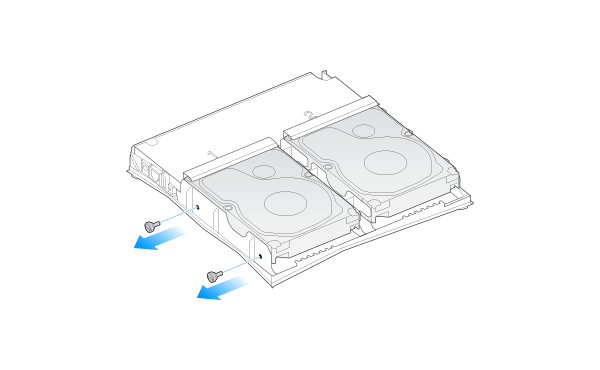
- Trek de harde schijf naar voren en til deze iets op om hem uit de behuizing te verwijderen.

Een harde schijf vervangen
Haal de stekker van het apparaat uit het stopcontact voordat u een harde schijf installeert.
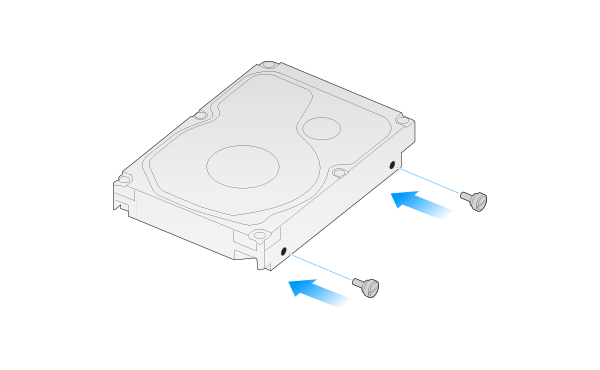
- Zet de schroeven die bij de Personal Cloud 2-Bay zijn geleverd, vast aan één kant van de harde schijf.
- Richt de harde schijf zodat de achterste schroef in de sleuf valt, en schuif de harde schijf vervolgens op zijn plaats.

- Draai de schroeven in de gaten aan de buitenkant.
- Doe de kap weer terug en let op dat deze op zijn plaats klikt.
Maximale bescherming: repareren
Als uw opslag is geconfigureerd als Maximale bescherming, moet u het volume repareren om content te kopiëren naar de nieuwe schijf voor redundantie.
- Ga naar uw Personal Cloud.
- Pc—Klik in Windows of Bestandsverkenner onder Netwerken op PersonalCloud.
- Mac—Klik in Finder onder Gedeeld op PersonalCloud.
Opmerking: Als uw computer uw Personal Cloud niet herkent, gaat u naar Seagate Support. - Open de map Openbaar en dubbelklik op Personal Cloud.
- Meld u aan bij uw Personal Cloud 2-Bay.
- Klik op de pagina Netwerkschijven (linksonderaan) op Beheren. Klik niet op Beheren op de overzichtspagina.
- Kies Repareren en klik vervolgens op Volgende.
- Selecteer de nieuwe harde schijf en klik vervolgens op Volgende.
- Controleer het overzicht en klik op Voltooien.
- Klik op Ja om het apparaat te configureren.
Maximale capaciteit: een nieuw volume maken
Als uw opslag is geconfigureerd als Maximale capaciteit, moet u een nieuw volume maken nadat u de schijf hebt vervangen.
- Ga naar uw Personal Cloud.
- Pc—Klik in Windows of Bestandsverkenner onder Netwerken op PersonalCloud.
- Mac—Klik in Finder onder Gedeeld op PersonalCloud.
Opmerking: Als uw computer uw Personal Cloud niet herkent, gaat u naar Seagate Support. - Open de map Openbaar en dubbelklik op Personal Cloud.
- Meld u aan bij uw Personal Cloud 2-Bay.
- Klik op Beheren op de overzichtspagina.
- Kies hoe u uw apparaat wilt configureren. Seagate beveelt aan om Maximale bescherming te gebruiken voor het beschermen van uw gegevens in geval van een defecte harde schijf. Bij Maximale capaciteit kunt u de totale opslagcapaciteit gebruiken, maar als uw harde schijf defect raakt, verliest u alle gegevens erop. Opmerking: Omdat al uw bestanden worden gekopieerd naar beide harde schijven tijdens het gebruik van Maximale bescherming, bedraagt de beschikbare opslag de helft van de totale capaciteit. Bijvoorbeeld: als uw Personal Cloud 2-bay 8TB aan opslagcapaciteit heeft, kunt u tot 4TB opslaan bij het gebruik van Maximale bescherming.
- Kies Volgende.
- Bekijk het overzicht en kies dan Voltooien.
- Klik op Ja om het apparaat te configureren.