Was this content helpful?
How could we make this article more helpful?
Subaccount Management
Subaccounts allow you to maintain a multi-level account structure. Lyve Cloud provisions the master account, and the master account provisions subaccounts. The subaccounts are managed by and connected to the master account. Each subaccount can provision and manage its own storage, users, and account settings.
Large organizations can use subaccounts to support different departments. It can be used by service providers to manage their independent implementations or by storage resellers to aggregate the usage of different customers.
Master accounts
Lyve Cloud provisions the master account for an organization. A master account manages the entire lifecycle of its subaccounts, including creating, disabling, and deleting a subaccount. The master account has the details for each subaccounts usage and is responsible for billing all its subaccounts. The master account can create a limited number of subaccounts. The administrator can request to increase the limit by contacting support at support.lyvecloud@seagate.com. For more information, see Creating a support ticket.
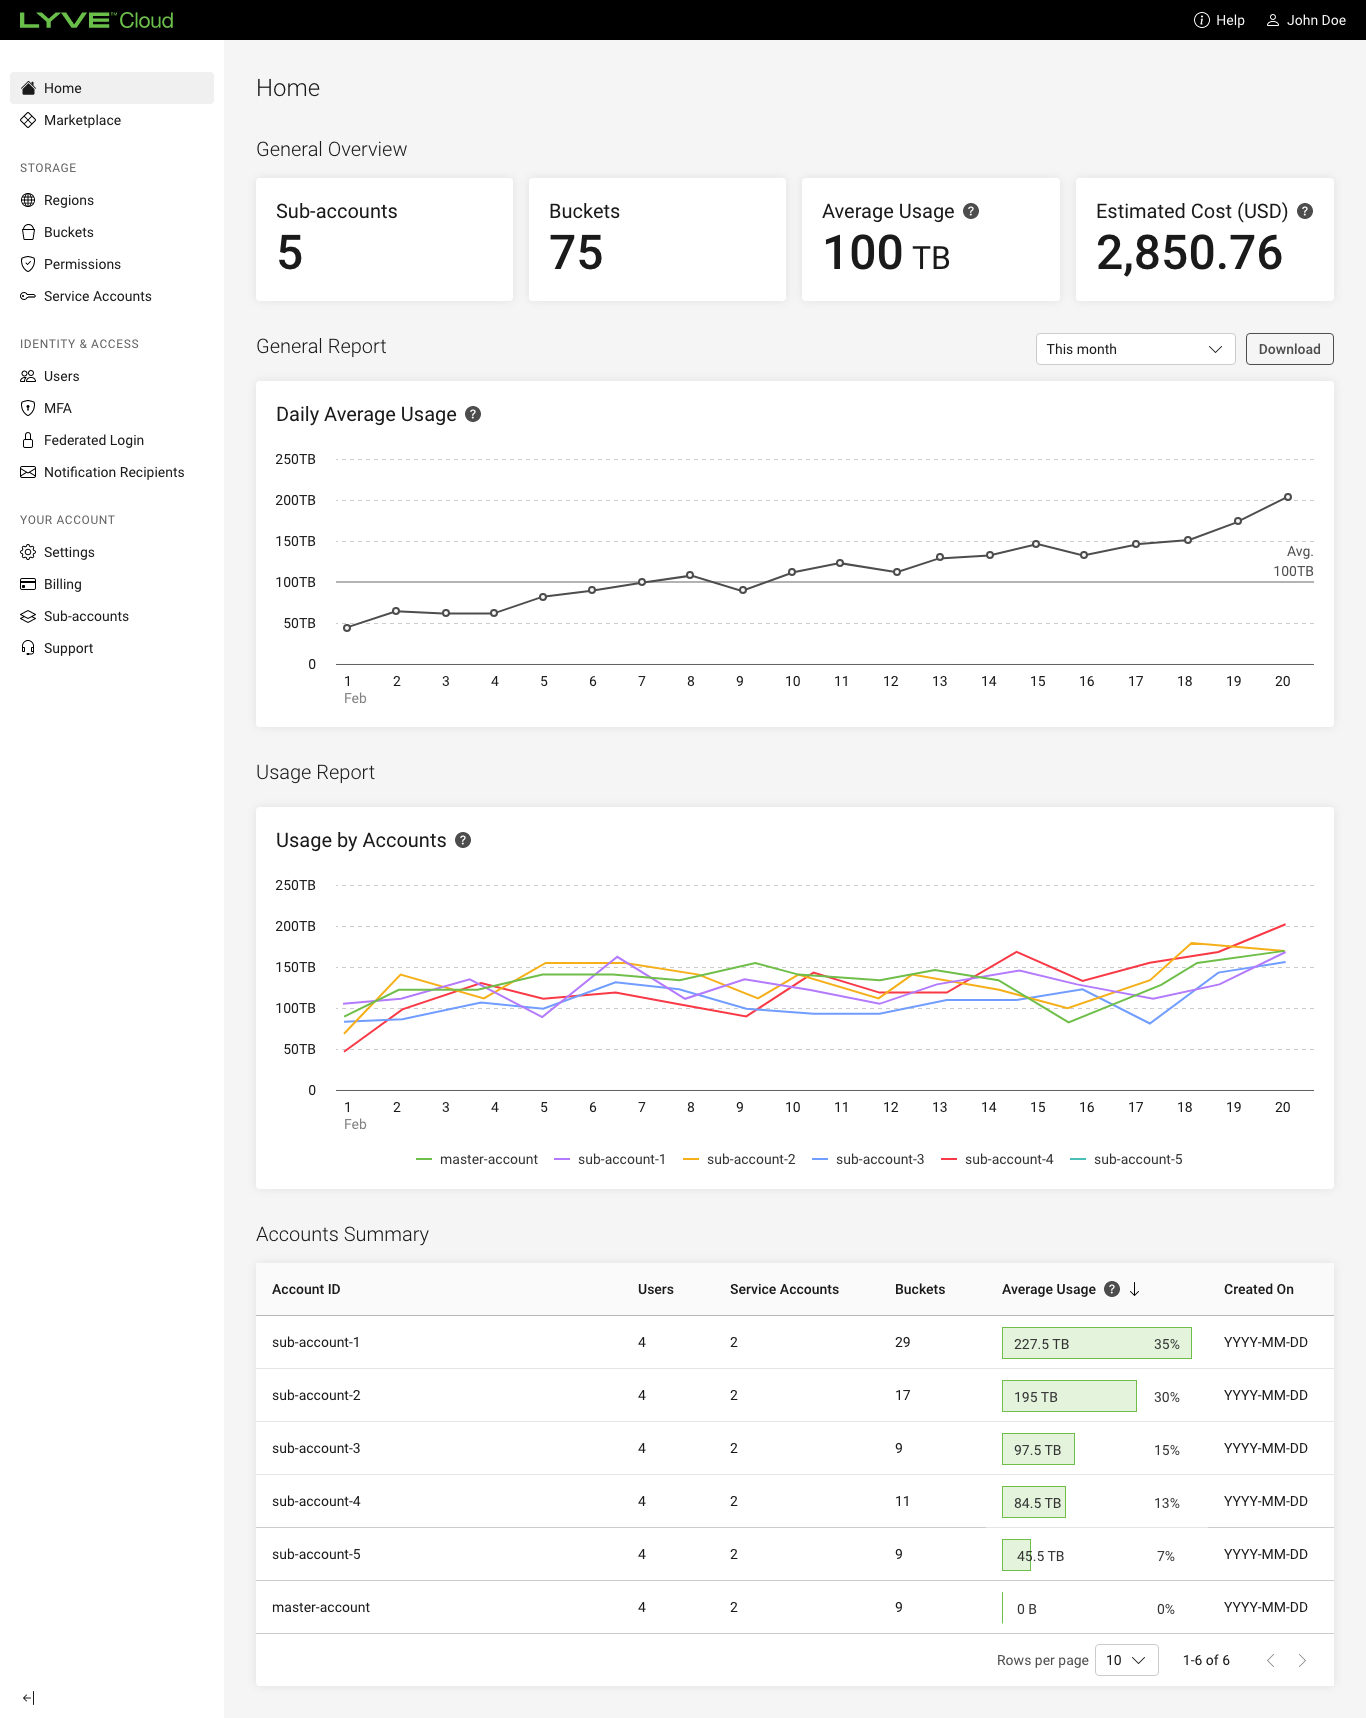
The master account can view all subaccount statistics on the dashboard, and this helps the organization identify its own and its customer's subaccounts.
The following image displays the dashboard of the master account.

The master account can view a list of all subaccounts. When the master account administrator selects a subaccount name, it displays the subaccount dashboard. For more information, see Understanding subaccount dashboard.
Using support
Reseller's subaccounts can create and manage support tickets through the Lyve Cloud console, while managed service providers (MSPs) are responsible for creating and managing support tickets for theirsubaccounts. While creating a support ticket, you must include the organization name, phone number to contact and details concerning the issue. To create a support ticket, see Creating a support ticket.
If you do not have a support option available, please contact your administrator with the required details of the issue.
Managing subaccounts
Role-based access to manage subaccount
The following table describes access to manage subaccount features based on the user's role:
| Actions | Admin | Storage Admin | Auditor (Read only) |
|---|---|---|---|
| Subaccount menu | ✓ | × | ✓ |
| Create subaccount | ✓ | × | × |
| Disable subaccount | ✓ | × | × |
| Delete subaccount | ✓ | × | × |
| View subaccount details | ✓ | × | ✓ |
| View all storage usage | ✓ | ✓ | ✓ |
Creating a subaccount
Based on the user type, the fields are available for the administrator to create a subaccount (see the table above).
The number of subaccounts per master account is limited. If you need additional subaccounts beyond the limit, please create a support ticket to request an increase to the limit.
To create a subaccount:
- On the left-hand menu, select Subaccounts.
- On the subaccounts management page, select Create Subaccount.
- Enter the following:
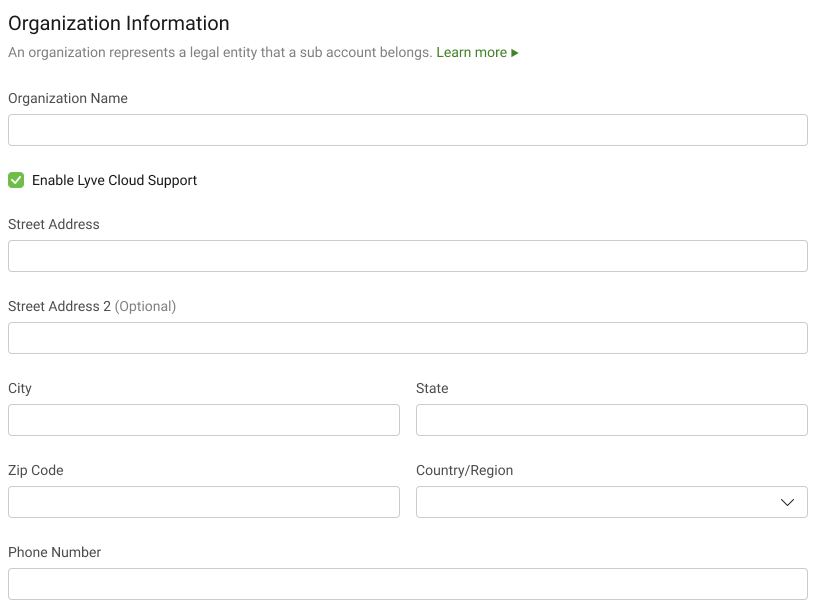
- Organization Information
- Organization Name: Specify the name of the organization. The name is chosen when your first create a subaccount and is provisioned for your organization. The length must be between 3-64 characters.
- Enable Lyve Cloud Support: This option displays the support menu option in the left navigation pane for the subaccount.
- Street Address: Specify the street address of the organization.
- City: Specify the city name of the organization.
- State: Specify the state of the organization.
- Zip Code: Specify the zip code.
- Country/Region: Specify the country or region of the organization.
- Phone Number: Specify the contact number.
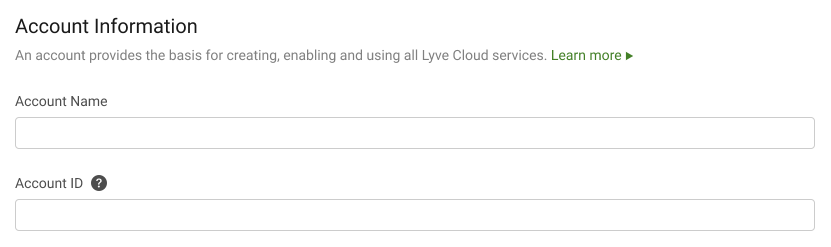
- Account Information
- Account Name: Specify the name of the account. You specify an account name when you create a new account, while an account name uniquely identifies an account within your organization.Only alphabet letters, numbers, spaces, dash (-),' (single quote), (_)underscore, (,) coma, (&) ampersand and (.) periods are allowed. The length must be between 3-64 characters.
- Account ID: Account ID is unique across all the Lyve Cloud accounts. A single URL is used to access the Lyve Cloud console authenticated by the account ID. The account id is used in the URL, and the URL is account specified in the following format:
https://<account_ID>.console.lyvecloud.seagate.com. You cannot change the account ID once it is created and is generated immediately.
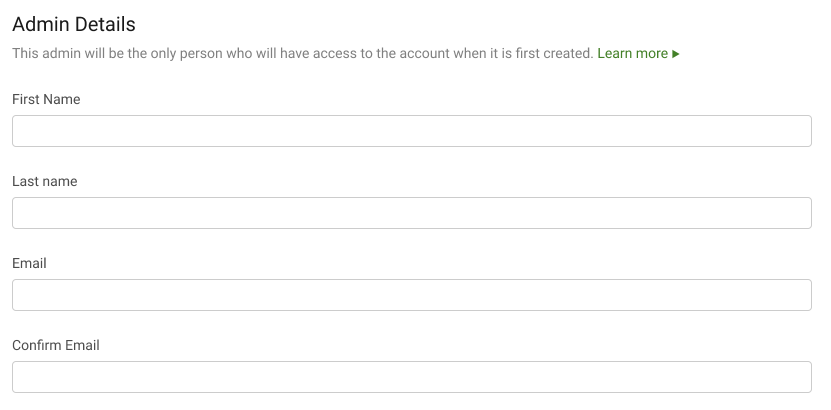
- Admin Details: Specify the administrator's details managing the subaccount. Once the account is created, the administrator will receive an email with a link to create a password for the new Lyve Cloud account. If this user exists in the master account, the administrator will receive an email with a link to the new account.
- First Name: Specify the name of the administrator.
- Last Name: Specify the last name of the administrator.
- Email: Specify the email address of the administrator. After registering, the administrator will receive all notifications on the registered email.
- Confirm Email: Re-enter the email to verify the email mentioned in the Email field.
- Click Create.
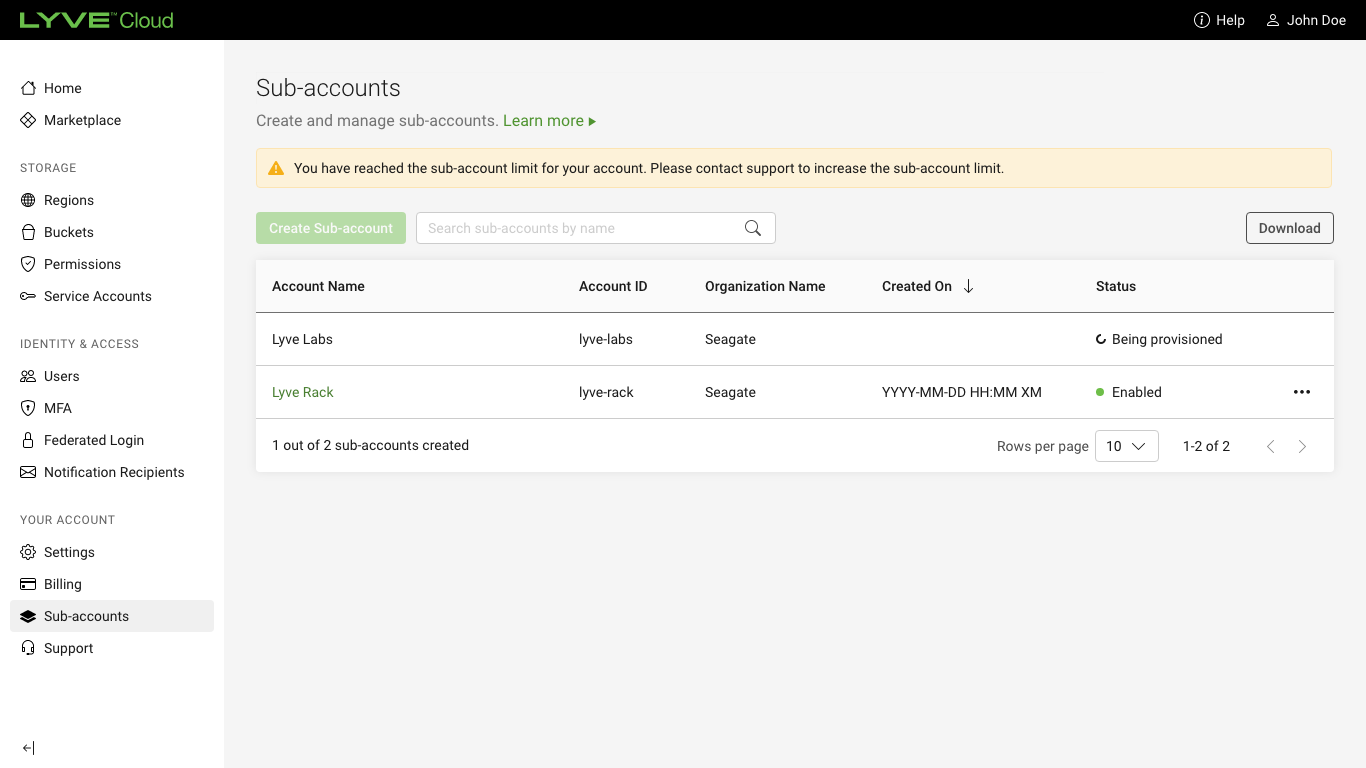
After the subaccount is created, it is listed on the Subaccounts page, and you can view the status of the subaccount. Initially, the status is Being Provisioned, which will be changed to Enabled or Provision failed. For more information, see Listing subaccounts.
If the provisioning fails, you can try to create an account again by choosing the option Try again from the ellipses or contact support at support.lyvecloud@seagate.com.
Use Dismiss to remove the failed subaccount from the list.

When the total number of subaccounts with the status Being provisioned, Enabled and Disabled reaches the total subaccount limit, you cannot create a new subaccount, and a warning message is displayed.
Only the admin who created the subaccount receives an email notifying whether the subaccount was successfully created or failed.
Listing subaccounts
Subaccounts are listed under the subaccounts management page in the master account. You can search the subaccounts by name.
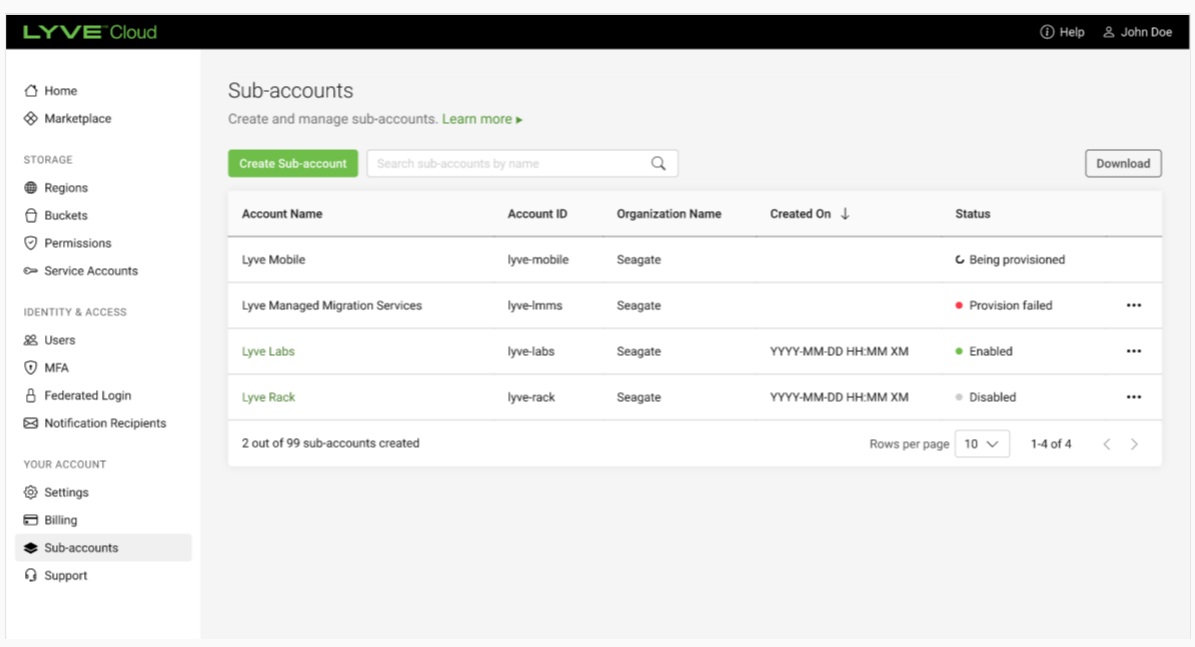
| Column Name | Description |
|---|---|
| Account Name | Displays the name of the account. |
| Account ID | Displays the account ID of the subaccount. This is a unique ID across Lyve Cloud. |
| Organization Name | Displays the name of the organization. |
| Created On | Displays the date and time when the subaccount is created. |
| Status | Subaccount UI updatesDisplays the status of the subaccount. The status can be:
|
| Trial | Displays the remaining number of days for the trial to expire. |
Exporting the subaccount list
By selecting Download, the administrator of the master account can export the subaccount list in the CSV file.

Disabling/enabling a subaccount
Disabling a subaccount restricts all account users from accessing the console and all its service accounts from accessing storage. After the account is disabled, the master account is not billed for that period.
You must contact the administrator if the option to disable an account is unavailable.
You can enable a subaccount if it is disabled. You can enable the account with all data access and its users without restrictions. Enabling a disabled account permits all active users to access the console, and the service accounts are re-enabled.
To disable a subaccount:
- On the left-hand menu, select Subaccounts.
- Select the ellipsis for the account to disable, and then select Disable.
- Select Yes in the confirmation dialog.
- Verify the subaccount name to disable, and select Confirm.
A confirmation message is displayed on the subaccount list page.
Alternatively, you can disable a subaccount from the subaccounts dashboard from the Settings tab.

Deleting a subaccount
You can delete a subaccount if it is disabled for at least 30 days. You can confirm the status of the disabled account on the subaccount detail page. Once the subaccount is deleted, all the data, including buckets, objects, service accounts, users, etc., are also deleted and cannot be restored.
To delete a subaccount:
- On the left-hand menu, select Subaccounts.
- Select the subaccount to delete.
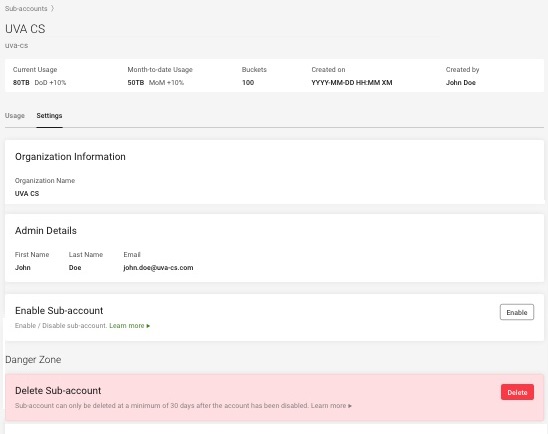
- Select the Settings tab on the subaccount detail page and then select Delete.
Video: Lyve Cloud - How to use the subaccount feature of Lyve Cloud
Seagate on Vimeo: Lyve Cloud - How to use the subaccount feature of Lyve Cloud
Understanding the subaccount usage dashboard
Subaccount usage is monitored from the subaccount usage dashboard.
The subaccount dashboard displays statistics of the storage system, including usage, the number of buckets, daily average usage etc. After selecting a subaccount on the left navigation pane, you can view the dashboard. Initially, there is no data on the dashboard. Once you create subaccounts and the accounts begin storing data in the buckets, the dashboard displays essential details in different sections. A graphical view of daily average usage with the date range filter displays the storage usage trend.
There are two tabs on the dashboard displaying the Usage information and Settings for the subaccount.
- Month-to-date Usage: Displays the average usage of the account from the beginning of the month until the current date.
- Buckets: Displays the total number of buckets created in the subaccount.
- Created on: Displays the date and time of subaccount creation.
- Created by: Displays the administrator's name who created the subaccount.
- Usage: The Usage tab is selected by default.
- Reports
- Daily Average Usage: Displays the daily average from a series of four usage snapshots within 24 hours of data stored in all the buckets.
- This month is a default selection that displays the daily average usage trend for the current month to date.
- Selecting the Last 6 months shows the usage trend of the previous six months. Each data point displays the monthly average for that month.
- Selecting a Custom time range allows you to choose the monthly time range, and the data points display the monthly average usage.
- Date range selection: Select a current month, last six months, or custom time range to view usage trends.
Use the Date range selection to choose the length of time of the report. Download the usage data in CSV format by selecting Download. This report shows the Date, Region Name, Bucket Name, Usage(byte), and Usage (GB) in the excel sheet.
- Settings: Click the tab to display the details of the subaccount.
- Organization Information: Displays the organization name and address of the subaccount.
- Admin Details: Displays the administrator details of the subaccount.
- Danger Zone: This section allows you to disable and delete the subaccount. You must be very careful before you perform any of these actions. For more information, see Disabling/enabling a subaccount and Deleting a subaccount.
Understanding subaccount billing
Master account billing
The master account administrator can view the usage total, the number of buckets, and the storage trends of the buckets in that account. The Home page displays the details of the master account that is combined with subaccounts. It shows the number of buckets, total usage from the beginning of the month to date, and a graphical representation of unlimited usage.
The subaccount usage graph displays the usage of each subaccount on the same chart. The graph shows different colour lines for separate subaccounts.
Invoicing master account
The master account is billed for all the subaccounts created under the master account. The administrator can view all the monthly invoices.
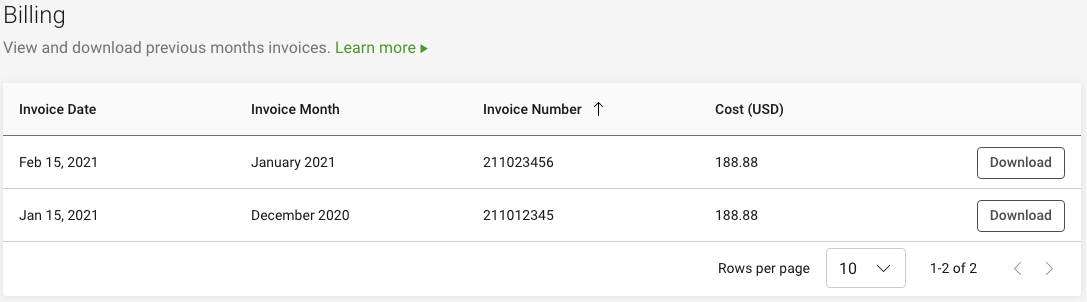
You can download the Invoices for each month by selecting Download.
The image shows a sample usage for a US-based customer.

The Product Number/Product Description displays the following information:
- Service Period
- Actual Usage
For more information, see Understanding billing.
Billing for a disabled subaccount
The master account is not charged for the usage of the disabled subaccount. If the account is disabled during the period of usage calculation, then the usage is calculated till the date the account is disabled.
For example, If the subaccount is disabled on June 15, and the usage is calculated for June, the subaccount is billed from June 1 to June 15.
If you re-enable the subaccount, the account is billed on a pro-rata basis. For example, If the account is enabled on August 10, then the account is billed on a pro-rata basis from August 10 till the end of August.