¿Le pareció útil este contenido?
¿Cómo podríamos hacer que este artículo sea más útil?
Recursos compartidos: acceso y transferencia de archivos
Acerca de los recursos compartidos
Un recurso compartido es un volumen de red que puede configurar para que almacene y comparta datos. Las unidades NAS de Seagate cuentan con dos recursos compartidos de forma predeterminada: admin (Administrador) y Public (Público). Tras el inicio de sesión inicial, se modificará el recurso compartido admin (Administrador) con el nombre que utiliza el administrador.
La siguiente tabla muestra las diferencias entre los recursos compartidos privados y públicos:
| Tipo | Accesibilidad | Inicio de sesión | Disponibilidad | Recurso compartido predeterminado |
|---|---|---|---|---|
| Privado | Inicio de sesión y contraseña necesarios | Protegido mediante contraseña | Los ordenadores de la red y acceso remoto (deben activarse) | admin (administrador) o definido por el usuario |
| Público | Disponible para cualquier usuario de la red | Ninguno | Los ordenadores de la red y acceso remoto (deben activarse) | Público |
Para ver las instrucciones sobre cómo crear y administrar recursos compartidos, consulte Shares (Recursos compartidos).
Acceder a recursos compartidos
Existen diferentes opciones para acceder a los recursos compartidos.
Opción 1: Seagate Network Assistant - Acceso rápido al recurso compartido
Utilice Seagate Network Assistant para acceder rápidamente a los recursos compartidos públicos. Consulte Seagate Network Assistant para obtener más información.
Opción 2: Seagate Network Assistant - Autenticación de recursos compartidos privados
Utilice Seagate Network Assistant para especificar el nombre de usuario y la contraseña. Consulte Seagate Network Assistant para obtener más información.
Opción 3: sistema operativo
Utilice el sistema operativo para abrir los recursos compartidos de NAS.
Opción 4: Sdrive
Sdrive ofrece a los usuarios y administradores un acceso sencillo a los recursos compartidos y el NAS OS en redes locales y remotas. Al integrar un archivo único de Sdrive, se coloca un volumen en una ventana del Explorador (Windows) o en el escritorio (Mac). El volumen contiene todos los recursos compartidos públicos y privados asignados al usuario por el administrador. Consulte Remote Access (Acceso remoto) para obtener más información.
Windows
- En el campo de dirección de la ventana de Explorador, escriba el \\[nombre del equipo] o la \\[dirección IP]] de la unidad NAS de Seagate.
- Haga doble clic en el recurso compartido que desee abrir.
- Los recursos compartidos privados le solicitarán el nombre de usuario y la contraseña del NAS OS.
O bien, en el menú Inicio, seleccione Ejecutar y, a continuación, escriba el \\[nombre del equipo] o \\[dirección IP]]. Seleccione la opción OK (Aceptar).
Nota sobre Bonjour: si su equipo de Windows ejecuta Bonjour, el nombre de la dirección debe incluir .local. Por ejemplo, \\[nombre del equipo].local.
Mac
- En el escritorio, vaya a Go > Connect to Server (Ir > Conectarse al servidor).
- En la ventana de diálogo, escriba una de las siguientes opciones:
- afp://[nombre del equipo].local
- smb://[nombre del equipo].local
- afp://[dirección IP]
- smb://[dirección IP]
Cómo crear accesos directos a recursos compartidos
Crear accesos directos a recursos compartidos para acceder rápidamente a sus datos
Cree accesos directos utilizando Seagate Network Assistant
Es posible configurar Seagate Network Assistant para montar automáticamente recursos compartidos en el ordenador. Consulte Seagate Network Assistant para obtener más detalles.
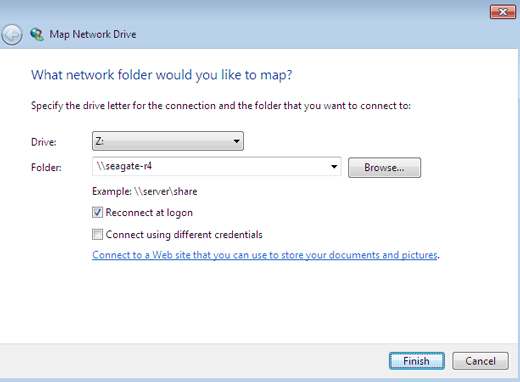
Crear accesos directos mediante el sistema operativo: Windows 7
- Abra una ventana del Explorador de archivos y navegue hasta Equipo.
- Seleccione Asignar unidad de red.

- Examine y seleccione el recurso compartido al que quiera acceder (los recursos compartidos privados le solicitarán su nombre de usuario y contraseña del NAS OS). Seleccione la opción OK (Aceptar).
- Seleccione una letra de unidad en el menú desplegable y asegúrese de que Conectar de nuevo al iniciar sesión está marcado.
- Seleccione Finish (Finalizar).
Windows 8 y 10
- En el campo de dirección de una ventana de Explorer, escriba el \\[nombre del equipo] o la \\[dirección IP]] de su unidad NAS de Seagate.
- Haga clic con el botón derecho en el recurso compartido al que desee acceder y seleccione Conectar a unidad de red.
- Seleccione una letra de unidad en el menú desplegable y asegúrese de que Conectar de nuevo al iniciar sesión está marcado.
- Seleccione Finish (Finalizar). Los recursos compartidos privados le pedirán su nombre de usuario y contraseña del NAS OS.
Crear accesos directos mediante el sistema operativo: Mac
Montar
- Abra una nueva ventana del Finder y seleccione su unidad NAS en SHARED (Archivos compartidos) > [nombre de la máquina]. Aparecerán todos los recursos compartidos. Para acceder a los recursos compartidos privados, seleccione Connect As (Conectar como) e introduzca su nombre de usuario y la contraseña del NAS OS.

- Seleccione la opción Connect (Conectar).
Montar durante el arranque
- Antes de seguir los pasos indicados a continuación, asegúrese de montar los recursos compartidos tal como se describe más arriba.
- En el icono Apple de la barra de menús, seleccione Preferencias del Sistema > Cuentas > Arranque.
- Seleccione el icono "+" para añadir un nuevo ítem a la lista y buscar los recursos compartidos que se han montado.
Cuando inicie sesión en el sistema operativo del Mac, los recursos compartidos se montarán automáticamente en el escritorio. Si los recursos compartidos no se montan en el escritorio, abra una ventana del Finder y compruebe SHARED (Archivos compartidos). Si los recursos compartidos están disponibles en SHARED (Archivos compartidos) pero no son visibles en el escritorio, vaya a las preferencias del Finder y cambie la configuración para mostrar los servidores conectados en el escritorio.
Copia de seguridad: NAS de Seagate y PC/Mac
Realizar una copia de seguridad de la unidad NAS
Consulte en Administrador de copias de seguridad una explicación completa de cómo automatizar las copias de seguridad de los datos almacenados en su unidad NAS. Puede hacer una copia de seguridad de los datos en:
- Un dispositivo de almacenamiento de conexión directa (DAS).
- Otro dispositivo Seagate NAS OS o servidor compatible de su red local.
- Otro dispositivo Seagate NAS OS o servidor compatible de una red remota/externa.
- Un servicio de almacenamiento en la nube (Amazon S3 o Box, entre muchos otros).
Información importante acerca de la copia de seguridad de la unidad NAS y RAID: RAID es una excelente solución para mantener su unidad NAS en funcionamiento en caso de que se produzca un fallo de disco. No obstante, RAID no es una solución de copia de seguridad y no ofrece protección frente a todos los tipos de fallo de hardware. Por tanto, los administradores deberían hacer copias de seguridad de los datos de la unidad NAS en una unidad DAS o en otra unidad NAS con frecuencia. Consulte la sección Administrador de copias de seguridad para obtener más información.
Realizar una copia de seguridad de sus equipos
Su unidad NAS es totalmente compatible con soluciones de copia de seguridad habituales, como:
- La Copia de seguridad de Windows y el Historial de archivos de Windows.
- Apple Time Machine®.
Es posible establecer un recurso compartido en su unidad NAS como destino de copia de seguridad para este y otro software de seguridad. Cerciórese de que el usuario tiene acceso al recurso compartido de destino. Tenga presente que eliminar el recurso compartido de destino también eliminará todas las copias de seguridad de ordenador asociadas.
Nota sobre Time Machine: Time Machine debe activarse en el NAS OS antes de que se pueda usar un recurso compartido de una unidad NAS como destino de copias de seguridad. Vaya a Device Manager > Services (Administrador de dispositivos > Servicios) para activar el servicio Time Machine. Consulte Servicios para obtener más información.
Servidor multimedia
UPnP/DLNA
Configure la unidad NAS para que actúe como servidor multimedia para los dispositivos UPnP/DLNA. Para comenzar, active UPnP/DLNA en Device Manager > Services (Administrador de dispositivos > Servicios) (consulte Servicios). Una vez activado, los reproductores con certificación UPnP/DLNA conectados a su red podrán reproducir archivos ubicados en la unidad NAS. Algunos ejemplos de reproductores UPnP/DLNA son Xbox, PlayStation y los televisores inteligentes, entre muchos otros.
Los archivos multimedia almacenados en recursos compartidos públicos se identifican sin necesidad de introducir un nombre de inicio de sesión y una contraseña. Si mantiene los archivos multimedia en recursos compartidos privados, asegúrese de que el dispositivo de reproducción sea capaz de solicitar las credenciales.
Volver a indexar el servidor multimedia
Para realizar un inventario de los archivos multimedia disponibles, puede volver a indexar los recursos compartidos de la unidad NAS y el almacenamiento de conexión directa (DAS) conectado a los puertos de la unidad NAS.
- Si procede, asegúrese de que la unidad DAS esté conectada al dispositivo del NAS OS.
- Confirme que UPnP/DLNA está activado en Device Manager > Services (Administrador de dispositivos > Servicios) (consulte Servicios).
- Pase el cursor por el lado derecho de la fila UPnP/DLNA para activar el menú desplegable y seleccione Edit (Editar).
- Seleccione Re-index (Volver a indexar).

Inicie la reindexación tal y como se indica anteriormente si parece que faltan archivos en los recursos compartidos multimedia o en los dispositivos conectados.
El tiempo que tarda en terminar la indexación depende de la capacidad total del almacenamiento y el tamaño de la biblioteca multimedia. Si ha creado muchos recursos compartidos en la unidad NAS, la reindexación puede añadir más carga a los recursos de la CPU. Antes de comenzar la reindexación, considere la opción de desconectar la asistencia multimedia para los recursos compartidos que no almacenen archivos multimedia. Consulte Servicios y Recursos compartidos para obtener más información sobre cómo administrar servicios.
iTunes
La unidad NAS puede actuar como servidor de música de iTunes. Copie la biblioteca de iTunes en un recurso compartido de la unidad NAS y los archivos de audio estarán disponibles para los dispositivos compatibles de la red. Para acceder fácilmente a toda la red, utilice un recurso compartido público. Para limitar el acceso a una biblioteca de iTunes, utilice un recurso compartido privado con la autenticación de Seagate Network Assistant (consulte Seagate Network Assistant).
Para activar el uso compartido de las redes, siga los pasos que aparecen a continuación para su versión de iTunes.
- Active el servicio iTunes en su dispositivo del NAS OS. Vaya a Device Manager > Services (Administrador de dispositivos > Servicios) (consulte Servicios).
- Pase el cursor por el lateral derecho de la fila de iTunes y active el menú desplegable Edit (Editar).
- Seleccione Start (Iniciar).

- Para acceder a la biblioteca de iTunes, los ordenadores de la red deben iniciar la aplicación iTunes y seleccionar el dispositivo del NAS OS como origen de la música.
Nota técnica: el servicio de servidor de iTunes admite los tipos de archivo siguientes: .mp3, .wav, .aac, .pls y .m3u.
Compartir música con dispositivos iOS 9
Para compartir la biblioteca de iTunes con los dispositivos móviles iOS:
- Monte el recurso compartido con la biblioteca de iTunes en un equipo de la red.
- Inicie la aplicación iTunes en el ordenador.
- Active el uso compartido en las preferencias de iTunes.
- En el dispositivo iOS, inicie la aplicación de música y toque el menú desplegable de categorías.
- Toque la opción de uso compartido en el hogar para ver la biblioteca de iTunes en su unidad NAS.
Utilice recursos compartidos públicos con dispositivos iOS.
FTP
El FTP (protocolo de transferencia de archivos) se usa para transferir archivos de un ordenador a otro a través de la red local o de Internet. Este protocolo le permite intercambiar archivos con sus compañeros, clientes o socios empresariales de forma segura, ya que solo podrán acceder personas con cuenta de usuario.
El servicio FTP está deshabilitado de forma predeterminada, pero puede activarlo en la página Device Manager > Services (Administrador de dispositivos > Servicios) (consulte Servicios).
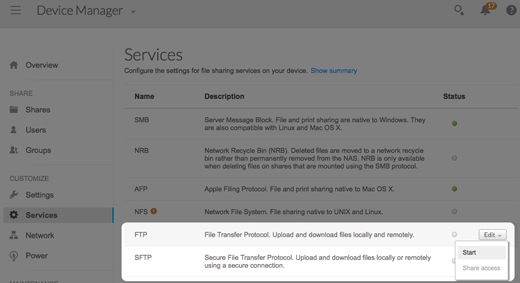
Una vez habilitado el FTP, podrá acceder a su NAS usando un navegador de Internet o un software de cliente FTP. El software de cliente FTP resulta muy útil si desea compartir, descargar y cargar datos dentro de una aplicación dedicada en lugar de un navegador de Internet. Algunos ejemplos de software de cliente FTP son Filezilla y Cyberduck.
Acceso a FTP local
Para usar el servicio FTP en su red local, introduzca la dirección IP de la unidad NAS o el nombre del dispositivo en el campo de dirección del cliente de FTP o en el campo de dirección de un navegador de Internet. La dirección IP de la unidad NAS está disponible en la página Network (Red) o en Seagate Network Assistant (consulte Red y Seagate Network Assistant).
Carpetas de acceso público (sin protección con contraseña)
ftp://[dirección IP]/ (Por ejemplo, ftp://192.168.10.149)
ftp://[nombre de máquina]/ (Por ejemplo, ftp://seagate-r8 o ftp://seagate-r8.local )
Carpetas de acceso privado (con protección con contraseña)
Si sigue las instrucciones que se indican a continuación, tenga en cuenta que los nombres de usuario y las contraseñas pueden variar en función del usuario. Por ejemplo, el nombre de usuario y la contraseña del administrador no son iguales que los de otro usuario.
- ftp://[nombre de usuario:contraseña@dirección IP] (Por ejemplo,
ftp://admin:[email protected]) - ftp://[nombre de usuario:constraseña@nombre de máquina]/ (Por ejemplo,
ftp://admin:contrasenadeaadmin@seagate-r8/ o
ftp://admin:[email protected]/)
Acceso a FTP remoto
Puede acceder y compartir los archivos de su unidad NAS desde un ordenador fuera de su red. Para usar FTP, deberá conocer la dirección IP pública de su enrutador.
- Desde un ordenador en la misma red local que la unidad NAS, visite la página http://www.whatismyip.com/ para averiguar su dirección IP pública.
- Tome nota de su dirección IP pública.
- Abra un navegador de Internet o un software de cliente FTP. Dentro del campo de dirección del navegador de Internet o del software de cliente FTP, escriba:
- Solo para carpetas públicas: ftp://[dirección IP pública] (Por ejemplo, ftp://94.10.72.149)
- Carpetas públicas y privadas: ftp://[nombre de usuario:contraseña@dirección IP pública] (Por ejemplo, ftp://admin:[email protected])
Para obtener más información sobre la dirección IP pública de su enrutador, consulte el manual de usuario del enrutador o su proveedor de servicios de Internet.
SFTP
SFTP es una versión segura del servicio FTP. Los datos están más seguros al usar SFTP pero las velocidades de transferencia son más bajas. SFTP es similar a FTP, y está deshabilitado de forma predeterminada, pero puede iniciarlo desde Device Manager > Services (Administrador de dispositivos > Servicios).
Nota sobre el servidor Network Backup y SFTP: al activar el servidor Network Backup, se deshabilitará el SFTP (consulte Administrador de copias de seguridad para obtener más detalles).
NFS
Network File System (NFS, sistema de archivos en red) es un protocolo del sistema de archivos distribuidos que permite a la unidad NAS compartir directorios y archivos a través de una red. Como ocurre con los SMB, NFS da acceso en el nivel de los archivos a los usuarios y los programas.
NFS tiene una amplia difusión para albergar almacenes de datos de VMWare o carpetas de red compartidas en un entorno de Linux/UNIX.
Cuando activa el servicio NFS en un recurso compartido, puede acceder a este mediante la ruta siguiente: [NOMBRE_DE_NAS_O_DIRECCIÓN_IP]:/shares/NOMBRE_DE_RECURSO_COMPARTIDO]
El protocolo NFS no está activo de forma predeterminada. Para activarlo:
- Vaya a Device Manager > Services (Administrador de dispositivos > Servicios) [consulte Services (Servicios)].
- Coloque el cursor a la derecha de la fila de NFS para activar el menú desplegable Edit (Editar).
- Seleccione Start (Iniciar).
Información importante: todos los recursos compartidos NFS son públicos y están disponibles en la red.
Wake On LAN (WOL)
El dispositivo Seagate NAS puede conservar energía entrando en el modo de ahorro de energía. Utilice el NAS OS para programar el modo de ahorro de energía cuando nadie acceda al dispositivo Seagate NAS y reactívelo cuando el personal de la oficina se disponga a trabajar. Si desea obtener más información sobre los modos de ahorro de energía, consulte la sección Alimentación.
Seagate Network Assistant puede reactivar la unidad NAS si necesita acceder a ella antes de su salida programada del modo de ahorro de energía. Esta función se denomina Wake on LAN (WOL). Siga los pasos que aparecen a continuación:
- Haga clic con el botón derecho en el icono de Seagate Network Assistant de la barra de tareas (Windows) o selecciónelo en la barra de menús (Mac).
- Seleccione Wake Up a Device (Activar un dispositivo).

- Seleccione la unidad NAS en el menú desplegable.
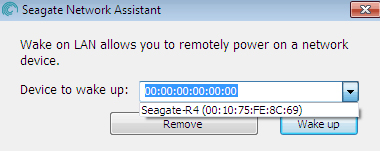
- Seleccione Wake up (Activar).
Nota sobre la lista de direcciones MAC: si la lista está vacía la primera vez que inicia Wake Up a Device (Activar un dispositivo), introduzca la dirección MAC del dispositivo en el campo y seleccione Wake up (Activar). Una vez especificada, Seagate Network Assistant guardará la dirección MAC del dispositivo en la lista.
También puede activar una unidad NAS pulsando brevemente el botón de encendido.