Was this content helpful?
How could we make this article more helpful?
Reseller Management
Sign In As Reseller
Reseller accounts are provided to Lyve customers. The reseller admin account needs to be whitelisted before access becomes available. The reseller account allocates customer accounts (also known as subtenant accounts).
To sign in as a reseller, use the following URL:
https://<reseller-name>.lyve.seagate.com/admin/signin
where <reseller-name> is the reseller account name.
Set Up Customer Accounts
A reseller subtenant (customer) account is created by using the add button under the customer menu in the upper right corner of the web GUI (or through the Lyve Cloud API). This is used by the root account to create subaccounts. The example below is from a reseller account.
- Name: Name of customer account.
- Assume Role: Grants permission for the reseller to assume the identity of the customer to provide support to the interface when required. The setting has three options: Enable, Disable, and Managed by Customer. See Assume Role.
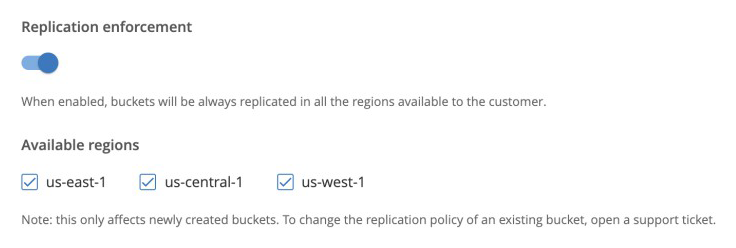
- Replication Enforcement: An admin chooses the data centers in which to replicate data. If the setting is off, all three nodes are automatically selected as valid replication points. This feature prevents subaccounts from adjusting the replication parameter. The 'Replication enforcement' setting determines the dots displayed in the user interface—when enabled, the dots are not be displayed.
Replication enforcement (disabled):

Replication enforcement (enabled):

- Customer Status: Disable the account without deleting contents.
- Email: Address of the subaccount admin or owner/user.
- Password: Initially set, but can be reset using the 'Reset Password' URI for an end administrator/user.
- Regions: May be locked to 3-region replication.
Assume Role
Reseller accounts provide the ability to assume the role of a customer account in order to assist in debugging. When creating a subtenant account, a reseller may set the 'Assume Role' setting to one of the following:
- Enabled—The reseller can assume the role of the customer.
- Disabled—The reseller cannot assume the role of the customer.
- Managed by Customer—The customer controls when this feature is enabled. The reseller has to be authorized by the subtenant account before using the 'Assume Role' feature. Once 'Managed by Customer' has been chosen during account creation, it cannot be modified.
To disable 'Assume Role', the subtenant root user must log in and update the setting in the 'My Account' section. The subtenant root user can choose when 'Assume Role' is enabled or disabled.
When the 'Assume Role' debugging is completed, the reseller account may return to the parent session by selecting Return to original session.
RProtect: Reseller
RProtect is a feature that enables more-granular whitelisting to resources for both reseller and customer roles.
RProtect can explicitly ensure that only a select IP address (or a range of IP addresses) can access a specific resource. It can also be used to remove all restrictions by using 0.0.0.0/0 as the whitelisted IP address. RProtect currently works with IPv4 and is not designed for IPv6.
The RProtect feature may be enabled for a reseller or fully disabled such that anyone can access the buckets within the accounts. This feature is listed in the main navigation bar as well as being available via the Lyve Cloud Space API.
To create an RProtect whitelist:
- Select RProtect in the menu bar and you will be presented with a subnet whitelisting page. If there are customers already created in the reseller account, you will be presented with a list.
- Select a customer from the drop-down list box. To add a new rule, select + REQUEST RULE .
- In the Subnet field, enter the subnet you want to create a whitelist rule for. A subnet may consist of a single IP address or a range of IP addresses.
- (Optional) Select the Lyve Cloud Space in which you want this whitelist to apply.
- (Optional) In the Time to live field, enter the number of days for your whitelist rule to be enforced for the new IP address or range of addresses. Enter 0 or leave Time to live blank to make the enforceable period indefinite.
- (Optional) In the Notes field, add a 144-character note for future reference, such as a reason for the whitelist, the customer, a support request number, or the whitelist location.
- Select SAVE .
There are three options next to the 'Pending' status:
- Checkmark Icon—APPROVE or REJECT the request.
- Selecting APPROVE provides an option to add text to the Notes field, if applicable. Approved requests are added to the list, with the most recent appearing at the top with an 'ACTIVE' status.
- Selecting REJECT will mark the request as 'REJECTED'.
- Trash Bin Icon—Delete all requests, whether 'APPROVED' or 'REJECTED'.
- Information Icon—View the notes associated with the requests.
As with the reseller account, the customer account can also request a range of addresses or a single IP address to be whitelisted.
Statistics of Selected Customer
When you are signed into the Lyve Cloud Reseller portal as the Root identity, you can view account statistics for storage used and transfer rates. Traffic details are ordered by the day on which downloads and uploads occurred.
- To view the statistics, select Stats in the top navigation bar.
- Use the From date and To date selectors to specify the time period you want to view, and then select SHOW.
Statistics of Transfer
In the Lyve Cloud Reseller portal, you can display statistics of the buckets under your reseller subuser (customer) account along with the storage and transfer rates. It will also display a graph with the total used space (GB), number of objects stored, and egress and ingress traffic, all aggregated by day. This can give insight into when your users seem to be using the most bandwidth.
- To view the statistics, select Stats in the top navigation bar.
- Use the From date and To date selectors to specify the time period you want to view, and then select SHOW.
You can export the data to a CSV file for easier processing using third-party programs. Information on how to obtain the same data via the API is available in the API documentation.