Was this content helpful?
How could we make this article more helpful?
Sdrive
Important info: Sdrive is available for the most recent version of NAS OS. Make certain to update your compatible Seagate NAS device to the most recent version of NAS OS before following the directions below.
Sdrive is an application for:
- Windows
- Mac OS
- iOS
- Android
Download and install Sdrive
Go to Sdrive downloads to download and install the application for your operating system.
Create an Sdrive account
All users can create a free Sdrive account and receive access to compatible NAS OS devices.
- Following the installation, launch Sdrive.
- Users with accounts can enter their Sdrive Username and Password. Otherwise, they should choose Sign up.
- When creating an account, users:
- Fill in the applicable fields
- Check the box next to I have read and agree with the Terms of Service
- Choose Create a new account
Sdrive sends an email confirming the account.
Accessing Sdrive
Once it is launched, Sdrive takes on two roles:
- An application to manage NAS OS devices
- A volume to access content at the file level
Sdrive application
Click on the Sdrive icon to access its features. The Sdrive icon location differs by operating system:
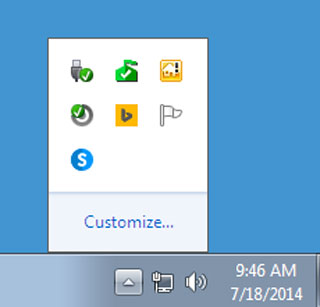
- Windows: System tray > Hidden icons (up arrow in the system tray). See below for instructions on how to add the Sdrive icon to the system tray for easy access.
- Mac: Menu bar.
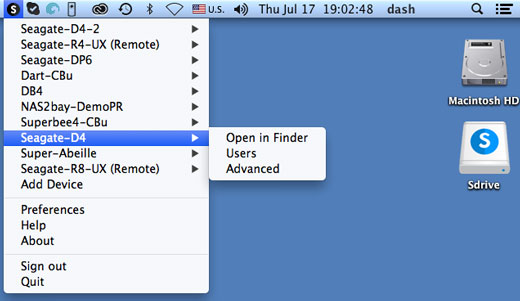
Similar to most applications in the system tray or menu bar, actions are dependent upon the operating system. For example, Windows users must apply a right-click on the Sdrive icon to access most of its features. A left-click in Windows launches the Sdrive volume in an Explorer window. Mac users can use a standard left-click
Sdrive volume
The Sdrive volume gives users quick access to files on their NAS OS devices.
- Windows: Explorer window > Network

- Mac: Desktop
Windows: move the Sdrive icon to the system tray
- In the system tray, click on Hidden icons (up arrow).
- Choose Customize.
- Click on the pull-down menu for Sdrive and choose Show icon and notifications.
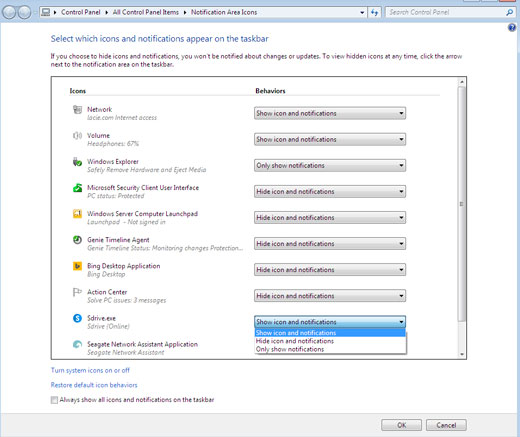
- Choose OK.
Link Sdrive to your NAS OS device
- Sdrive recognizes all compatible NAS OS devices on your local network.
- Sdrive helps you navigate your NAS OS shares on your local network, similar to traditional network volumes.
- Sdrive gives you and your colleagues access to your NAS OS shares anywhere with a connection to the Internet.
Add your NAS OS device to Sdrive
Users and administrators must perform the steps below on a computer connected to the same network as the NAS OS device. Once the NAS OS device is added to an Sdrive account, access becomes available outside of the local network.
- Launch the Sdrive application and sign in using Sdrive credentials.
- Click on the Sdrive icon.
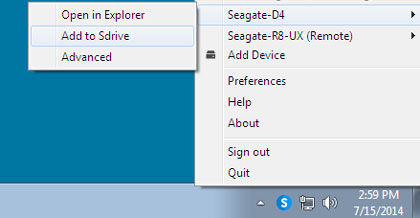
- Windows: Go to the system tray and right-click on the Sdrive icon.
- Mac: Go to the menu bar and click on the icon.
- Select the NAS OS device and choose Add to Sdrive.
- Enter the username and password for the NAS OS device. Do not enter the credentials for Sdrive at this step.
The NAS OS device has been added to the Sdrive account. The administrator can confirm that users have linked the NAS OS device to their Sdrive accounts.
- Go to NAS OS > Users.
- In the Users table, review the Sdrive account column. It is filled in automatically once the NAS OS device is added to an existing user’s Sdrive account.
The administrator cannot edit the Sdrive account field in the Users table for NAS OS. However, the administrator can remove a user’s link to Sdrive using the Edit pull-down menu.
NAS OS discovery
If Sdrive cannot find your compatible NAS OS device, confirm that your company's firewall permits the following:
- Multicast UDP
- Group = 224.0.0.1
- Port = 4448 (in and out)
- TCP is enabled for port 18811 (out only)
- A proxy server for your NAS (if applicable)
Sdrive features
Sdrive has three primary functions:
- Local and remote access to NAS OS shares via the Sdrive volume.
- Remote NAS OS management for administrators and users.
- Share the NAS OS device by inviting colleagues and clients to join Sdrive.
Sdrive remote access
Users and administrators must follow the installation and setup steps to link compatible NAS OS devices to their Sdrive accounts. Once the link is established on the local network, the Sdrive application can be downloaded and installed on any computer with a connection to the Internet.
For example, an employee wants to access her files from a home computer. After Sdrive is installed on the home computer, she signs in using the same Sdrive account created in the office. The Sdrive volume appears in an Explorer window (Windows) or the desktop (Mac).
The Sdrive installers are available at Sdrive downloads.
Remote access requires that:
- The NAS OS device is turned on.
- One or more ports on the company's router have been opened to allow access from outside the network.
- The Sdrive service is enabled in NAS OS.
Sdrive remote management
Administrators and users can access NAS OS using Sdrive.
- Launch the Sdrive application and sign in using Sdrive credentials.
- Click on the Sdrive icon.
- Windows: Go to the system tray and right-click on the Sdrive icon.
- Mac: Go to the menu bar and click on the icon.
- Select the NAS OS device and choose Advanced.
- The login page for the NAS OS device opens in the computer’s default web browser. Enter the login credentials for the NAS OS device.
Administrators can view all NAS OS functions while users have limited access to their account information.
Sdrive invitations to join the NAS OS device
An administrator can invite users to join the NAS OS device using Sdrive. Sdrive invitations perform two functions:
- Create a user account in NAS OS.
- Create a dedicated share with the user’s name.
This option is ideal for sharing a NAS OS device with colleagues and clients who do not work within the local network. Users created in NAS OS should follow the steps in Add your NAS OS device to Sdrive and Sdrive remote access.
Example 1: An employee in the office wants easy access to his files on the Seagate NAS OS device. Since he works within the local network, he follows the steps in Add your NAS OS device to Sdrive and Sdrive remote access.
Example 2: The administrator wants to give a colleague in a branch office access to the NAS OS device at the company’s headquarters. Once the invitation is accepted, the colleague will have a user account and a dedicated share on the NAS OS device. The administrator can give the colleague rights to access additional shares on the NAS OS device.
Example 3: The creative services team wants to share artwork with a client using secure remote access. The NAS OS administrator sends an Sdrive invitation to the client, automatically creating a user account and a dedicated share in the user’s name. The administrator also gives the group Creative Services read+write access to the client’s dedicated share (see Groups for instructions on how to manage multiple users in a single group). The creative services team can now collaborate with the client by sharing files on the dedicated share. Additionally, the administrator knows that the client only has access to the dedicated share. Sdrive provides ideal content sharing since it is secure and easy to manage.
Administrator: Invite user
- Launch the Sdrive application and sign in using Sdrive credentials.
- Click on the Sdrive icon.
- Windows: Go to the system tray and right-click on the Sdrive icon.
- Mac: Go to the menu bar and click on the icon.
- Select the NAS OS device and choose Users.
- Enter the email address in the applicable field then choose Invite.
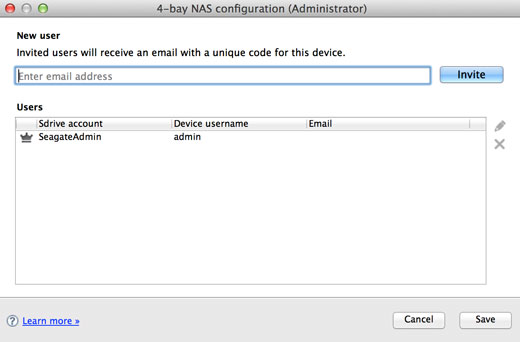
- The user will appear in the table. Choose Save to send the invitation.
The user must accept the invitation for access to the NAS OS device.
User: Accept invitation
Open the email from the administrator and follow the steps to download and install Sdrive. The invitation includes a unique code.
A new share will be created on the NAS OS device with each Sdrive invitation. The name of the share is determined by the name of the user’s Sdrive account. For example, the name of the invitee.
By default, only the user has read+write access to the share that bears his name. However, the administrator can revise access rights to the share using the NAS OS > Shares page. See Shares for details.
Administrator: Remove a user
A user added in Sdrive can be removed in the Sdrive Users window or in NAS OS > Users (see Users for details). To remove a user in Sdrive:
- Launch the Sdrive application and sign in using Sdrive credentials.
- Click on the Sdrive icon.
- Windows: Go to the system tray and right-click on the Sdrive icon.
- Mac: Go to the menu bar and click on the icon.
- Select the NAS OS device and choose Users.
- Select the user you want to remove and click on the X on the right.
- A popup window asks you to confirm.
If the user was created in Sdrive, he has an associated share on the NAS OS device with the same name. Deleting the user does not remove the associated share and its data. Additionally, a user cannot be recreated in Sdrive as long as the NAS OS device continues to have a share with the same name.
Instructions to remove a share are available at Shares. Removing the share will also delete all of its data.
Administrator: User accounts and preferences
The administrator can adjust users’ names and passwords by choosing Sdrive > NAS OS device > Users. Select a user in the table and click on the pencil icon.
Sdrive options are also available at Sdrive > Preferences. Options include:
- Setting memory limits
- Removing NAS OS devices from the account
- Adjusting the account profile