Was this content helpful?
How could we make this article more helpful?
System Overview
The Seagate NAS Pro is a hard drive enclosure available in two models.
- Seagate NAS Pro 2-Bay (up to two 3.5 inch/2.5 inch hard drives)
- Seagate NAS Pro 4-Bay (up to four 3.5 inch/2.5 inch hard drives)
- Seagate NAS Pro 6-Bay (up to six 3.5 inch/2.5 inch hard drives)
Each individual hard drive is swappable and field replaceable. When installing hard drives into the Seagate NAS Pro, make certain they are 3.0 Gb/s SATA that spin up to 7200 RPM. Seagate recommends NAS HDD.
Note: Your Seagate NAS is shipped with screws to mount 2.5-inch hard drives to the hard drive trays
Specifications
Storage management
The Seagate NAS Pro runs on Seagate NAS OS. Use the NAS OS administration tool to create volumes, shares, users, groups, and much more. See Software.
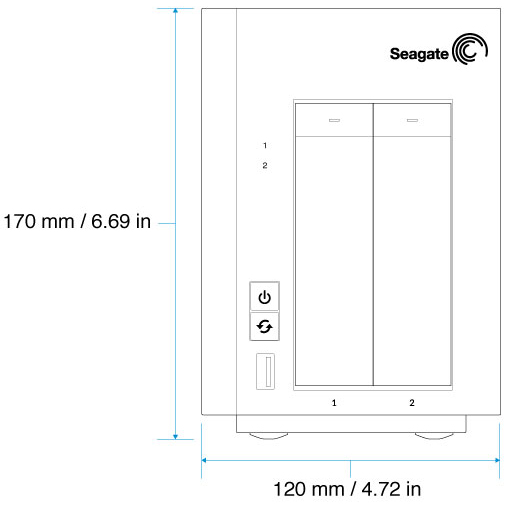
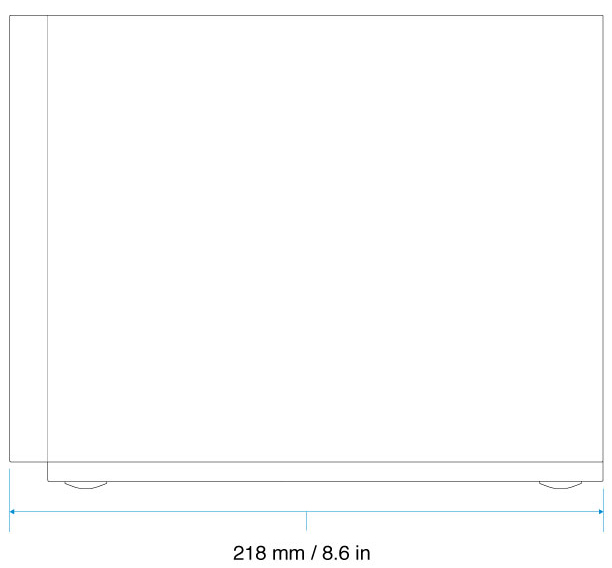
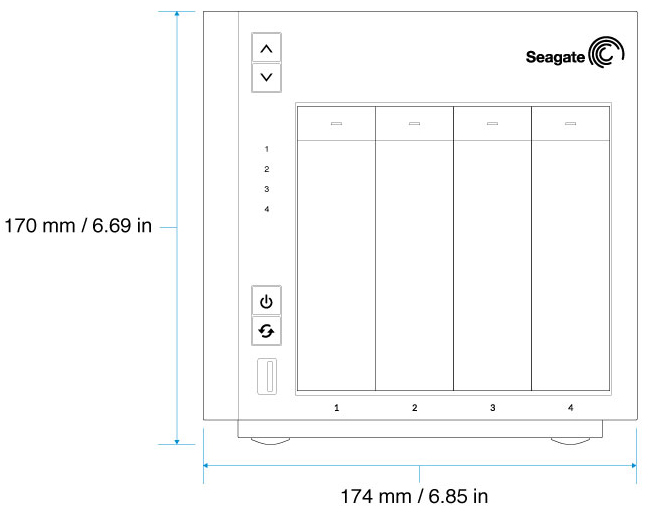
Enclosure dimensions
NAS Pro 2-Bay
NAS Pro 4-Bay
NAS Pro 6-Bay

Enclosure weight
NAS Pro 2-Bay
| Disks | Disk capacity | Weight (Kg / lbs) |
|---|---|---|
| 0 | N/A | 1.75 / 3.86 |
| 2 | 2TB | 2.81 / 6.19 |
| 2 | 4TB | 2.82 / 6.22 |
| 2 | 5TB | 2.83 / 6.24 |
NAS Pro 4-Bay
| Disks | Disk capacity | Weight (Kg / lbs) |
|---|---|---|
| 0 | N/A | 2.45 / 5.40 |
| 2 | 2TB | 3.51 / 7.74 |
| 2 | 4TB | 3.52 / 7.76 |
| 2 | 5TB | 3.53 / 7.78 |
| 4 | 2TB | 4.57 / 10.08 |
| 4 | 4TB | 4.59 / 10.12 |
| 4 | 5TB | 4.61 / 10.16 |
NAS Pro 6-Bay
| Disks | Disk capacity | Weight (Kg / lbs) |
|---|---|---|
| 0 | N/A | 3.0 / 6.60 |
| 2 | 2TB | 4.06 / 8.95 |
| 2 | 4TB | 4.07 / 8.97 |
| 2 | 5TB | 4.08 / 8.99 |
| 4 | 2TB | 5.12 / 11.29 |
| 4 | 4TB | 5.14 / 11.33 |
| 4 | 5TB | 5.16 / 11.38 |
| 6 | 2TB | 6.18 / 13.62 |
| 6 | 4TB | 6.21 / 13.69 |
| 6 | 5TB | 6.24 / 13.76 |
Temperature ranges
| Ambient environment | Temperature range |
|---|---|
| Standard (operating) | +0ºC to +40ºC |
| Storage (non-operating) | -20ºC to +60ºC |
Humidity
| Environment | Humidity range |
|---|---|
| Standard (operating) | 0% to 90% non-condensing |
| Storage (non-operating) | 0% to 95% non-condensing |
Electrical
The included power supply is meant for use with your specific Seagate NAS Pro. It is not compatible with power supplies provided with other hard drive enclosures produced by Seagate, an affiliate of Seagate, or a third party.
NAS Pro 2-Bay
External power supply: 100 - 240 VAC, 50 / 60 Hz, 12 V / 48 W
NAS Pro 4-Bay
External power supply: 100 - 240 VAC, 50 / 60 Hz, 19 V / 120 W
NAS Pro 6-Bay
External power supply: 100 - 240 VAC, 50 / 60 Hz, 19 V / 150 W
Acoustics
NAS Pro 2-Bay
Operational: 20-32 dBA @ 1m
NAS Pro 4-Bay
Operational: 22-32 dBA @ 1
NAS Pro 6-Bay
Operational: 24-32 dBA @ 1
Front panel view
NAS Pro 2-Bay

- Hard drive LEDS: The LEDs blink to indicate activity for the drive.
- Power button and status LED: Turn the NAS on and off (see Operation). A LED will turn on once the button is pushed.
- One-touch backup button: Push the button to initiate a backup. The one-touch button must be configured using the NAS OS Backup Manager.
- SuperSpeed USB 3.0 Port: Connect a compatible USB storage device to the port.
- Hard drive bays: Bays for the hard drives.
For details on LED behavior, see System LEDs.
NAS Pro 4-Bay

- LCD up/down buttons: Push the up/down buttons to navigate the LCD menu.
- LCD menu: Review the NAS Pro’s settings (see LCD Menu (NAS Pro 4-Bay and 6-Bay)).
- Hard drive LEDs: Activity LEDs for the hard drives.
- Power button and status LED: Turn the NAS on and off (see Operation). A LED will turn on once the button is pushed.
- One-touch backup button: Push the button to initiate a backup. The one-touch button must be configured using the NAS OS Backup Manager.
- SuperSpeed USB 3.0 Port: Connect a compatible USB storage device to the port.
- Hard drive bays: Bays for the hard drives.
For details on LED behavior, see System LEDs.
NAS Pro 6-Bay

- LCD up/down buttons: Push the up/down buttons to navigate the LCD menu.
- LCD menu: Review the NAS Pro’s settings (see LCD Menu (NAS Pro 4-Bay and 6-Bay)).
- Hard drive LEDs: Activity LEDs for the hard drives.
- Power button and status LED: Turn the NAS on and off (see Operation). A LED will turn on once the button is pushed.
- One-touch backup button: Push the button to initiate a backup. The one-touch button must be configured using the NAS OS Backup Manager.
- SuperSpeed USB 3.0 Port: Connect a compatible USB storage device to the port.
- Hard drive bays: Bays for the hard drives.
For details on LED behavior, see System LEDs.
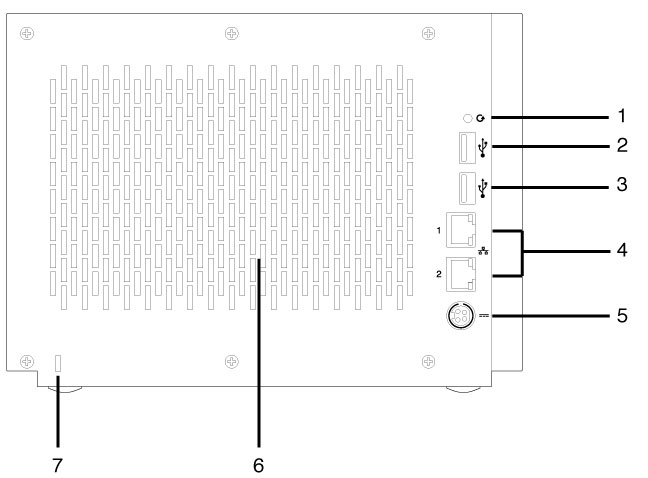
Rear panel view
NAS Pro 2-Bay
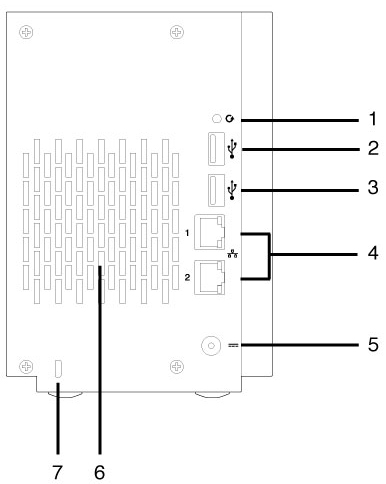
- Recovery button: The recovery button is used to perform a NAS OS Rescue (see NAS OS Rescue) or when first configuring a diskless NAS Pro (see Setup). Use a pointed instrument to gently push the button within the cavity.
- SuperSpeed USB 3.0 port: Connect a compatible USB storage device to the port.
- Hi-Speed USB 2.0 port: Connect a compatible USB storage device to the port.
- Gigabit Ethernet ports (x2): Connect the Ethernet cable from the device to your network. See Setup.
- Power input: Plug in the AC adapter supplied with the NAS. See Setup.
- Ventilation: Keeps your NAS Pro's power supply unit cool during operation. Be sure not to block the fan exhaust when using the product.
- Kensington lock: Secure the NAS Pro to a desk using a compatible cable.
NAS Pro 4-Bay

- Recovery button: The recovery button is used to perform a NAS OS Rescue (see NAS OS Rescue) or when first configuring a diskless NAS Pro (see Setup). Use a pointed instrument to gently push the button within the cavity.
- SuperSpeed USB 3.0 port: Connect a compatible USB storage device to the port.
- Hi-Speed USB 2.0 port: Connect a compatible USB storage device to the port.
- Gigabit Ethernet ports (x2): Connect the Ethernet cable from the device to your network. See Setup.
- Power input: Plug in the AC adapter supplied with the NAS. See Setup.
- Ventilation: Keeps your NAS Pro's power supply unit cool during operation. Be sure not to block the fan exhaust when using the product.
- Kensington lock: Secure the NAS Pro to a desk using a compatible cable.
NAS Pro 6-Bay
- Recovery button: The recovery button is used to perform a NAS OS Rescue (see NAS OS Rescue) or when first configuring a diskless NAS Pro (see Setup). Use a pointed instrument to gently push the button within the cavity.
- SuperSpeed USB 3.0 port: Connect a compatible USB storage device to the port.
- Hi-Speed USB 2.0 port: Connect a compatible USB storage device to the port.
- Gigabit Ethernet ports (x2): Connect the Ethernet cable from the device to your network. See Setup.
- Power input: Plug in the AC adapter supplied with the NAS. See Setup.
- Ventilation: Keeps your NAS Pro's power supply unit cool during operation. Be sure not to block the fan exhaust when using the product.
- Kensington lock: Secure the NAS Pro to a desk using a compatible cable.
USB ports
The Seagate NAS Pro has:
- Two USB 3.0 ports (front and rear)
- One USB 2.0 port (rear)
Connect USB direct-attached storage (DAS) devices to the Seagate NAS Pro for backups. Compatible file formats for DAS include: FAT32, NTFS, HFS+, EXT3, EXT4, and XFS. Other storage formats will not be recognized by the NAS. Capacity limitations do not apply.
Your Seagate NAS Pro also has a one-touch backup button on its front. Run the NAS OS Backup Manager to configure the one-touch button for automated backups to a compatible DAS.