Was this content helpful?
How could we make this article more helpful?
Optional Formatting and Partitioning
Seagate Ultra Touch is preformatted exFAT for compatibility with both PC/Mac computers and Android mobile devices. If you use the drive with only one type of computer, you can optimize file copy performance by formatting the drive in the native file system for your operating system—NTFS for Windows or HFS+ for macOS. If you also use the drive with Android, make certain to use a compatible format such as exFAT.
About file system formats
NTFS—The native file system for Windows. macOS can read NTFS volumes but cannot natively write to them. NTFS is not recommended for connections to compatible Android mobile devices.
Mac OS Extended (HFS+)—An Apple file system optimized for macOS 10.12 and earlier. This file system remains the best option for external hard drives and is the only format compatible with Time Machine. Windows cannot natively read or write to HFS+ (journaled) volumes. HFS+ is not recommended for connections to compatible Android mobile devices.
APFS (Apple File System)—An Apple file system optimized for solid state drives (SSDs) and flash-based storage systems. Note the following restrictions:
- You cannot use an APFS-formatted disk as your Time Machine backup drive. Format Seagate Ultra Touch to HFS+ if you intend to use it with Time Machine.
- APFS is only supported on macOS 10.13 or later.
- APFS is not recommended for connections to compatible Android mobile devices.
exFAT—Compatible with macOS and Windows. exFAT is not a journaled file system, which means it can be more susceptible to data corruption when errors occur or the drive is not disconnected properly from the computer.
FAT32—Compatible with macOS and Windows. However, FAT32 is a legacy file system designed for low capacity hard drives and it is not recommended for modern hard drives or operating systems. A FAT32 partition can reach up to 32GB when formatted on a Windows PC.
How to choose the file system format
| Use NTFS if: |
| …you connect the storage device to Windows computers, and you don’t need to allow a Mac to write to the disk. NTFS is not recommended for connections to compatible Android mobile devices. |
| Use HFS+ if: |
| …you connect the storage device to Mac computers, and you don’t need to allow a Windows computer to read or write to the disk. HFS+ is the only format compatible with Time Machine. HFS+ is not recommended for connections to compatible Android mobile devices. |
| Use APFS if: |
| …you connect the storage device to Mac computers, and you don’t need to allow a Windows computer to read or write to the disk. Do not use APFS if you intend to use Seagate Ultra Touch with Time Machine, or if your computer is not running macOS 10.13 or later. APFS is not recommended for connections to compatible Android mobile devices. |
| Use exFAT if: |
| …you need to allow both Mac and Windows computers to read and write to the disk. exFAT is recommended when connecting to compatible Android devices. |
| You can use FAT32 if: |
| …you connect the storage device to older Windows and Mac computers. FAT32 is not recommended for modern operating systems and computers. |
Manual formatting
Use the steps below to manually format and partition a storage device.
Mac
macOS version 10.11 and later
- Open the Finder and go to Applications > Utilities > Disk Utility.
- In the sidebar to the left, select your Seagate Ultra Touch.
| macOS starting version 10.13—Make sure to select the disk and not just the volume. If you don’t see two entries listed in the sidebar, change the view in disk utility to show both the drive and the volume. The view button is in the upper left side of the Disk Utility window. Change the view to Show All Devices. This feature was introduced in macOS 10.13 and is not available in 10.11 or 10.12. | 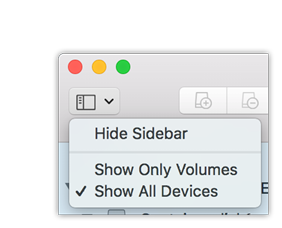 |
- Select Erase.
- A dialog box opens. Enter a name for the drive. This will be the name displayed when the drive mounts.
- For Format, select OS X Extended (Journaled).
- For Scheme, select GUID Partition Map.
- Click Erase.
- Disk Utility formats the drive. When it’s finished, click Done.
Windows
- Make sure the storage device is connected to and mounted on the computer.
- Go to Search and then type diskmgmt.msc. In the search results, double-click Disk Management.
- From the list of storage devices in the middle of the Disk Management window, locate your Seagate device.
- The partition must be available to format. If it is currently formatted, right click on the partition and then choose Delete.
- To create a new partition, right click on the volume and select New Simple Volume. Follow the on-screen instructions when the New Simple Volume Wizard appears.