


Sometimes, after connecting an internal or external hard drive to your system, Windows Disk Management says that it is prepared with a GPT Protective Partition. This will mean that you cannot repartition or reformat the drive. This article will discuss how to overcome this issue.
What is a GPT disk?
The GUID Partition Table (GPT) was introduced as part of the Extensible Firmware Interface (EFI) initiative. GPT provides a more flexible mechanism for partitioning disks than the older Master Boot Record (MBR) partitioning scheme that has been common to PCs.
A partition is a contiguous space of storage on a physical or logical disk that functions as though it were a physically separate disk. Partitions are seen by the system firmware and the installed operating systems. Access to a partition is controlled by the system firmware before the system boots the operating system, and then by the operating system after it starts.
The GUID Partition Table (GPT) Scheme was implemented under Microsoft Windows XP x64 edition, Windows Server 2003 (64-bit), Windows Server 2003 SP1 (all versions), Windows Vista, Windows 7+
In a nutshell, GPT Partition was developed to get around known, MBR partition size issues; the maximum size for a MBR partiton is 2 Terabytes (TB). GPT partitions enable this limit to be exceeded.
Note: For more comprehensive information on GPT Protective Partitions, refer to the following Microsoft link:
https://docs.microsoft.com/en-us/windows-hardware/manufacture/desktop/windows-and-gpt-faq
GUID Partition Table (GPT) partitions are also found in Mac OS X versions 10.4.6 and newer. All Intel-based Macs require a GPT partition on a boot volume, whether it be internal or external.
When connecting an internal and/or and external hard drive to a Windows XP (or newer), 32-bit operating system, you may find your drive is inaccessible and that Disk Management reports that the drive has a GPT Protective Partition on it. The drive cannot be repartitioned and formatted in this state. This is because the internal or external hard disk was previously prepared on either a Windows or Macintosh computer with a GPT partition.
Normal Disk Management facilities will not overcome this issue. To prepare this drive, you will need to use the Windows diskpart command-line utility. The following procedure provides the steps for cleaning a GPT Protective Partition from a hard disk drive connected to an existing Windows XP (or newer), 32-bit Operating System.
 This is a data destructive process. This procedure not only removes the drive's partition, but also removes the Drive Signature. It is highly recommended that you backup any/all critical data on the drive before proceeding.
 You must open Disk Management and document the Disk Number of the drive containing the GPT Protective partition, as you will need this information later in the procedure.
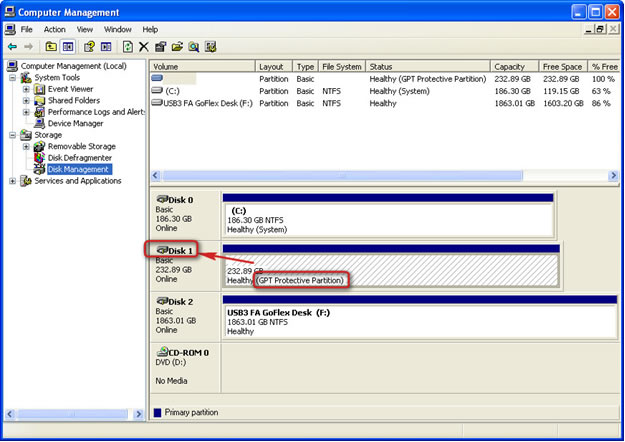
- Determine the disknumber assigned to the GPT-protected drive.
- Right-click on (My) Computer.
- Choose Manage.
- Select Disk Management (listed under Storage).
- Look for the drive that is identified as GPT and note the Disk number (such as Disk 1).
- Open a Command Window. From the command prompt, type diskpart and press Enter. The diskpart prompt will open.
- From the diskpart prompt, type list disk and press Enter. A list of disks will appear in a text format. You will return to the diskpart prompt.
- From the diskpart prompt, type select disk disknumber (for instance, if the disk containing the GPT Protective Partition is Disk 2, you would type select disk 2)and press Enter. A message appears saying that the disk is selected. You will return to the diskpart prompt.
- From the diskpart prompt, type clean and press Enter. At this point the drive's partition and signature a removed. You will return to the diskpart prompt.
- From the diskpart prompt, type exit and press Enter. Type exit once more to close the Command Window. At this point, the internal and/or external drive can be re-initialized, partitioned and formatted.
- Launch Disk Management, and to initialize the disk:
- Use the Initialize and Convert Disk Wizard...
-OR-
- Close the Wizard, right-click on the disk in question and select Initialize Disk from the drop-down menu.
- Use the Initialize and Convert Disk Wizard...
- Once the drive is initialized, continue using Disk Management to partition and format the drive.
 REFERENCE TO THIRD PARTIES AND THIRD PARTY WEB SITES. Seagate references third parties and third party products as an informational service only, it is not an endorsement or recommendation - implied or otherwise - of any of the listed companies. Seagate makes no warranty - implied or otherwise - regarding the performance or reliability of these companies or products. Each company listed is independent from Seagate and is not under the control of Seagate; therefore, Seagate accepts no responsibility for and disclaims any liability from the actions or products of the listed companies. You should make your own independent evaluation before conducting business with any company. To obtain product specifications and warranty information, please contact the respective vendor directly. There are links in this document that will permit you to connect to third-party web sites over which Seagate has no control. These links are provided for your convenience only and your use of them is at your own risk. Seagate makes no representations whatsoever about the content of any of these web sites. Seagate does not endorse or accept any responsibility for the content, or use, of any such web sites.