


Main Menu
The boot drive is no longer detected
Drive is not spinning up
SMART error
Error Messages
Check the BIOS
The Storage drive is no longer detected
New bootable drive is not detected correctly
Motherboard Compatibility
Installing a NEW Storage Drive
My drive's capacity is lower than I expected
Noisy Drive
The Boot Drive is No Longer Detected
Generally, if a drive is configured as the bootable drive, then the computer relies on that drive to boot the computer and to launch Windows. It is the source of most of the computer's operations. So, if the computer suddenly stops detecting the bootable drive, this will almost certainly mean that the computer will fail to boot at all. Instead, some error message will occur, and it will become obvious that a serious problem has occurred.
This set of troubleshooting steps will attempt to get the drive detected again, or to conclude whether the drive has failed and should be replaced.
One error in particular, however, is more important than others to watch out for. If a S.M.A.R.T. (Self-Monitoring, Analysis, and Reporting Technology) error has recently appeared on your computer, this generally means drive failure is imminent or has already occurred. If you have received a SMART error, we strongly recommend that you stop everything and make an immediate backup of any and all important data contained on this drive that is not already backed up.
Drive is not spinning up
Note: These steps are NOT applicable for SSDs (solid state drives).
If the drive is not receiving power, or receiving an incorrect level of power, it will not spin up. To check to see if this is the cause of the BIOS not detecting the hard drive, follow these steps:
- Power off the computer
- Open the computer case and remove the data cable from the hard drive. This will stop any power saving commands from being sent.
- Turn on the system. Check to see if the hard drive is spinning. If you touch the side of the drive you should feel a slight vibration. If you do not hear or feel the hard drive spinning, the drive did not start.
If you cannot determine whether the drive is spinning:
- Boot the computer and listen carefully.
- Shut the computer down.
- Disconnect the power cord from the computer itself.
- Disconnect the power cable from the hard drive in question.
- Reconnect the power cord to the computer itself.
- Boot the computer up to see if the drive sound was audible before.
- Repeat, only reconnect the hard drive and listen for it to spin up.
- Switch power cables with a known working power cable.
- Check the power supply on your computer to determine whether it is providing sufficient electrical power to operate the drives and devices you have in your computer.
- If the drive is still not spinning, connect it in another computer if possible.
- Connect the drive in a SATA-USB enclosure or something similar is possible.
- If the drive does not spin up after all of those steps, please visit the Warranty page to begin a warranty replacement order.
SMART error:
Under what circumstances did the SMART error occur?
After running a SeaTools test:
SeaTools' is the standard that Seagate uses to determine whether a drive is still in good working order or is failing. A drive may be failing but continue to function normally for a short time, so SeaTools is often a better judge of whether the drive is failing than the drive's functionality at any given moment.
Therefore, if SeaTools indicates that the drive is failing, Seagate recommends backing up your data immediately and replacing your drive.
Please see our Warranty Information page for replacement information.
It appeared suddenly, without warning:
Each Seagate drive engages in regular self-tests, and most computers automatically run regular SMART tests on the hard drive(s) installed on them. SMART tests indicate whether a drive is approaching imminent failure. Thus, if a SMART error appears suddenly, it virtually always means, unfortunately, that the drive is about to fail and should be replaced.
A third-party SMART software issued an alert:
With the backing of personal computer manufacturers, the disk drive industry adopted an analysis system in the 1990's called Self Monitoring Analysis and Reporting Technology or SMART. The idea then and today is to predict a failure before it happens. Various attributes are being monitored and measured against certain threshold limits. If any one attribute exceeds a threshold then a general SMART Status test will change from Pass to Fail.
Seagate uses the SeaTools diagnostic software to test the SMART status of the drive. As a practical matter, the technology supporting SMART is constantly being improved. Each new design incorporates improvements that increase the accuracy of the SMART prediction. As a matter of policy, Seagate does not publish attributes and thresholds.
Please remember that these third-party programs do not have proprietary access to Seagate hard disk information, and therefore often provide inconsistent and inaccurate results. SeaTools is more consistent and more accurate and is the standard Seagate uses to determine hard drive failure.
Error Messages:
Black screen when Windows is booting
See Microsoft Knowledge Base Article
Delayed write failure error message
If you encounter a delayed write failure, please check the following things:
- Confirm the cable is firmly connected to the drive
- If the drive cables come loose repeatedly, use locking SATA cables or reposition the drive in the case so that pressure/tautness on the cable is reduced.
- If the problem continues, consider replacing your SATA cable.
- Confirm you are using the current SATA driver from the manufacturer of your SATA motherboard/controller.
- Test the drive using SeaTools Bootable.
Errors from SeaTools
A FAIL result means two things:
- You should make sure your data is completely backed up. If further assistance is needed, please contact Seagate Support for assistance in recovering your data.
- You should replace the drive.
Check the BIOS
The BIOS is a basic status monitor for the state of your computer and its devices.
Access the BIOS by rebooting the computer and, while it is in the process of booting, before the Windows screen appears, press the key that will open the BIOS. This key will vary by computer make and model, but it is often Escape, Delete, F1, or F2. Consult your computer manufacturer if you are unable to enter the BIOS.
Sometimes the reboot will proceed too quickly for you to be able to press the BIOS key in time. In this case, shut down the computer and wait for it to cool a little (probably at least 5 minutes). Then boot the computer again and retry.
Most new computers will automatically detect devices through the system setup program (CMOS or BIOS). As the system starts, the auto-detect feature may display the drive model number on screen. Seagate drive model numbers begin with the letters ST. Some Serial ATA BIOS have a system setup that is not contained within the normal motherboard BIOS. If this is the case, the Serial ATA drive will only be displayed in this Serial ATA BIOS message. Please consult the motherboard or Serial ATA controller documentation for assistance with entering into the Serial ATA BIOS setup.
Ensure that the SATA port to which your drive is connected is enabled. If in doubt, enable all SATA ports unless instructed otherwise by the BIOS. My drive is not detected in the BIOS My drive is detected in the BIOS.
If the drive is not detected in the BIOS
- Verify Cabling: The cause of non-detection may be faulty cabling.
- Replace the power cable and the data cable for the drive in question with cables that are known to be in good working order.
- Connect in a Second Computer (if available).
- Connect to an External Enclosure (Please verify if the enclosure is compatible with the hard drive).
If the drive is detected in the BIOS
Since the drive is detected in the BIOS but has stopped booting correctly, the culprit may be faulty cabling. Replace the power cable and the data cable for the drive in question with cables that are known to be in good working order.
If the problem persists, the most likely culprit may be a corrupted operating system. In this case, a Windows repair may be necessary.
Important: A Windows repair is potentially data destructive! If your data is backed up elsewhere and/or you don't need the data recovery, please proceed with the instructions to repair Windows, otherwise do not proceed with the steps below!
Warning: This will very probably erase all data on the drive.
- Insert and boot from your Windows install disc to perform a Windows Repair/Restore.
- Disconnect all external storage devices such as external USB, FireWire, and eSATA drives, jump/thumb/flash drives, cameras, and printers before proceeding with a Windows repair or recovery. Failure to disconnect such devices could result in serious data corruption.
- Boot up the computer.
- Connect Windows bootable media.
- Reboot the computer, and it should boot up into the Windows media source.
- Select to perform a repair or restore action, and follow the steps provided there.
- If the repair or restore fails, the following articles may be of assistance:
- If the drive successfully passes the diagnostics (but the Windows repair/recovery failed), then the drive itself is most probably safe to continue using. You should therefore, attempt to erase the drive and reinstall the operating system.
The simplest way to reinstall the operating system (and probably erase the data, though that does not happen every time) is to insert the Windows install media and reboot the computer. The option to repair Windows should appear as well as an option to reinstall Windows. Since the repair has failed, simply choose to reinstall Windows.
If that fails to reinstall Windows, a stronger erase is probably required. Seagate's utility SeaTools Bootable can perform a quick, a timed, or a Overwrite full erasure (known as a zero-fill) of the drive. In this case, a full zero-fill is probably the best option. This can take many hours depending on many factors, including the drive capacity, so leave adequate time for this. If you are short on time, attempt a timed zero-fill of at least a few minutes.
Connect Windows bootable media and reboot the computer. You should be able to install Windows as if from scratch.
When the storage drive is no longer detected
If a Serial ATA drive, installed as additional storage in your computer, was previously detected but is no longer detected, this set of troubleshooting steps will attempt to get the drive detected again, or to conclude whether the drive has failed and should be replaced.
If a SMART error has recently appeared on your computer, this generally means drive failure is imminent or has already occurred. If you have received a SMART error, we strongly recommend that you stop everything and make an immediate backup of any and all important data contained on this drive that is not already backed up.
Check the Partition Status
To check the partition status, please follow the steps:
- Windows 8/8.1/10/11: Press the Windows key + X and select Computer Management, or Windows 7/Vista/XP: Right-click on (My) Computer and choose Manage.
- In the left column, select Disk Management.
- Locate the storage drive in the lower window. Disk 0 is usually the boot drive. Disk 1 or Disk 2 may be the additional storage drive.
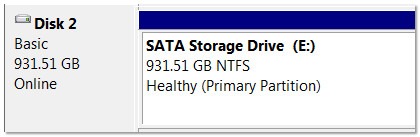
If the drive is detected there and the coloured bar to the right is still dark blue (see figure), follow the steps to Reset the Drive Letter.
If the drive is not detected in the lower window of Disk Management at all, please check the BIOS.
If your drive is detected there but the coloured bar is black (see figure) or some other colour, this means that the partition has become lost.
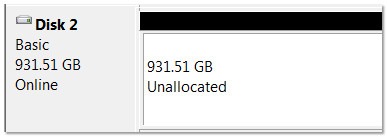
Lost Partition
A black bar in Disk Management means that the partition has become lost. At this point, we must ensure the safety of your data.
Is the data on this drive backed up elsewhere, or do you need to try to recover it?
If you were unable to access the data, please contact Seagate Support for assistance in recovering your data.
If you have data saved elsewhere, proceed with the Diagnostics and Reformat instructions below.
Diagnostics and Reformat
Since the data is backed up, or you do not need it, we can proceed to diagnostics and reformatting the drive
Warning: Formatting the drive will erase all the data on the drive!
Perform a diagnostic on the drive with SeaTools Bootable.
If the drive fails, please begin a warranty replacement order online.
- If the drive passes, reformat the drive using Windows Disk Management.
- Reset the Drive Letter
If the drive is no longer detected in (My) Computer/This PC or Windows File Explorer, but it is displaying a blue bar in Disk Management, Windows has probably lost track of the drive letter. Please follow these steps:
- Attempt to perform a checkdisk action on the drive. See Document ID: 184611 for instructions.
- Remove any potential conflicts:
- Power down the computer.
- Disconnect all other storage devices, external hard drives, thumb drives, printers and cameras.
- Power the computer up again and retry detection.
- If the drive is detected properly, add the disconnected devices one by one until you find the one that is causing the problem.
- Reassign devices to unused drive letters to avoid conflicts in the future. See this Microsoft article for instructions.
I am attempting a new installation of a bootable Serial ATA drive in my PC and it is not detected correctly
Once you connect a new Serial ATA drive in your computer, there remains more to do to get your drive working.
First of all, often, users want to install a new drive in order to upgrade to a larger hard drive in their computer. This usually means that the user wants to copy all the data from the older hard drive to the newer drive, then install the newer drive as the bootable drive. To upgrade to a new drive, copying your data from the old drive to a new one, see Document ID: 007717.
See also Document ID: 196169 for more information on installing drives and Document ID: 188411 about the proper drivers in Windows.
Install Windows
If you are simply going to install a new copy of Windows (the operating system), you first need to format and partition the drive, and then install Windows:
- Disconnect all external storage devices such as USB, FireWire, and eSATA drives, jump/thumb/flash drives, cameras, and printers before proceeding with a Windows repair or recovery. Failure to disconnect such devices could result in serious data corruption.
- Connect Windows bootable media.
- Power down the computer.
- Install the drive physically into the computer.
- Boot up the computer.
- The Windows installation process should begin, as the computer boots from the installation media. Follow the guidance of the installation program.
- It will take you through a process of several steps, including partitioning and formatting the drive. You can choose the default setting - one big partition - or choose to partition the drive into multiple different partitions, as you prefer. It will then install Windows. Once it is complete, it will most probably ask you to remove the bootable media source and reboot the computer.
- Once this is done, you should be able to boot into Windows, and the installation is complete.
If you correctly installed the drive and it is not detected in the BIOS, please check the motherboard age.
Motherboard Compatibility
Some older computer motherboards are unable to support modern Serial ATA drives.
If your motherboard only supports SATA1 (1.5 Gbits/sec transfer rate) and you are installing a SATA2 (3.0 Gbits/sec) or SATA3 (6.0 Gbits/sec) drive, the motherboard may not detect the drive. There are four options in that case:
- Obtain an add-on controller card that can support more modern drives and connect the drive to that card.
- (For Barracuda 7200.11 drives and older, as well as certain Barracuda 7200.12 models) You can place a jumper on the drive to slow it down to 1.5 Gbits/sec, so older motherboards can support it.
- Use an older drive.
- Update your computer equipment or obtain a newer computer.
Please make sure if your computer does support SATA2 (3.0 Gbits/sec) drives at least.
For additional information, please contact the motherboard manufacturer.
Installing a NEW Storage Drive
Once you connect a new Serial ATA drive in your computer as additional storage, the drive must first be formatted to be accessible.
First, please see Document ID: 196169 for more information on installing drives and Document ID: 188411 about the proper drivers in Windows (though if your computer's boot drive is SATA, there should be no need for additional drivers).
Once you have reviewed those articles for any relevant information, you may proceed with formatting the drive.
Formatting the Drive
Before the drive can display in (My) Computer/This (PC) or Windows/File Explorer, it must be formatted in Windows. Please see the following Microsoft Disk Management article for instructions: Instructions in Windows 7-11.
Please check the motherboard compatibility if the drive is not detected in the Disk Management application.
My drive's capacity is lower than I expected
If your drive is larger than 2 Terabytes, please see Document ID: 218619.
If your drive is otherwise displaying a lower capacity than you believe was advertised, please see Document ID: 172191 for all relevant information.
Noisy Drive
Seagate hard drives do not contain audio speakers. Some failure mechanisms may make a regular repeating beep from the computer's internal speaker. This may or not be hard drive related. Check your system documentation for an explanation of system beep codes. If a drive failure is possible, it is always important to make an immediate backup. Some whining noises can also be caused by mounting issues, due to a high-frequency vibration in the mounting hardware.
Abnormal noises include:
- High-pitched whining sound. This can be an indication of mounting issues, abnormal function, or a potential drive failure. Check the drive's mounting hardware to rule that out. If the sound is coming from the drive, but the drive is still functional, you should first make sure that the data on the drive is backed up, then use SeaTools to diagnose the drive.
- Repeated, regular tapping, beeping, or clicking are also possible indicators of abnormal function, or a potential drive failure. Two hard clicks at start up and then a boot error message or system shutdown is a symptom of a failed drive. Check your cables and connections in case they might have become loose. You can use SeaTools Bootable to diagnose the drive. If SeaTools fails to function properly or is unresponsive, replace the drive.
- Grinding. If you hear grinding coming from the drive, you should immediately power down the drive to avoid further damage to the drive that would make any data recovery attempts more difficult, if not impossible.