Was this content helpful?
How could we make this article more helpful?
Connecting S3 Clients
This guide explains how to configure third-party clients including AWS CLI, Cyberduck, Mountain Duck, or S3 Browser to manage data in Lyve Cloud. Lyve Cloud is an S3-compatible storage service for data-intensive applications such as data backup and analytic workloads, that leverage multi-petabyte data lakes. You can also use any other compatible third-party client to copy and move files, manage files and folders, and synchronize folders between Lyve Cloud and your local storage, once you've established a connection.
This document and its subtopics provide instructions about how to:
- Configure Cyberduck, Mountain Duck, S3 Browser, or rclone to connect to Lyve Cloud.
- Upload, download, and delete files, and how to best manage files and folder.
- Disconnect from the server.
Using Cyberduck
Use Cyberduck to connect with Lyve Cloud and transfer your data. For more information, review the Cyberduck Tutorial and Cyberduck Quick Reference Guide.
Prerequisites
- Download and Install Cyberduck.
- Register the S3 (HTTPS) profile for preconfigured settings. For more information, see Generic S3 profiles.
To enable and register the S3 (HTTPS) profile:
- Select Edit and then Preferences. For Mac users, select Cyberduck and then Preferences.
- In the Profiles tab, choose S3 (HTTPS) from the connection profiles list.
Alternatively, to register the S3 (HTTPS) profile:
- Open S3 (HTTPS) profile connection profile file. Copy the file contents into a notepad/any text editor.
- Save the notepad file name with .cyberduckprofile extension and change the Save as type to All Files.
- You need both the access key and secret key for each account you plan to connect with Cyberduck. For more information, see Creating service accounts.
Connect Cyberduck to Lyve Cloud
Bookmarks store the details of the connection to easily re-connect to the server.
To connect Cyberduck to Lyve Cloud:
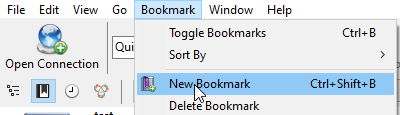
- In Cyberduck, select Bookmark|New Bookmark. Mac users: Select + in the bottom left to add a new bookmark.
- Select the S3 (HTTPS) protocol from the list.
- Enter the following mandatory details to add your connection to Lyve Cloud:

| Field Name | Description |
|---|---|
| Nickname | Enter a name for the bookmark. |
| URL | Displays the URL once you enter the server and access key in the following format:http:// <Access Key ID><Server> |
| Server | Enter Lyve Cloud S3 endpoint. For more information see S3 API endpoints. Lyve Cloud supports only region-specific S3 endpoints. To access buckets created in different regions in the S3 client, add an endpoint connection for each of the regions. Tip—Copy the URL without https:// |
| Port | Enter 443 as the port number to access the server. |
| Access Key ID | Enter your access key, a private key for authentication to connect a bucket created in Lyve Cloud. The access key is displayed when you create a new service account in Lyve Cloud. A service account contains bucket credentials for Lyve Cloud to access a bucket. For more information, see Creating service accounts. |
| Secret Access Key | Enter your secret key, a private key password for authentication to connect a bucket created in Lyve Cloud. The secret key displays when you create a new service account in Lyve Cloud. For more information, see Creating service accounts. |
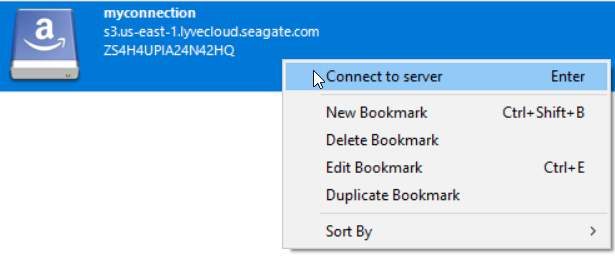
- The bookmark is displayed once you close the window. Right-click the bookmark and select Connect to Server.
- Select Continue to establish the connection.
- View the buckets available in the created bookmark once the connection is established.
- On the Cyberduck client, the Disconnect button is displayed in the top right corner. A green dot appears to the right of active bookmarks, signifying an established connection. If no connection is established, the Disconnect icon is greyed out.
- Right-click the bucket or select Actions to perform various operations or actions. For more information, see Managing data.
Video: Lyve Cloud - How to connect Cyberduck to Lyve Cloud
Seagate on Vimeo: Lyve Cloud - How to connect Cyberduck to Lyve Cloud
Managing data
Perform various actions once a connection is established between Cyberduck and Lyve Cloud. For more information, see Cyberduck Help.
Uploading data to a bucket
To upload data to a bucket:
- Select and right-click the bucket and select Upload and choose the file to upload.
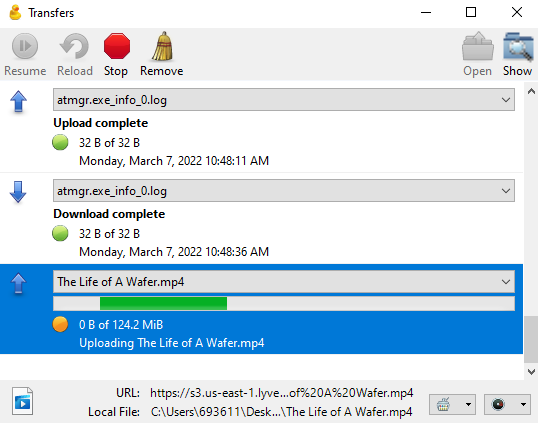
- After the file transfer progress status is complete, you can view the file.
- Accept the certification installation and select Continue.
Downloading data to local storage
To download data to local storage:
- Expand the bucket where files are available.
- Right-click the file to download and select one of the following options:
- Download: Download a file to the predefined path.
The Transfers dialog displays the connection status. Select Continue in the Download dialog. You can view the remote file location and the local file location, but you cannot change the download path. Once the download is complete, the Transfers dialog displays the status. - Download As: Download a file in the required format.
Select Save as Type from the list, and select Save. - Download To: Download the file to a specific location.
Select the download folder in the Browse to Folder dialog, or create a new folder. Select Save.
Deleting data from the bucket
To delete data from the bucket:
- Expand the bucket from which to delete data.
- Right-click the data file, and select Delete.
- Select Delete in the Confirmation prompt.
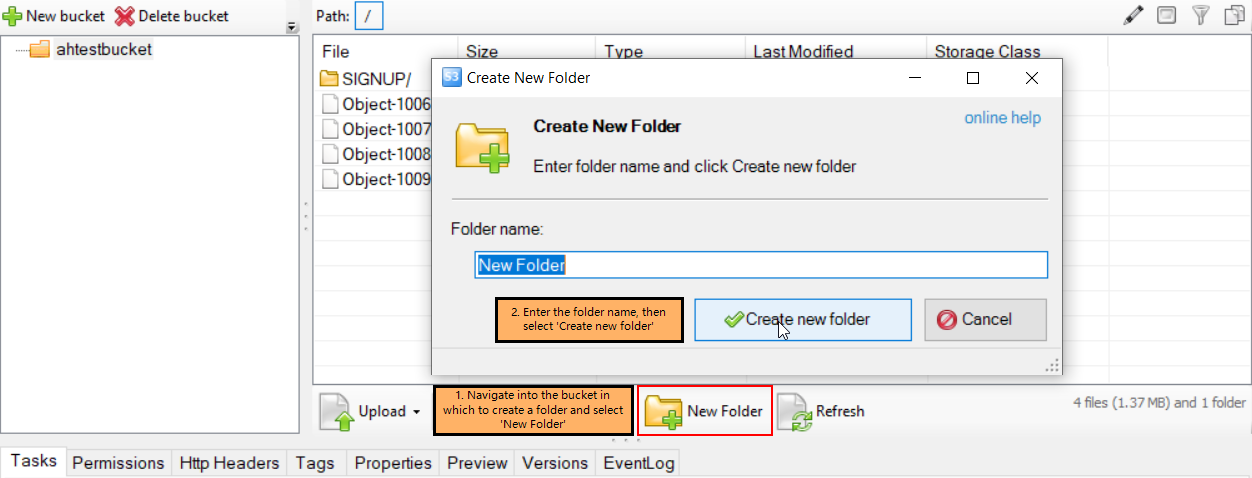
Creating a new folder
To create a new folder:
- In Cyberduck, select Select and open a bucket.
- Right-click inside the bucket and select New Folder.
- Enter the folder name in the Create New Folder screen.
Deleting a folder
To delete a folder:
- Navigate into the bucket from which to delete the folder.
- Right click the folder and select Delete.
- Select Delete in the confirmation prompt.
Disconnecting Cyberduck from Lyve Cloud
To disconnect Cyberduck from Lyve Cloud:
- Open Cyberduck to view all the available bookmarks or connections.
- Select Disconnect in the top-right corner on the Cyberduck client.
Using S3 Browser
Use S3 Browser to connect with Lyve Cloud and manage your data transfer. For more information on S3 Browser see, S3 Browser Help.
Prerequisites
- You will need the access key and secret key for each account you’ll be using to connect with S3 browser. For more information, see Creating service accounts.
Connect S3 Browser to Lyve Cloud
To connect S3 Browser to Lyve Cloud:
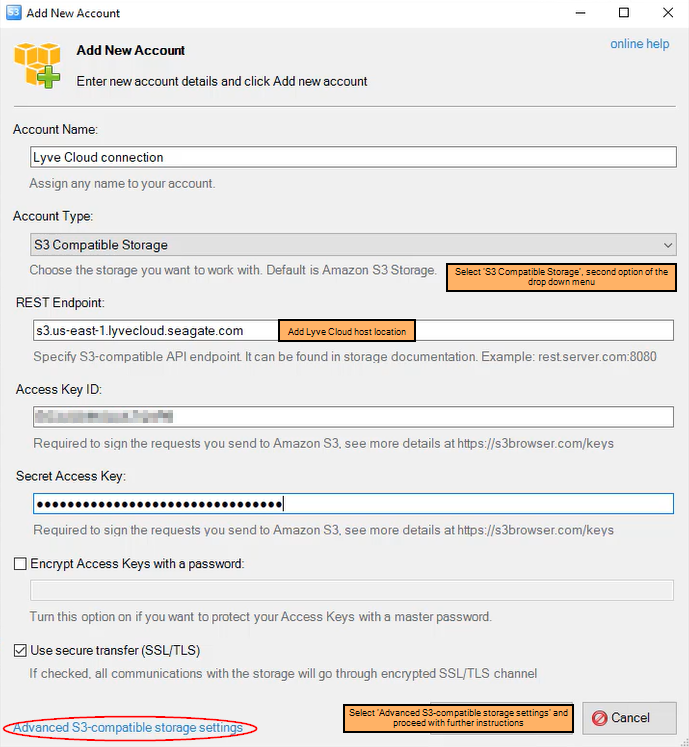
- Open S3 Browser and select Accounts, then select Add New Account.
- Enter the following mandatory details:
| Field Name | Description |
|---|---|
| Account name | Enter an account name. |
| Account type | Enter the account type. Select S3 Compatible Storage from the list. |
| REST Endpoint | Enter Lyve Cloud S3 endpoint. For more information see S3 API endpoints. Currently, Lyve Cloud supports only region-specific S3 endpoints. To access buckets created in different regions in the S3 client, add an endpoint connection for each of the regions. |
| Access Key | Enter your access key.The access key displays when you create a new service account in Lyve Cloud. A service account contains the bucket credentials for the Lyve Cloud bucket.For more information, see Creating service accounts. |
| Secret Key | Enter your secret key.The secret key displays when you create a new service account in Lyve Cloud.For more information, see Creating service accounts. |
| Use secure transfer (SSL/TLS) | Select this option to ensure all communication with the storage passes through encrypted SSL/TLS. |
| Advanced S3 Compatible storage settings | Select the signature version and addressing model in the advanced settings. For more information, see Advanced S3 compatible storage settings below. |
Advanced S3 compatible storage settings
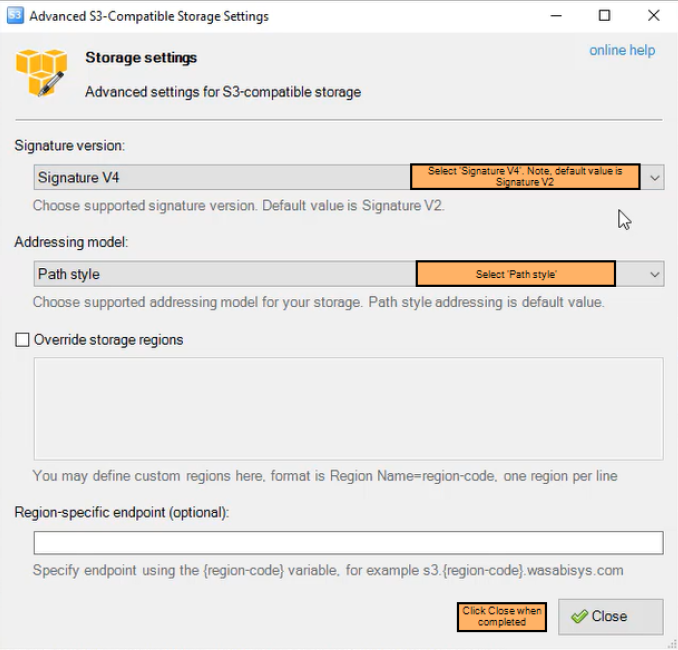
| Field Name | Description |
|---|---|
| Signature Version | Select Signature V4.For more information, see S3 Browser's help documentation. |
| Addressing Model | Path Style is selected by default and is the recommended setting.For more information, see S3 Browser's help documentation. |
Video: Lyve Cloud - How to use S3 Browser with Lyve Cloud
Seagate on Vimeo: Lyve Cloud - How to use S3 Browser with Lyve Cloud
Managing data
Perform various actions once the connection between S3 Browser and Lyve Cloud is established. For more information, see S3 Browser's help documentation.
Uploading data to a bucket
To upload data to a bucket:
- Select the bucket, and then select Upload.
- Select Upload file(s) or Upload folder(s).
- Select the file, and then select Open.
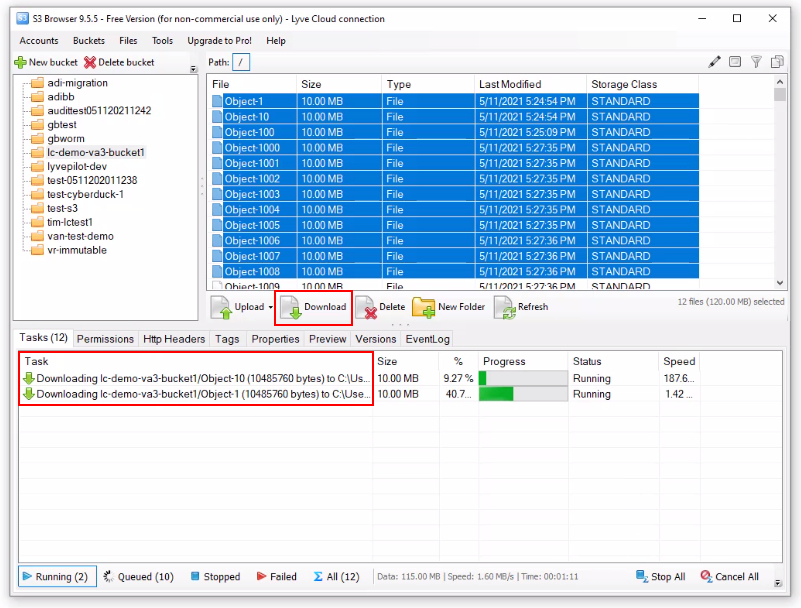
Downloading data to local storage
To download data to your local machine:
- Select the bucket where the data file is available.
- Select the folder or file(s) to download, and then select Download.
The Tasks tab displays the upload or download progress.
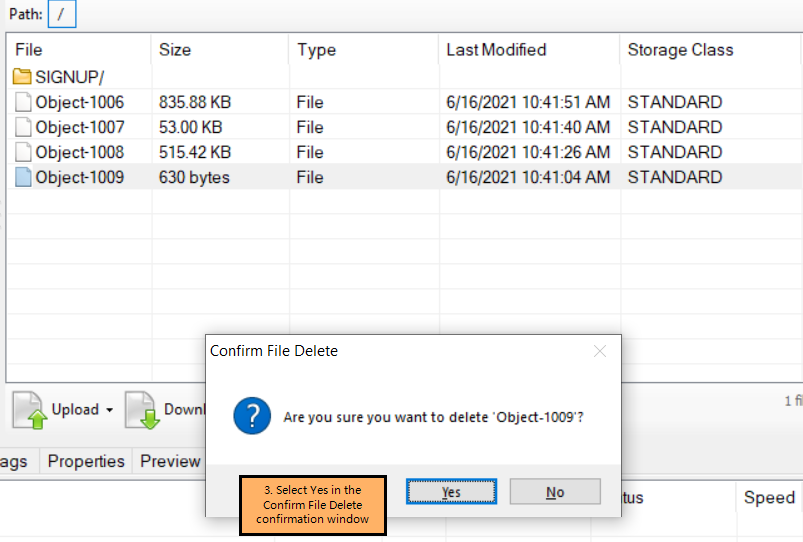
Deleting data from a bucket
To delete data from a bucket:
- Navigate into the bucket, select the file from the right pane, and select Delete.
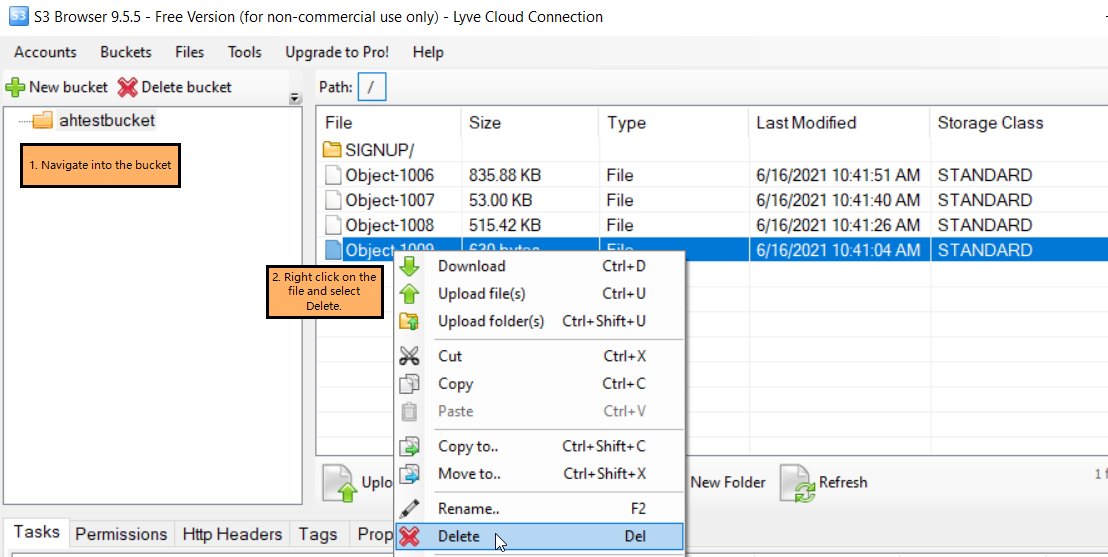
- Select Yes in the Confirm File Delete dialog.
Creating a new folder
To create a new folder:
- Navigate into the bucket in which to create a folder.
- Select New Folder. Enter a folder name, and then select Create New folder.
Deleting a folder
To delete a folder:
- Open the bucket, right-click the folder to delete, then select Delete.

- Select Yes in the Confirm File Delete dialog.
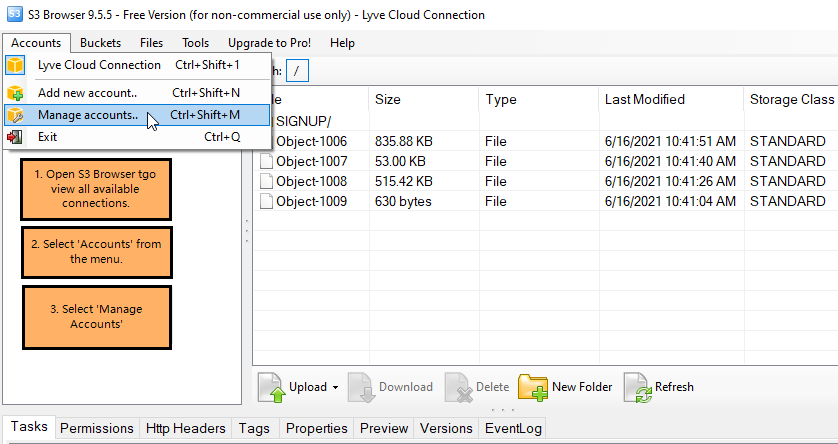
Disconnecting S3 Browser from Lyve Cloud
To disconnect S3 browser:
- Open the S3 Browser to view all available connections.
- Select Accounts from the menu.
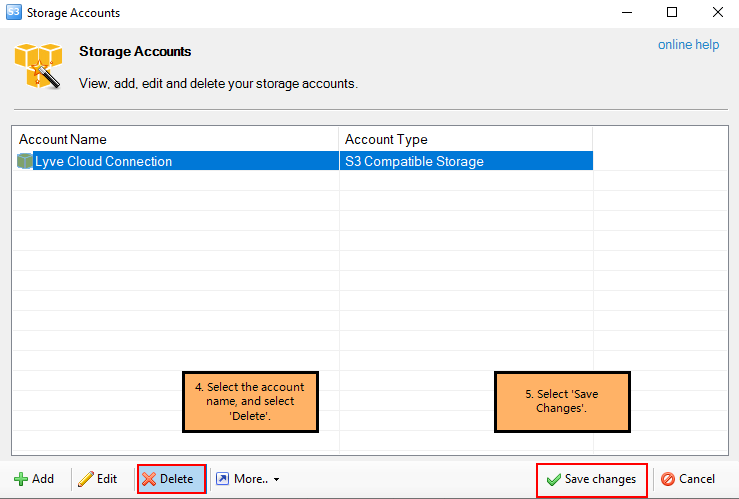
- Select Manage Accounts. Select the account name, and then select Delete.
- Select Save Changes.
Using Mountain Duck
Use Mountain Duck to mount your Lyve Cloud storage as a disk in the Windows File Explorer or Mac OS Finder, and manage your files through a familiar interface. For more information on Mountain Duck see, Mountain Duck Help.
Prerequisites
- You will need the access key and secret key for each account you’ll be using to connect with S3 browser. For more information, see Creating service accounts.
Connect Mountain Duck to Lyve Cloud
To connect Mountain Duck to Lyve Cloud:
- Download Mountain Duck’s S3 (HTTPS) profile for preconfigured settings. For more information, see their Generic S3 profiles documentation.
- Open the downloaded file with Mountain Duck. The New Connection dialog appears.
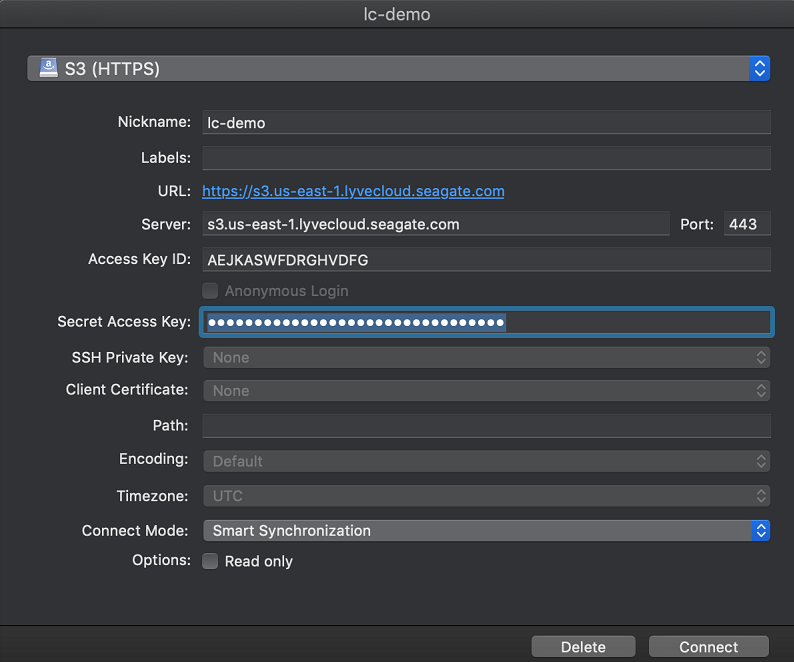
- Enter the following information:
| Field Name | Description |
|---|---|
| Nickname | Enter a unique name. This will be the name of your connection bookmark. |
| Server | Enter the endpoint based on the region. To select endpoint see, the section called “S3 API endpoints”.Currently, Lyve Cloud supports only region-specific S3 endpoints. To access buckets created in different regions in the S3 client, add an endpoint connection for each of the regions. |
| Port | This should populate as 443. If not, enter that port number. |
| Access Key ID | Enter your access key ID. For more information, see the section called “Creating service accounts”. |
| Secret Access Key | Enter your secret key.For more information, see the section called “Creating service accounts”. |
| Drive Letter(Windows only) | Enter a drive letter so that Mountain Duck always uses that same letter for the mounted drive. |
- Once the fields have been filled, select OK. This creates your connection bookmark.
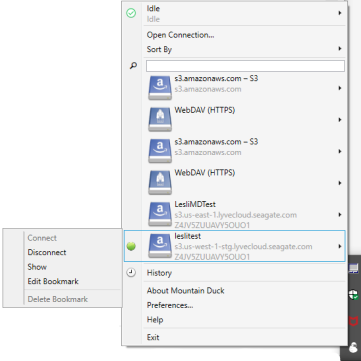
- Select the Mountain Duck icon in the Windows system tray or the macOS' menu bar.
- Select your connection bookmark, and then select Connect. When the connection is created, a notification appears.
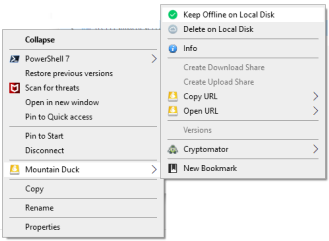
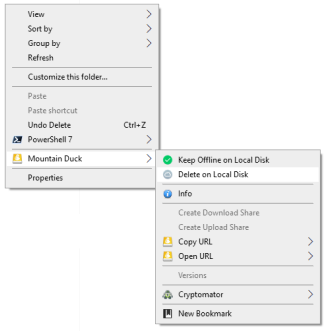
- Select the new drive and right-click or Ctrl+click in the File Explorer or Finder to bring up the context menu. Right-click in the folder to get the context menu for macOS.
- Select Mountain Duck and select Keep offline on local disk to sync all the data to local drive.
When connected, the drive and folder contents display their sync status. Look for a circle in the lower-left corner of the folder or file icon. Once mounted, all the files are stored on your local drive.
| icon | Meaning |
|---|---|
| In Progress. Synchronization is in progress for this item. | |
| In sync. This item is selected to be synced, and the content will always be available offline. | |
| Sync error. This item cannot be synchronized. | |
| Up to date. This item is synced and up to date. | |
| Ignored. The file is available in its temporary location and never synced to cloud or remote storage. | |
| Paused. The sync on that item is paused. | |
| Online only. This item is available in the cloud but can be opened and edited when you have an active connection to the server. |
To learn more about various Mountain Duck options and sync modes, see Mountain Duck’s Help documentation.
Video: Lyve Cloud - How to mount Lyve Cloud as a local drive on Windows with Mountain Duck
Seagate on Vimeo: Lyve Cloud - How to mount Lyve Cloud as a local drive on Windows with Mountain Duck
Managing data
Once your Lyve Cloud storage is mounted as a drive, managing your files works much the same as working in any other network drive. Many of these operations may only be performed once a given bucket has synced with the local drive. Learn more about Mountain Duck’s user interface documentation.
Copying data
To copy data:
- Select the data from your source drive and copy it.
- Navigate to your destination and paste your data.
You can also drag and drop the data from one folder to another. If the bucket's or your service account’s permissions do not allow you to write to that bucket, an error message appears.
Deleting bucket data
To delete bucket data:
- Navigate to the synced bucket from which you want to delete the data.
- Right-click or Ctrl+click the file or folder inside the bucket to bring up the local context menu.
- Select Mountain Duck, and then select Delete on Local Disk.
- Right-click or Ctrl+click the file and select Delete, and then select Yes in the confirmation box to delete the object permanently from the bucket.
Creating a folder in a bucket
To create a folder in a bucket:
- Navigate into the bucket where you want to create a new folder.
- Right-click or Ctrl+click the bucket and select New Folder.
- Type a new folder name, and then select Enter.
The new folder immediately begins syncing with its Lyve Cloud destination.
Disconnecting Mountain Duck from Lyve Cloud
To disconnect Mountain Duck from Lyve Cloud:
- In the Windows system tray or the macOS menu bar, select the Mountain Duck client icon. The menu lists all of your connection bookmarks.
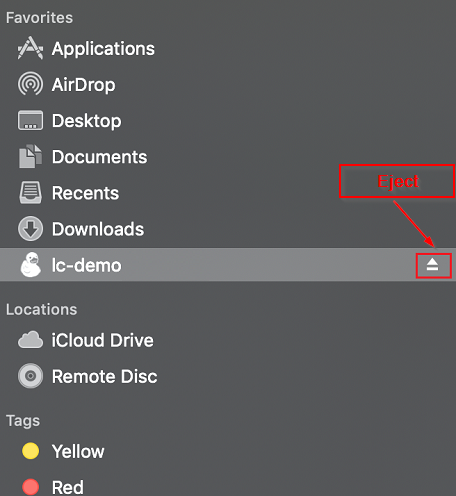
- Windows: Select a connection bookmark, and select Disconnect. macOS: Select the Eject icon next to the connection bookmark, or click a connection and select Eject.
A notification pop-up appears when the connection is broken.
| Windows | Mac |
|---|---|
 |
 |
Using Rclone
Use rclone to connect with Lyve Cloud and manage your files from the command line, or mount the cloud storage as a drive.
Prerequisites
You will need the access key and secret key for each account you’ll be using to connect with Rclone. For more information, see Creating service accounts.
Connecting to Lyve Cloud from Linux
Installing Rclone
- Download Rclone for Linux, then extract the rclone binary to your desired location.
- To use Rclone, open a terminal window and navigate to the directory where you saved the executable.
Configuring rRlone to connect to Lyve Cloud
To configure a remote connection with Rclone:
- Run rclone config to setup and select
nfor a new remote.
No remotes found - make a new one
n) New remote
s) Set configuration password
q) Quit config
n/s/q> n
- Enter a name for the configuration.
name> <Name>
- Select s3 storage.
Type the storage to configure.
Choose a number from below, or type in your own value
1 /Fichier
 \(fichier)
2 /Akamai NetStorage
  \(netstorage)
3 / Alias for an existing remote
 \ (alias)
4 / Amazon Drive
 \ (amazon cloud drive)
5 / Amazon S3 Compliant Storage Providers including AWS, Alibaba, Ceph, Digital Ocean, Dreamhost, IBM COS,  Lyve Cloud, Minio,  RackCorp, SeaweedFS, and Tencent COS
 \ (s3)
6 / Backblaze B2
 \ (b2)  [snip]
46 / seafilehttp Connection
  \ (seafile)
 Storage> 5
- Choose Lyve Cloud as the storage provider.
Choose the S3 provider.
Choose a number from below, or type in your own value
Press Enter for the default ("")
  1 / Amazon Web Services (AWS) S3
   \ (AWS)
 2 / Alibaba Cloud Object Storage System (OSS) formerly Aliyun
   \ (Alibaba)
 3 / Ceph Object Storage
   \ (Ceph)
 4 / Digital Ocean Spaces
   \ (DigitalOcean)
 5 / Dreamhost DreamObjects
   \ (Dreamhost)
 6 / IBM COS S3
   \ (IBMCOS)
 7 / Seagate Lyve Cloud
   \ (LyveCloud)
 8 / Minio Object Storage
   \ (Minio)
 9 / Netease Object Storage (NOS)
   \ (Netease)
10 / RackCorp Object Storage
   \ (RackCorp)
11 / Scaleway Object Storage
   \ (Scaleway)
12 / SeaweedFS S3
   \ (SeaweedFS)
13 / StackPath Object Storage
   \ (StackPath)
14 / Storj (S3 Compatible Gateway)
   \ (Storj)
15 / Tencent Cloud Object Storage (COS)
   \ (TencentCOS)
16 / Wasabi Object Storage
   \ (Wasabi)
17 / Any other S3 compatible provider
   \ (Other)
Provider>7
- Enter false to enter your credentials.
Get AWS credentials from the runtime (environment variables or EC2/ECS meta data if no env vars).
Only applies if access_key_id and secret_access_key is blank.Enter a boolean value (true or false).
Please Enter for the default ("false").Choose a number from below, or type in your own value
   1 / Enter AWS credentials in the next step
    \ "false"
   2 / Get AWS credentials from the environment (env vars or IAM)
     \ "true"
   env_auth>false
- Enter your access key and secret key.
AWS Access Key ID.
Leave blank for anonymous access or runtime credentials.
Enter a string value. Press Enter for the default ("")
    access_key_id> <access key>
AWS Secret Access Key (password)
Leave blank for anonymous access or runtime credentials.
Enter a string value. Press Enter for the default ("")
     secret_access_key> <secret key>
- Leave the region blank.
Region to connect to.
Leave blank if you are using an S3 clone and you don't have a region.
Enter a string value. Press Enter for the default ("")
Choose a number from below, or type in your own value
1 / Use this if unsure.
  | Will use v4 signatures and an empty region.
  \ ()
2 / Use this only if v4 signatures don't work.
  | E.g. pre Jewel/v10 CEPH.
  \ "other-v2-signature"
region> <>
- Specify the endpoint for Lyve Cloud. For more information about endpoints, see S3 API endpoints.
Endpoint for S3 API.
Required when using an S3 clone.
Choose a number from below, or type in your own value.
Press Enter to leave empty.
 1 / Seagate Lyve Cloud US East 1 (Virginia)
   \ (s3.us-east-1.lyvecloud.seagate.com)
 2 / Seagate Lyve Cloud US West 1 (California)
   \ (s3.us-west-1.lyvecloud.seagate.com)
 3 / Seagate Lyve Cloud AP Southeast 1 (Singapore)
   \ (s3.ap-southeast-1.lyvecloud.seagate.com)
endpoint> 1
- Press Enter to skip the location constraint as there is no location constraint
Location constraint - must be set to match the Region.
Leave blank if not sure. Used when creating buckets only.
Enter a string value.
Press Enter for the default ("")location constraint>
- Choose default ACL (private).
Canned ACL used when creating and or storing or copying objects.
This ACL is used for creating objects and if bucket_acl isn't set, for creating buckets too.
Note that this ACL is applied when server-side copying objects as S3
It doesn't copy the ACL from the source but rather writes a fresh one.
Enter a string value. Press Enter for the default ("")
Choose a number from below, or type in your own value
1 / Owner gets FULL_CONTROL.
  | No one else has access rights (default).
   \(private)
2 / Owner gets FULL_CONTROL.
  | The ALLUsers group gets READ access.
  \(public-read)
3 /Owner gets FULL_CONTROL.
  | The ALLUsers group gets READ and WRITE access.
[snip]
acl>1
- Select n to save the default advanced configuration.
Edit advanced config? (y/n)
y) Yes
n) No (default)
y/n>n
- Review the displayed configuration and accept to save the remote and then quit. The config file should look like this:
NAME]
    type = s3
    Provider = LyveCloud
    env_auth = false
    access_key_id = xxx
    secret_access_key = yyy
    region = us-west-1
    endpoint = s3.us-east-1.lyvecloud.seagate.com
    acl = private
- Click y to confirm the configuration.
y) Yes this is OK (default)
e) Edit this remote
d) Delete this remote
y/e/d>y
- Type q to quit the configuration, else select any of the following to edit, delete, rename, copy, Set configuration password.
Current remotes:

Name                 Type
====                 ====
ashrcl               s3

e) Edit existing remote
n) New remote
d) Delete remote
r) Rename remote
c) Copy remote
s) Set configuration password
q) Quit config
e/n/d/r/c/s/q>q
Video: Lyve Cloud - How to configure Rclone
Seagate on Vimeo:Lyve Cloud - How to configure Rclone
Mounting Lyve Cloud as a drive
Prior to mounting Lyve Cloud as a drive, connect and test the connection by viewing the contents of one or more buckets using the rclone ls command.
To mount Lyve Cloud as a drive, use this command where:
- remote is the name of the remote server
- path/to/files is the exact path to the bucket(s)
- path/to/local/mount is the local directory:
rclone mount remote:path/to/files /path/to/local/mount
For more information, see Rclone’s mount command documentation.
Managing data
Here are several of the more commonly-needed commands for viewing and managing your data from the command line. See the Rclone docs, including information on global flags, for additional information.
Viewing information about your buckets and directories
There are three list commands with easily readable output available: ls, lsd, and lsl.
- To list all data in a certain bucket, where remote is the name of the remote and path is the name of the bucket:
rclone ls remote:path [flags]
- To list the directories in a certain remote and see the total directory size, modification time, and number of objects in the directories:
rclone lsd remote:path [flags]
Or
rclone lsd remote: [flags]
- To list all objects in a certain remote and see modification time, size and path where path is the remote path beginning with the bucket name. Any of the filtering options can be applied to this command.
rclone lsl remote:path [flags]
Video: Lyve Cloud - How to use Rclone list commands
Seagate on Vimeo: Lyve Cloud - How to use Rclone list commands
Uploading data to a bucket
- To upload data into a bucket, use either of these commands:
rclone copy C:/path/to/filename remote:path [flags]
rclone copy filename remote:path
- You can also use rclone copy to copy a file or directory to a new location and rename the directory at the same time. Neither of these commands deletes the file from the source, and neither of these commands will copy unchanged files.
- Learn more about copy and copyto.
Video: Lyve Cloud - How to use Rclone Copy-to and Copy-sync Commands
Seagate on Vimeo: Lyve Cloud - How to use Rclone Copy-to and Copy-sync Commands.
Downloading data to local storage
This is the same as copying, but the source path is something in the remote or in a bucket, while the destination path is on your local storage.
rclone copy remote:path C:/path/to/filename [flags]
Delete bucket data
- To delete files in a certain path from a certain bucket:
rclone delete remote:path [flags]
- You can use flags to delete only files with certain characteristics:
For example, to delete files that are over 100MB:
rclone --min-size 100MB delete remote:path
To delete only a specific file:
rclone deletefile remote:path [flags]
Learn more about rclone delete and deletefile.
Creating a new folder
To create a new folder:
- For example, to create a file named blue in the current location:
rclone mkdir blue
Create folders in other paths, or with other permissions, by setting the proper flags. Learn more about mkdir.
Deleting a folder
- To delete an empty folder.
For example, to delete a file named blue in the current location:
rclone rmdir blue
- Add flags to delete folders in locations other than the current directory.
For example, to delete an empty folder named blue that contains other empty folders:
rclone rmdirs blue
The folders must be empty for rmdiror rmdirsto work.
Learn more about rmdirand rmdirs.
Copying data
- First, connect rclone to Lyve Cloud. For step by step instructions, see, Configuring rclone to connect to Lyve Cloud. Once the configuration is complete, the rclone.config file must be updated as:
[REMOTE NAME]type = s3provider = Otherenv_auth = falseaccess_key_id = XXXXXXXXXXsecret_access_key = YYYYYYYYYYYYYYYYYYYYYYYYYYYendpoint = https://s3.us-east-1.lyvecloud.seagate.comacl = privateregion = us-east-1
- Start copying data from the existing cloud provider buckets to the buckets created in Lyve Cloud. To copy data:
$ rclone copy SOURCE REMOTE:[SOURCE BUCKET] <TARGET REMOTE>[TARGET BUCKET>/<PREFIX>]
- To copy all the data, including prefixes, from the source bucket to the target bucket:
$ rclone copy SRT:[ SB ] TRT:[TB]
- To copy all objects with a prefix to the target:
$ rclone copy SRT:[ SB ]/mypath1 TRT:[TB]/mypath1
Deleting a remote from Lyve Cloud
To delete a remote from Lyve Cloud, delete the remote’s name using this command, changing REMOTE_NAME to the name of the remote to disconnect:
rclone config delete REMOTE_NAME [flags]
Learn more about config delete.
Migrating Data
To migrate data:
- Set the Source and the Target as remote. For more information, see the section called “Configuring rclone to connect to Lyve Cloud”.
- Sync the Source and Target remote using rclone sync command.
rclone sync <source remote name>:path <target remote name>:path
- Once the source and the target are synced, all the data from the source is copied, removed or migrated to the target remotely.
- You can use the following flags in the command to check the status of the sync/copy/migration.
--progressDisplays the real-time transfer progress.--interactive: Enables interactive mode and displays interactive for every action taken.
For more information on RClone, see https://rclone.org/s3/.
Video: Lyve Cloud - Use Rclone Delete and Purge commands
Seagate on Vimeo: Lyve Cloud - Use Rclone Delete and Purge commands.