Was this content helpful?
How could we make this article more helpful?
RAID
This chapter provides an overview of the RAID levels supported by LaCie 8big Pro5. RAID levels differ in performance, usable storage capacity, and data‑protection capabilities, depending on the selected configuration and the number of hard drives in the array.
| RAID level | Min. disks | Max. disks | Notes |
|---|---|---|---|
| RAID 0 | 2 | 8 | |
| RAID 1 | 2 | 2 | Only two hard drives are supported for a RAID 1 array. |
| RAID 5 | 5 | 8 | A minimum of five hard drives are required to allow for background initialisation as an option.* |
| RAID 6 | 7 | 8 | A minimum of seven hard drives drives are required to allow for background initialisation as an option.* |
| RAID 10 | 4 | 8 | |
| RAID 50 | 6 | 8 | Can only be created via foreground initialisation. * 8big Pro5 must be disconnected from the host computer during initialisation. |
| RAID 60 | 8 | 8 | |
| * To better understand the difference between a background initialisation and a foreground initialisation, see Initialisation and Formatting. | |||
Review the summaries for each RAID level before selecting your configuration for 8big Pro5 storage. For instructions on creating or modifying a RAID array, see the RAID Manager user manual.
Standard RAID levels
RAID 0
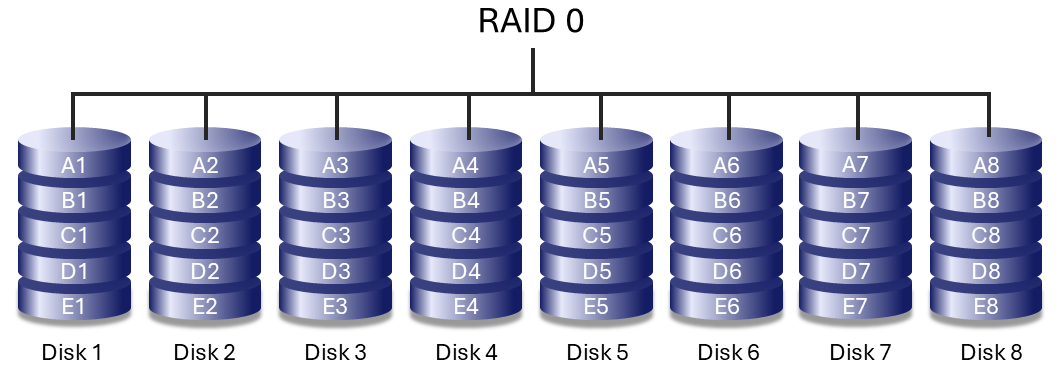
RAID 0 provides the highest sequential performance by writing data across all hard drives in the array (striping). The usable storage capacity equals the combined capacity of all hard drives.
RAID 0 does not provide data protection. If a single hard drive fails, all data in the array is lost. RAID 0 is best suited for temporary or non‑critical data where performance is the primary requirement and data can be restored from another source.
RAID 1
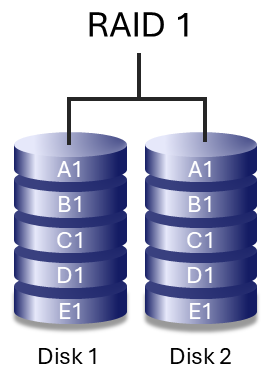
RAID 1 mirrors data between two hard drives, providing enhanced data protection. If one hard drive fails, data remains available on the remaining hard drive.
Because all data is written to both drives, usable storage capacity is reduced by 50%. Write performance is lower than RAID 0, due to the time it takes to write data multiple times. RAID 1 is supported only with two hard drives and cannot be expanded.
RAID 5
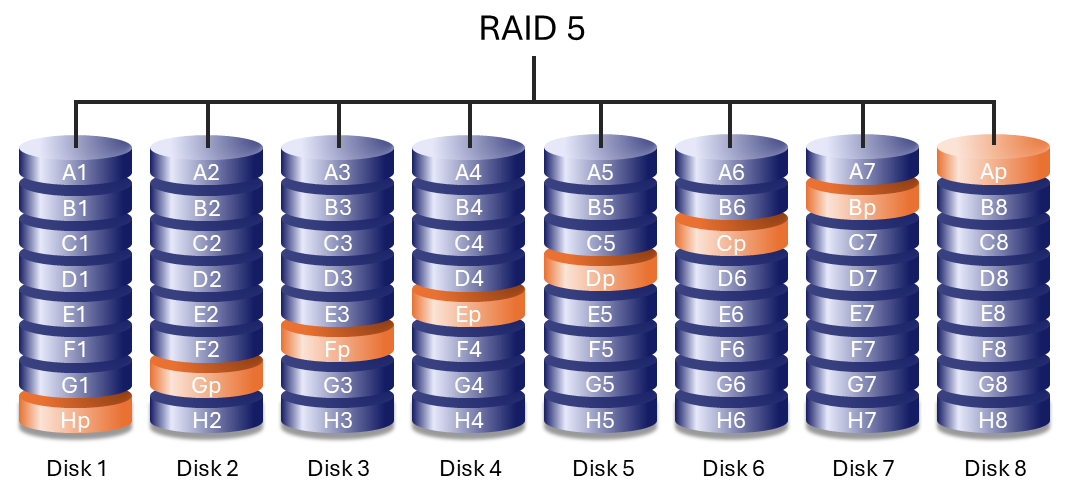
RAID 5 writes data across all hard drives in the array and distributes parity information among them. If one hard drive fails, the array continues to operate and the missing data can be rebuilt onto a replacement hard drive.
If a second hard drive fails before the rebuild process completes, data in the array is lost.
RAID 5 performance can approach that of RAID 0 while providing protection against a single hard drive failure. Usable capacity is calculated by multiplying the capacity of the smallest hard drive by the total number of hard drives in the array, minus one:
Smallest drive capacity × (Total number of drives − 1)
Example 1: An array is assigned five 8 TB hard drives for a total of 40 TB. The equation is:
8 TB x 4 = 32 TB
Example 2: An array is assigned four 16 TB hard drives and one 24 TB hard drive for a total of 88 TB. The equation is:
16 TB x 4 = 64 TB
RAID 6
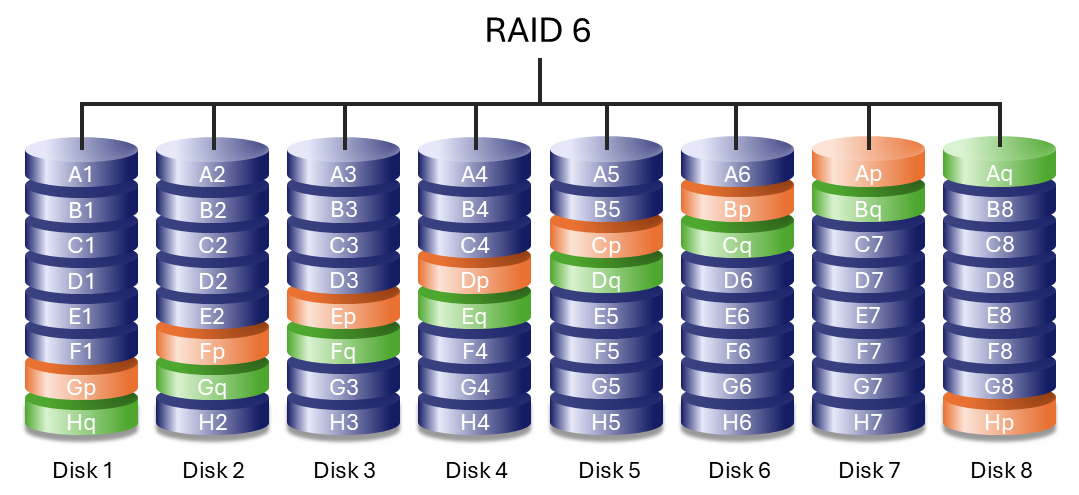
RAID 6 writes data across all hard drives in the array and stores two sets of distributed parity information. This configuration allows the array to withstand the failure of up to two hard drives without data loss.
Rebuilding data after a hard drive failure is slower than RAID 5 due to the additional parity calculations, but RAID 6 provides significantly greater protection for large‑capacity arrays.
Nested RAID levels
RAID 10
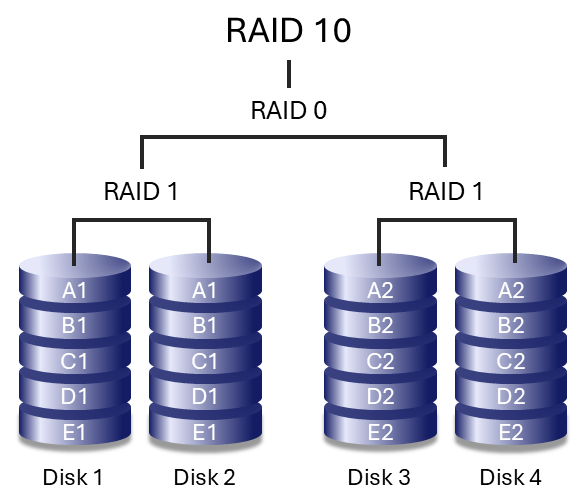
RAID 10 combines the data protection of RAID 1 with the performance benefits of RAID 0. The array is composed of mirrored pairs of hard drives that are then striped together.
RAID 10 can tolerate the failure of one hard drive in each mirrored pair, as long as both drives in the same mirror do not fail simultaneously. This configuration provides strong data protection and high performance, particularly for workloads that involve frequent access to many small files and benefit from higher input/output operations per second (IOPS).
RAID 50
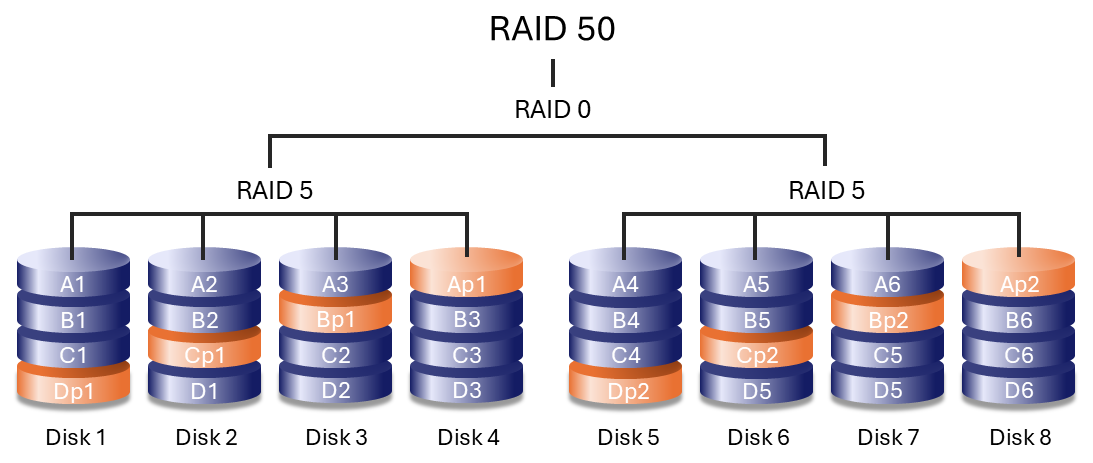
RAID 50 combines RAID 0 striping with RAID 5 parity by striping data across multiple RAID 5 groups. This configuration improves write performance compared to RAID 5 while offering greater fault tolerance than a single RAID level.
A minimum of six hard drives is required. Arrays with a large number of hard drives may take longer to initialise and rebuild due to increased capacity.
RAID 50 can only be created using foreground initialisation. During foreground initialisation, 8big Pro5 must be disconnected from the host computer. For details, see the RAID Manager User Manual.
RAID 60
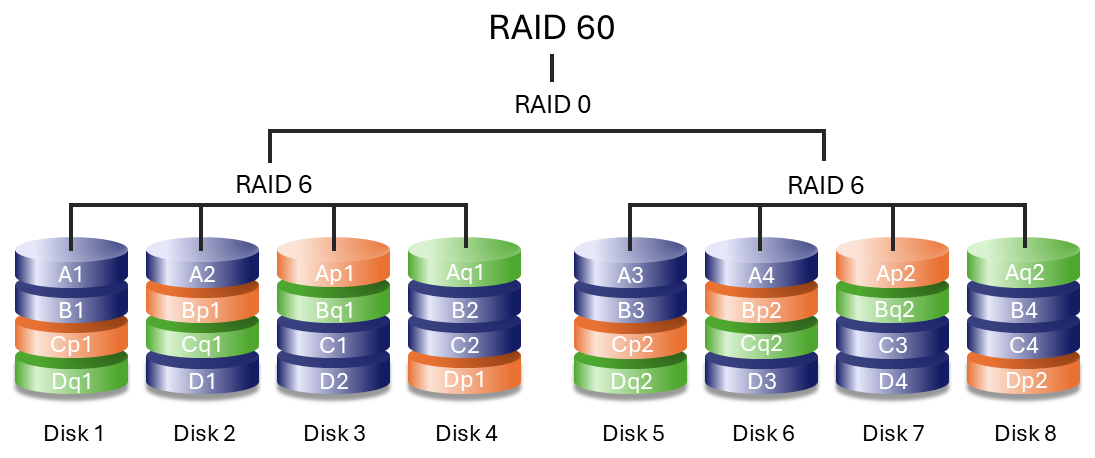
RAID 60 combines RAID 0 striping with RAID 6 double parity by striping data across multiple RAID 6 groups. This configuration offers improved performance compared to RAID 6 while providing high fault tolerance.
A minimum of eight hard drives is required. Because RAID 60 arrays use a large number of hard drives, initialisation and rebuild operations take longer than with standard RAID levels.
RAID 60 can only be created using foreground initialisation. During foreground initialisation, 8big Pro5 must be disconnected from the host computer. For details, see the RAID Manager User Manual.
RAID + Spare
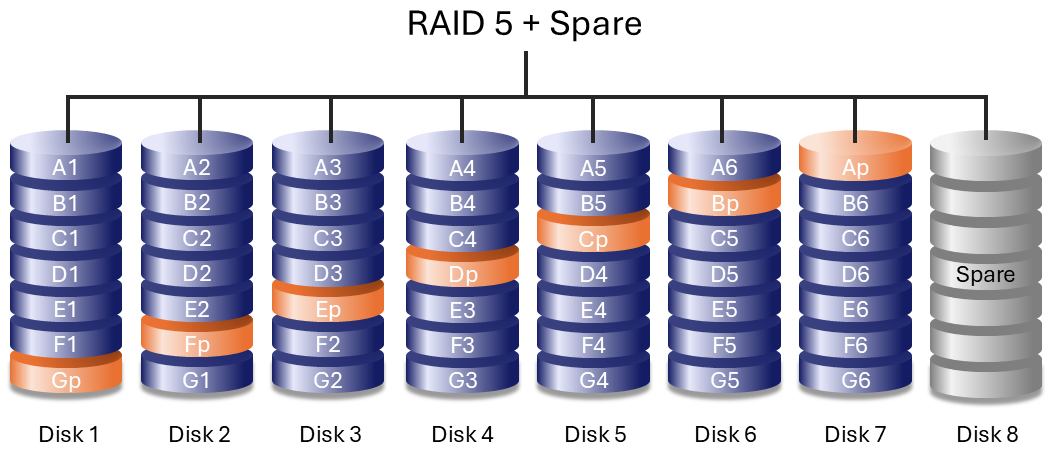
A RAID + Spare configuration includes a reserved hard drive that automatically replaces a failed hard drive. When a hard drive fails, data synchronisation to the spare begins immediately, reducing the time the array operates in a degraded state. Arrays with redundancy that do not include a spare must wait for a replacement drive to start before synchronisation.
- The spare hard drive is not available for data storage during normal operation.
- After synchronisation is complete, you can replace the failed hard drive and assign the new drive as the spare.
- Both dedicated and global spare drives are supported.
See the RAID Manager user manual.
Drive failures and synchronising a spare hard drive
For RAID + Spare arrays, data remains intact when the minimum number of redundant hard drives fail. However, if an additional hard drive fails before or during data synchronisation with the spare, data in the array is lost. See the examples below.
- RAIDs 1 and 5 — One drive has failed and the array immediately begins to synchronise with the spare hard drive. If a second hard drive in the RAID 5 array fails before synchronisation is complete, all data in the array is lost.
- RAID 6 — Two hard drives have failed and the array immediately begins to synchronise the first failed hard drive with the spare. If a third hard drive in the RAID 5 array fails before synchronisation is complete, all data in the array is lost.
- Nested RAID — Nested RAID levels have greater fault tolerances depending upon which of the nested RAID arrays have hard drives that fail.
- RAIDs 10 and 50 — Each of the nested arrays can lose one hard drive. If one of the two nested arrays loses two hard drives before or during the synchronisation, data is lost.
- RAID 60 — Each of the nested arrays can lose two hard drives. If one of the two nested arrays loses three hard drives before or during the synchronisation, data is lost.