Was this content helpful?
How could we make this article more helpful?
Customer Management
S3 API has emerged as the dominant API for storing large amounts of unstructured data. Lyve Cloud Object Storage supports the standard S3 RESTful API. The full API guide is available at:
https://<resellername>.rstorcloud.io/apidoc/index.html#introduction
Sign In As Customer
If you are a non-admin user, sign in as a customer using the following URL:
https://<reseller-name>.lyve.seagate.com/signin
where <reseller-name> is the reseller account name.
If you are an admin, sign in as a reseller.
Customers may access their buckets through a DNS-style or Virtual-Host convention:
- DNS-style: https://<bucket-name>.<endpoint>/<path>
- Virtual-Host: https://<endpoint>/<bucket-name>/<path>
Where <endpoint> is:
- Direct customers: <endpoint-name>.lyve.seagate.com
- Reseller customers: <endpoint-name>.lyve.seagate.com/admin
Access and Configuration
To access the subaccount of a Reseller, use the following URL: https://<reseller-name>.lyve.seagate.com/signin.
Once logged in, the account page gives access to options such as configuring multifactor authentication, changing the account password, and generating access keys.
Create a Bucket
To create a bucket:
- Select Buckets from the top navigation bar.
- Select the Add New Bucket icon in the upper right corner.
- In the dialog, enter the information required to make a bucket. You can select which sites you would like your bucket to be replicated to.
- Through 'Access Mode', buckets can be set as 'Private', 'Public', or 'Custom'. Check the boxes for the permissions that you want to provide. All new buckets are private by default. To grant access to your bucket to the general public (everyone in the world), select Public under 'Access Mode'. Granting public access permissions means that anyone can access files in the bucket.
The format for creating a public bucket is:
https://<bucketname>.<endpoint>.<path>
where there is case sensitivity in the letters.
Lyve Cloud leverages the concept of buckets: each bucket is a container for objects. All new buckets are private by default. A bucket can be made public by applying the following policy to it:
{
"Version": "2019-10-17",

   "Statement": [
   {
    "Action": ["s3:GetBucketLocation"], "Effect": "Allow",
    "Principal": { "AWS": ["*"] },
    "Resource": ["arn:aws:s3:::BUCKETNAME"], "Sid": ""
   },
   {
    "Action": ["s3:GetObject"], "Effect": "Allow", "Principal": { "AWS": ["*"] },
    "Resource": ["arn:aws:s3:::BUCKETNAME/*"], "Sid": ""
   }
   ]
}
The policy can be deleted any time with a DELETE /bucketname/?policy request to make the bucket private again.
Bucket policy can also be managed from the web GUI using a simple point-and-click web interface.
- Select Buckets from the top navigation bar.
- In the 'Actions' column, select the Wrench icon next to a bucket to change the 'Access Mode' (Private or Public) or versioning.
Delete a Bucket
To delete a bucket, you typically empty all of its objects and folders and delete all of its associated policies. Lyve Cloud offers a 'SuperDelete' feature that deletes the bucket and its entire contents for you at once.
To use either delete method:
- Select Buckets from the top navigation bar, and then select a bucket.
- Below the 'Actions' column, select the Trash icon.
- Use the dropdown menu to choose your deletion option. If you select SuperDelete, do not close or refresh your browser—the command may require several minutes to complete.
Uploads
The web GUI has a feature to upload files into Lyve Cloud. There are two methods to upload files:
Using the drag and drop method:
- Select Buckets from the top navigation bar, and then select a bucket.
- Drag and drop folders and files into the screen.
- Select START UPLOAD to begin uploading.
Using the upload method:
- Select Buckets from the top navigation bar, and then select a bucket.
- Select the Plus icon in the upper right corner to expand options.
- Select Upload files.
- Select UPLOAD FROM COMPUTER (you still have the option to drag and drop here too).
- (Optional) Enable server-side encryption using the Advanced Options menu.
- Select START UPLOAD to begin uploading the folders and files to the bucket.
Pre-Signed URL
Objects can be shared with a pre-signed URL. To share an object from the web GUI, select a folder and object you would like to share with anyone.
- Select the Information icon on the far right of your object.
- Below the 'Actions' section, select Generate pre-signed link.
- Select the length of time for the expiration period, and then select GENERATE.
- Select the Clipboard icon next to the expiration time, or perform a standard select and copy.
Create Users
As a subaccount under a reseller, you can grant users access to your buckets. They have the following permissions: policies, buckets, and adding more users.
To create a new user:
- Under 'Users' in the menu bar, select the Add New User icon in the top right corner.
- In the menu, enter the email address of the user you would like to give access to.
- Select Create User.
- Once created, you can edit the new user's permissions by clicking on their email.
Create Policies
To create policies in your Lyve Cloud bucket:
- Select Policies in the top navigation bar.
- Select the Add Policies icon in the top right corner.
- Enter a name and description for your new policy.
- Select a bucket from the dropdown menu..
- Select permissions to apply to the bucket.
- Select Save.
Use the menu at any time to change the permissions granted to the bucket.
Generate Access Keys
It's important to note the following about access keys:
- A root user without AccessKeyID / SecretAccessKey credentials cannot generate a pre-signed link. The request will not send a valid credentials object and will fail.
- The current user cannot generate a pre-signed link without AccessKeyID / SecretAccessKey credentials.
- By default, the root user of an account does not have AccessKeyID / SecretAccessKey credentials generated for them.
To create the credentials for the account:
- Go to the Lyve Cloud Portal.
- Select your profile name in the upper right corner and choose MY ACCOUNT.
- Select + GENERATE KEY in the bottom right corner.
- Download the CSV key and manage as you normally would (for example, with a password manager).
- Once downloaded, use an application that can edit .csv files (Excel, Google Sheets, Numbers) to view the contents. For a onetime view of the secret key, select the Show icon.
Generate Access Keys Using CLI
To install AWS CLI, refer to Amazon’s guide: https://docs.aws.amazon.com/cli/latest/userguide/cli-chap-install.html.
- Run
aws configureand set up the AWS command line. To begin initial installation, both access keys and secret keys are needed.
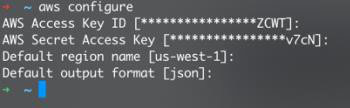
- Once configured, generate keys using the following command:
aws iam create-access-key --endpoint-url https://iam.lyve.seagate.com
A new key pair is generated.
Set Up Multifactor Authentication
Multifactor authentication (MFA) is a security system that requires more than one method of authentication from independent categories of credentials to verify the user’s identity for a login or other transaction.
To begin set up for multifactor authentication:
- Select your profile name and choose My Account.
- Select ENABLE 2FA.
- A window containing a QR code and secret key appears. Scan the QR code using a preferred MFA app such as Authy or Google Authenticator. The app will provide a token that needs to be entered into the space below the QR code to confirm the setup.
Once setup is completed, a number of recovery keys will be given in case you lose access to your MFA device. Make sure to copy the recovery codes and store them in a safe place. This will be the only way to recover your locked account.
Single Site Validation Testing
- Create any hash for a given file. The following example is a Python script for a SHA256 hash to validate the file.
import hashlib
import os
import sys

with open(sys.argv[1], 'rb') as f1:
    file_1 = f1.read()
with open(sys.argv[2], 'rb') as f2:
    file_2 = f2.read()

sha_1 = hashlib.sha256(file_1).hexdigest()
sha_2 = hashlib.sha256(file_2).hexdigest()

print("SHA256 of file 1: {0}".format(sha_1))
print("SHA256 of file 2: {0}".format(sha_2))
print("SHA256 of file 1 == SHA256 of file 2 returns {0}".format(sha_1==sha_2))
exit()
Sample output for script:

- Upload the file to Lyve Cloud.
- Download the file from Lyve Cloud to your machine.
- Re-hash the file using the same hash and compare hashes.
Multi-Site Validation Testing
Lyve Cloud offers multi-site replication to add redundancy to your dataset locality.
To test Lyve Cloud multi-site redundancy:
- Create a hash for any given file. For example, use the SHA256 hash written in Python under Single Site Validation Testing.
- Upload the file to a Lyve Cloud location.
- At each of the three sites, create a compute instance and run the hashing script.
- Use
<region-name>.<customername>.lyve.seagate.cominstead of<endpoint_name>.lyve.seagate.comas the endpoint.<region-name>can be:sjc03,dca02,den02. Replace <customer-name> with your customer name. - Compare the hashes of the different locations against the original hash.
Encryption
Lyve Cloud enforces encryption of data in flight using Transport Layer Security (TLS), a widely adopted security protocol designed to facilitate privacy and data security for communications over the Internet. It's used to establish encrypted links between a web server and a browser, protecting the data exchanged between them.
Lyve Cloud supports server-side encryption with customer-provided keys—the user manages the encryption keys and Lyve Cloud manages the encryption, as it writes to disks, and decryption, when accessing objects.
Note the following:
- The ETag in the response is the MD5 of the encrypted data.
- The user manages the mapping of the encryption key to the object. The user is responsible for tracking which encryption key was used for an object.
- If the bucket has versioning enabled, each object version can have its own encryption key. The user is responsible for tracking which encryption key was used for an object version.
- The user is responsible for ensuring the security of encryption keys and for managing all the required safeguards for encryption keys (such as key rotation) on the client side.
- If the encryption key is lost, any GET request for an object without its encryption key will fail, resulting in lost data. There is no recovery mechanism.
Configure Data At Rest Encryption
When data from multiple places collects in one bucket, it is called data at rest. Lyve Cloud currently supports Data At Rest Encryption, or DARE.
- Select or create a bucket you would like to encrypt. See Create a Bucket.
- A key from a third party application is required to set up the encryption. Lyve Cloud will use the generated key pair to encrypt your data on the server. When making the API calls below, a key can be provided to allow server-side encryption of the information.
See the following AWS documentation:
- PUT/POST Object
- PUT Object Copy
- Initiate Multipart Upload
- Upload Part
- Upload Part - Copy
- Complete Multipart Upload
- Get Object
- Head Object
- When making this request, you must include the key in the headers of the request. The following headers must be provided.
x-amz-server-side -encryption -customer-algorithm: AFDLKSJFJK
x-amz-server-side -encryption -customer-key: AKFLJDKLF
x-amz-server-side -encryption -customer-key-MD5: XAKFHLD
An example request for putting a file into Lyve Cloud would look something like this:
aws s3api put-object --bucket demo-sse
--key "keyname" \
--body example.txt	\
--sse-customer-algorithm "AES256" \
--sse-customer-key  \
--sse-customer-key-md5  \
--profile  \
--endpoint-url "https://.lyve.seagate.com)“
Configure Server-Side Encryption
A policy can be used to enforce all objects that are uploaded to a bucket, “mybucketname”, to be server-side encrypted with AES256. See Create Policies for more information.
$ awscurl --access-key XXX --secret-key YYY --service s3 https://.lyve.seagate.com/mybucketname/?policy -X PUT -H "Content-Type: application/json" --data "
{
   "Version": "2012-10-17",
   "Id": "PutObjPolicy", "Statement": [
      {
         "Sid": "DenyIncorrectEncryptionHeader", "Effect": "Deny",
         "Principal": "*", "Action": "s3:PutObject",
         "Resource": "arn:aws:s3:::mybucketname/*", "Condition": {
            "StringNotEquals": {
            "s3:x-amz-server-side-encryption": "AES256"
            }
         }
      },
      {
         "Sid": "DenyUnEncryptedObjectUploads", "Effect": "Deny",
         "Principal": "*", "Action": "s3:PutObject",
         "Resource": "arn:aws:s3:::mybucketname/*", "Condition": {
            "Null": {
                "s3:x-amz-server-side-encryption": true
            }
         }
      }
   ]
}"
To remove the aforementioned policy:
awscurl --access-key XXX --secret-key YYY --service s3 https://.lyve.seagate.com/mybucketname/?policy -X DELETE
Object Locking
Lyve Cloud supports Write Once Read Many (WORM) objects. A user can use this feature to prevent an object from getting overwritten for a period of time or indefinitely. Object locking can also be used for a legal hold. A legal hold is the same as a retention period, but it has no expiration date. Instead, a legal hold remains in place until you explicitly remove it. To use this feature, you must create a bucket with object lock configuration using the AWS CLI. Enabling object locking on an existing bucket is possible. It also enables versioning.
aws s3api create-bucket --bucket demo-lock --object-lock-enabled-for- bucket --endpoint-url https://demo.lyve.seagate.com --profile local
- Create a file in this bucket.
aws s3api put-object --bucket demo-lock --key "divina" --body ~/divina_commedia.txt --endpoint-url https://demo.lyve.seagate.com -- profile local
{
"ETag": "\"d43dc972416413a6114fbe4321ee1979\"",
"VersionId": "01DXHDYQ6Q7J0VGXPETMQY8W0Y-v"
}
- Create a legal-hold constraint for that file.
aws s3api put-object-legal-hold --bucket demo-lock --key divina -- legal-hold "Status=ON" --endpoint-url https://demo.lyve.seagate.com -- profile local
- Now remove the legal hold.
aws s3api put-object-legal-hold --bucket demo-lock --key divina -- version-id "01DXHDYQ6Q7J0VGXPETMQY8W0Y-v" --legal-hold "Status=OFF" --endpoint-url https://demo.lyve.seagate.com --profile local
- Delete object lock.
aws s3api delete-object --bucket demo-lock --key divina --version-id "01DXHDYQ6Q7J0VGXPETMQY8W0Y-v" --endpoint-url https://demo.lyve.seagate.com --profile local
{
"VersionId": "01DXHDYQ6Q7J0VGXPETMQY8W0Y-v"
}
- List the bucket.
aws s3api list-object-versions --bucket demo-lock --prefix divina -- endpoint-url https://demo.lyve.seagate.com --profile local
{
"DeleteMarkers": [
{
"Owner": {
"ID": "100000000001"
},
"Key": "divina",
"VersionId": "01DXHE1AW5HYQQ3DH24Q13Z1TM-v",
"IsLatest": true,
"LastModified": "2020-01-01T20:51:28.7730474Z"
}
]
}
- Retain Lock commands. Create a file (called divina-sec).
aws s3api put-object --bucket demo-lock --key divina-sec --body ~/divina_commedia.txt --endpoint-url https://demo.lyve.seagate.com -profile local
{
"ETag": "\"d43dc972416413a6114fbe4321ee1979\"",
"VersionId": "01DXHEMXSDT3GB8Y9Y6DENXX0Q-v"
}
- Create a retention lock.
aws s3api put-object-retention --bucket demo-lock --key divina-sec -retention="Mode=GOVERNANCE,RetainUntilDate=2020-01- 15T00:00:00.000Z" --endpoint-url https://demo.lyve.seagate.com --profile local
- Check the status.
aws s3api get-object-retention --bucket demo-lock --key divina-sec -endpoint-url https://demo.lyve.seagate.com --profile local
{
"Retention": { "Mode": "GOVERNANCE",
"RetainUntilDate": "2020-01-15T00:00:00Z"
}
}
Bucket Logging
Bucket logging is a feature that provides the ability to log access of a bucket for statistical or audit purposes. It also provides a mechanism to optionally store logs in a bucket other than the one being monitored.
Note the following:
- Log records are periodically collected and consolidated into the bucket that was enabled for logging.
- Bucket logging requires credentials.
- If there is no activity in the bucket where logging is enabled, log files will not be created.
- Logging is not meant to be a complete accounting of all requests.
There are two methods to establish this feature:
- Through the command line with tools like AWS CLI.
- Through the Lyve Cloud web GUI.
Bucket Logging: CLI
Bucket activities will be uploaded every 15 minutes in the destination bucket in a file formatted like this one:
bucket_logging_example_testlog_2020_02_12_20:28:08_819361559
Example:
bucket_logging.json
{
   "LoggingEnabled": {
      "TargetBucket": "bucketlogs",
      "TargetPrefix": "logs/",
      "TargetGrants": [
         {"Grantee": { "ID": "LYVE_KEY_123", "Type":  "AccessKey"}}
      ]
   }
}
In order to activate the logging on a given bucket with success, the following is required:
- TargetBucket
- TargetGrants with at least one 'Grantee' element with:
- ID: A valid Access Key. You might already have configured in ~/.aws/credentials
- Type: AccessKey
- TargetPrefix is optional
Example command:
aws s3api put-bucket-logging --bucket testbucket --bucket-logging- status file:///user/test/bucket_logging.json --endpoint-url "https://demo.lyve.seagate.com"
Remove a bucket logging configuration
In order to remove a Bucket Logging configuration for a specific bucket, perform a PUT giving an empty BucketLoggingStatus request. For example, you could create a disable.json with the following:
{
}
aws s3api put-bucket-logging --bucket testbucket --bucket-logging- status file:///user/test/ disable.json --endpoint-url "https://demo.lyve.seagate.com"
Retrieve bucket logging configuration
To retrieve a bucket logging configuration for a bucket:
aws s3api get-bucket-logging --bucket testlog --endpoint- url https://demo.lyve.seagate.com
This will look similar to:
<?xml version="1.0" encoding="UTF-8"?>
<bucketloggingstatus>
	<loggingenabled>
		<targetbucket>targetlog</targetbucket>
		<targetprefix>logs/</targetprefix>
		<targetgrants>
			<grant>
			<grantee xmlns:xsi="http://www.w3.org/2001/XMLSchema- instance" xsi:type="AccessKey">

	<ID>LYVE_KEY_123</ID>
		</Grantee>
			</Grant>
			</TargetGrants>
	</LoggingEnabled>
</BucketLoggingStatus>
Log Format
| Term | Description |
|---|---|
| BucketOwner | The owner ID of the monitored bucket. |
| Bucket | The monitored bucket. |
| TS | The timestamp of the action [06/Feb/2019:00:00:38 +0000]. |
| RemoteIp | The apparent IP of the requester. Intermediate proxies and firewalls might obscure the actual address of the machine making the request. |
| Requester | The AccessKey used to perform the action. |
| RequestId | The Request ID. |
| Operation | The kind of operation (example: s3.PutObject, s3.GetObject). |
| Key | The object Key (if present). |
| RequestUri | The Request-URI part of the HTTP request message. |
| HttpStatus | The numeric HTTP status code of the response. |
| ErrorCode | The S3 Error Code. A hyphen (-) character is displayed if no error occurred. |
| BytesSent | The transferred bytes. |
| ObjectSize | The size of the object transferred. |
| TotalTime | The number of milliseconds the request was in flight from the server's perspective. |
| TurnAroundTime | The number of milliseconds spent processing the request. |
| Referer | The value of the HTTP Referer header (if present). |
| UserAgent | The value of the HTTP User-Agent header. |
| VersionId | The version ID in the request (if present). |
| HostId | Not used. A hyphen (-) character is displayed. |
| SignatureVersion | The signature version ('SigV2' or 'SigV4') that was used to authenticate the request. A hyphen (-) is displayed in the other case. |
| Auth | The type of request authentication used: 'AuthHeader' for authentication headers, 'QueryString' or a hyphen (-) for other cases. |
| HostHeader | Not used. A hyphen (-) character is displayed. |
| TLSVer | The TLS version used. |
Log Examples
100000000001 testlog [12/Feb/2020:20:28:02 +0100] "[::1]:34178"
"LYVE_KEY_123" "qfqun6v6dido" s3:PutObject "testkey" "/testlog/testkey" "200" "-" 125829120 "0" 279 274 "" "aws-sdk-go/1.28.13 (go1.13.7; linux; amd64)" 01E0XDYR0H0DA24AYE1DV1PK5S - SigV4 SSL AuthHeader - "-" 100000000001 testlog [12/Feb/2020:20:28:02 +0100] "[::1]:34178"
"LYVE_KEY_123" "50gzg1qj4ftt" s3:HeadObject "testkey"
"/testlog/testkey" "200" "-" 125829120 125829120 1 0 "" "aws-sdk-
go/1.28.13 (go1.13.7; linux; amd64)" 01E0XDYR0H0DA24AYE1DV1PK5S - SigV4
SSL AuthHeader - "-"
100000000001 testlog [12/Feb/2020:20:28:02 +0100] "[::1]:34178"
"LYVE_KEY_123" "eybjzx8hvf5s" s3:DeleteObject "testkey" "/testlog/testkey" "200" "-" "0" "0" 2 0 "" "aws-sdk-go/1.28.13
(go1.13.7; linux; amd64)" "-" - SigV4 SSL AuthHeader - "-" 100000000001 testlog [12/Feb/2020:20:28:02 +0100] "[::1]:34178"
"LYVE_KEY_123" "69srbt1hije2" s3:PutObject "foo" "/testlog/foo" "200"
"-" 20 "0" 3 1 "" "aws-sdk-go/1.28.13 (go1.13.7; linux; amd64)" 01E0XDYR0TABEJXCHQ300Z8BHE - SigV4 SSL AuthHeader - "-"
100000000001 testlog [12/Feb/2020:20:28:02 +0100] "[::1]:34178"
"LYVE_KEY_123" "misyyofy69qw" s3:HeadObject "foo" "/testlog/foo" "200" "-" 20 20 1 0 "" "aws-sdk-go/1.28.13 (go1.13.7; linux; amd64)" 01E0XDYR0TABEJXCHQ300Z8BHE - SigV4 SSL AuthHeader - "-"
100000000001 testlog [12/Feb/2020:20:28:02 +0100] "[::1]:34178"
"LYVE_KEY_123" "7lkfytqs6d7x" s3:DeleteObject "foo" "/testlog/foo" "200" "-" "0" "0" 2 0 "" "aws-sdk-go/1.28.13 (go1.13.7; linux; amd64)" "-" - SigV4 SSL AuthHeader - "-"
Bucket Logging: Lyve Cloud web GUI
- In the web GUI, select the Bucket Logging icon in the 'Actions' column.
- By default, bucket logging is disabled. By enabling it, the Web User Access Key will display by default. This field will accept any Lyve Cloud Access Key.
- Select the bucket for logging storage.
- Create an optional folder name in the bucket.
| Status | When the logging status is disabled, all form fields are disabled, too. When changing the status from 'Enabled' to 'Disabled', current values are still saved in the form until submission. Submitting a form with the status 'Disabled' will delete the bucket logging configuration and all data in the form will be lost. |
| Grantee | The form has a dropdown menu to select AccessKeyIDs associated with the current user and will autocomplete using the prefix substring currently in the text input. If the desired AccessKeyID does not appear in the list, any arbitrary string (for example, AccessKeyIDs managed by other users) is a valid input. AccessKeyIDs must be alphanumeric and contain precisely 26 characters. |
| Saving Logs | You must select a bucket from the dropdown menu. It will display all buckets the current user can access. |
| Log Prefix | Log prefixes are optional. By default, it will save log files in the bucket without a prefix. Prefix strings must end with forward slash (/). |
Custom Metadata
Lyve Cloud has the ability to have custom metadata applied to objects. Here is an example of applying metadata with the API and commonly used AWS CLI tool.
aws --profile=local --endpoint="http://demo.lyve.seagate.com" s3 cp octocats/original.png s3://testbucket/ --metadata Test=Pluto
To retrieve the object with the custom metadata:
% aws --profile=local --endpoint="https://demo.lyve.seagate.com" s3api head-object --bucket=testbucket --key=original.png
{
   "AcceptRanges": "bytes",
   "LastModified": "Mon, 23 Mar 2020 19:42:16 GMT",
   "ContentLength": 50758,
   "ETag": "\"2ec6d2a9d4888c31c5ae802e8cc9efd6\"",
   "VersionId": "01E44ENHPQKG54VAFC8FB2RR10",
   "ContentType": "image/png",
   "Metadata": {
      "test": "Pluto"
   }
}
Object Byte Range Access
Lyve Cloud supports reading with Byte Range and updating using MultiPart upload copy. The next few sections display an example for each.
Byte Range Read
[testing@vbook:~]
% aws --profile pre --endpoint https://demo.lyve.seagate.com' s3api get-object --bucket simplebucket-testing --key='poignant.txt' 'poignant2.txt' --range bytes=0-500
{
   "AcceptRanges": "bytes",
   "LastModified": "Mon, 30 Mar 2020 18:59:08 GMT",
   "ContentLength": 501,
   "ETag": "\"2909cf38d280b0d88586740cd86e45e6\"", "VersionId": "01E4PCZK3W672JT0X74WK4BAHR",
   "ContentRange": "bytes 0-500/1476", "Metadata": {}
}
[testing@vbook:~]

% cat poignant2.txt
Pretend that you've opened this book (although you probably have opened this book), just to find a huge onion right in the middle crease of the book. (The manufacturer of the book has included the onion at my request.) So you're like, "Wow, this book comes with an onion!" (Even if you don't particularly like onions, I'm sure you can appreciate the logistics of shipping any sort of produce discreetly inside of an alleged programming manual.) Then you ask yourself, "Wait a minute. I
Object Update
Partially updating an object can be very useful in cases where a full object updated is not desired, such as with large objects. While the standard S3 protocol does not offer a byte-range update, there are a few use cases for updating an object with Multipart copy. Once a file has been written, it cannot be modified, only overwritten (as a whole) with a newer version.
The closest behavior to an object update can be produced by using the UploadPartCopy API to create a new version of the file, starting from the old file and from the changed parts. Note that this still triggers a full copy of the file.
- If you want to copy a large file, note that there's a size limit on the PutObjectCopy, and there might be timeouts on the client side. You can copy the file in parts, then use CompleteMultipartUpload to obtain the complete file. (The
aws s3 cp commanddoes that does that in some cases.) - If you want to append to the end of a file without downloading and uploading it again.
- If you want to change some bytes in the middle of a file, you can UploadPartCopy the part before, then UploadPart the changed part, and then UploadPartCopy the part after.
To clarify, you cannot change a part in a file that is already in S3, but you can create a new file (using multipart uploads), and tell the server you want to use some range of the old file as a "part" instead of uploading from your computer. Having immutable versions helps greatly when replicating a file as there is no risk of conflicts between the same file on two datacenters, or replicating an older version over a newer one, or the client reading a partially updated version. This is an example using multipart upload:
% aws --profile pre --endpoint 'https://demo.lyve.seagate.com' s3api create-multipart-upload --bucket simplebucket-testing --key='some-multipart-upload'
{
   "Bucket": "simplebucket-testing",
   "Key": "some-multipart-upload",
   "UploadId": "7xDckkL3iSJAvFBvZw5GmJWKkjfCxFXE3tAPalCVHOQZhaESNu"
}%


aws --profile pre --endpoint 'https://demo.lyve.seagate.com' s3api upload-part --bucket simplebucket-testing --key='some-multipart-upload' --upload-id 7xDckkL3iSJAvFBvZw5GmJWKkjfCxFXE3tAPalCVHOQZhaESNu --part-number 1 --body ~/Downloads/poignant-guide.pdf

{
   "ETag": "\"61062673c8b37d22354523849923bbd2\""
}%


aws --profile pre --endpoint 'https://demo.lyve.seagate.com' s3api upload-part --bucket simplebucket-testing --key='some-multipart-upload' --upload-id 7xDckkL3iSJAvFBvZw5GmJWKkjfCxFXE3tAPalCVHOQZhaESNu --part-number 2 --body ~/Downloads/poignant-guide.pdf

{
   "ETag": "\"61062673c8b37d22354523849923bbd2\""
}%


aws --profile pre --endpoint 'https://demo.lyve.seagate.com' s3api complete-multipart-upload --bucket simplebucket-testing --key='some-multipart-upload' --upload-id 7xDckkL3iSJAvFBvZw5GmJWKkjfCxFXE3tAPalCVHOQZhaESNu --multipart-upload 'Parts=[{ETag="\"61062673c8b37d22354523849923bbd2\"",PartNumber=1},{ETag="\"61062673c8b37d22354523849923bbd2\"",PartNumber=2}]'

{
   "VersionId": "01E4PDSTT5DBJC5CFE57CTYG7E",
   "Location": "",
   "Bucket": "simplebucket-testing", "Key": "some-multipart-upload",
   "ETag": "\"05c7f4ca2b92bedafcab99a3094c435b-2\""
}
RProtect Customer
RProtect is a feature that enables more-granular whitelisting to resources for both Reseller and Customer users. RProtect can explicitly ensure that only select IP addresses (or a range of IP addresses) can access a specific resource.
The RProtect feature may be enabled for a Reseller or fully disabled, meaning that anyone can access the buckets within the accounts. This feature is listed in the main menu bar as well as being available via the Lyve Cloud API.
- Using the web GUI, select RProtect from the navigation bar.
- To add a new rule, select + ADD RULE in the upper right corner. The 'Subnet' option may consist of a single IP address or range of IP addresses. While there are no limitations on the size of the range, a best practice is to minimize the range to its smallest possible size.
- (Optional) Add a 144-character note for future reference, such as the reason for the whitelist, the customer, a support request number, or the whitelist location.
- The single IP address goes into a pending state post submission of request.
- Customer Account RProtect requests are approved by the Reseller Account administration. See the RProtect: Reseller section in this guide for how to APPROVE pending requests. When requesting an RProtect IP address or range of addresses from a Customer account, the Reseller account will need to approve the request. Once the Reseller administrator approves, the request, it will change from Pending to Active.