Was this content helpful?
How could we make this article more helpful?
iSCSI Network Setup for Linux (Ubuntu/Debian)
Small Computer System Interface (SCSI) is a widely used protocol for controlling direct-attached storage devices. Internet SCSI (iSCSI) uses the SCSI protocol on network volumes. iSCSI works on top of the Transport Control Protocol (TCP) and allows SCSI commands to be sent through a local area network (LAN), wide area network (WAN), or the internet.
Requirements
Network Components
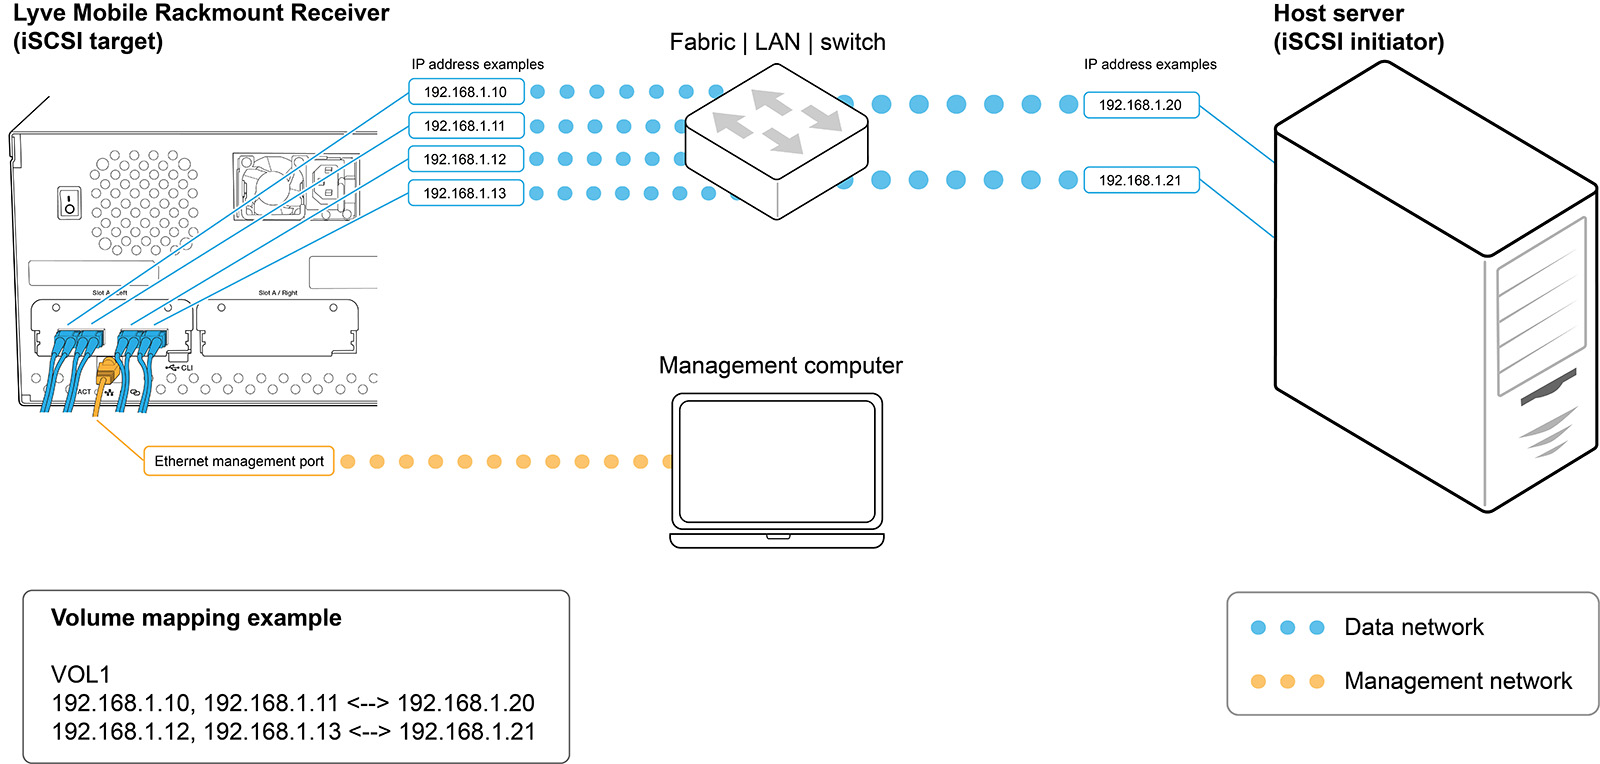
Your iSCSI network requires four components:
Data network—iSCSI requires an IP-based network for data transport between systems with initiators (servers) and targets (storage volumes or arrays).
Management network—To configure the applicable iSCSI ports on Lyve Mobile Rackmount Receiver, a Windows or Mac computer installed with the Lyve Client Software app must be able to access the same management network connected to an Ethernet management port on the back of Rackmount Receiver. Make sure to use the Ethernet management port for the slot in which the Lyve Mobile Array device is inserted.
iSCSI target—The target is a storage volume or array connected to the network. In the following instructions, the iSCSI target is a volume in a Lyve Mobile Array inserted in a Lyve Mobile Rackmount Receiver.
iSCSI initiator—The initiator is the software component residing on a server that is configured to connect to an iSCSI target. By using an iSCSI initiator, target volumes can be mounted on a server as if they were local volumes.
IP addresses
Assign or obtain the following:
- IP addresses for the Linux station’s Ethernet data ports.
- IP address for the Linux station’s Ethernet management port.
- IP address for the Windows/Mac computer’s Ethernet management port.
Hardware
Host connection
- Linux server.
- If the host and target connections are not on the same network/subnet, your network infrastructure must be capable of routing and managing traffic between subnets. Note that for optimal performance, the host connection should have a transfer rate that matches the target connection ports.
- Ethernet (copper Cat6a and above)/SFP+ (optical) cables supporting the host and target data connection ports. Use the correct cables for your environment.
Target connection
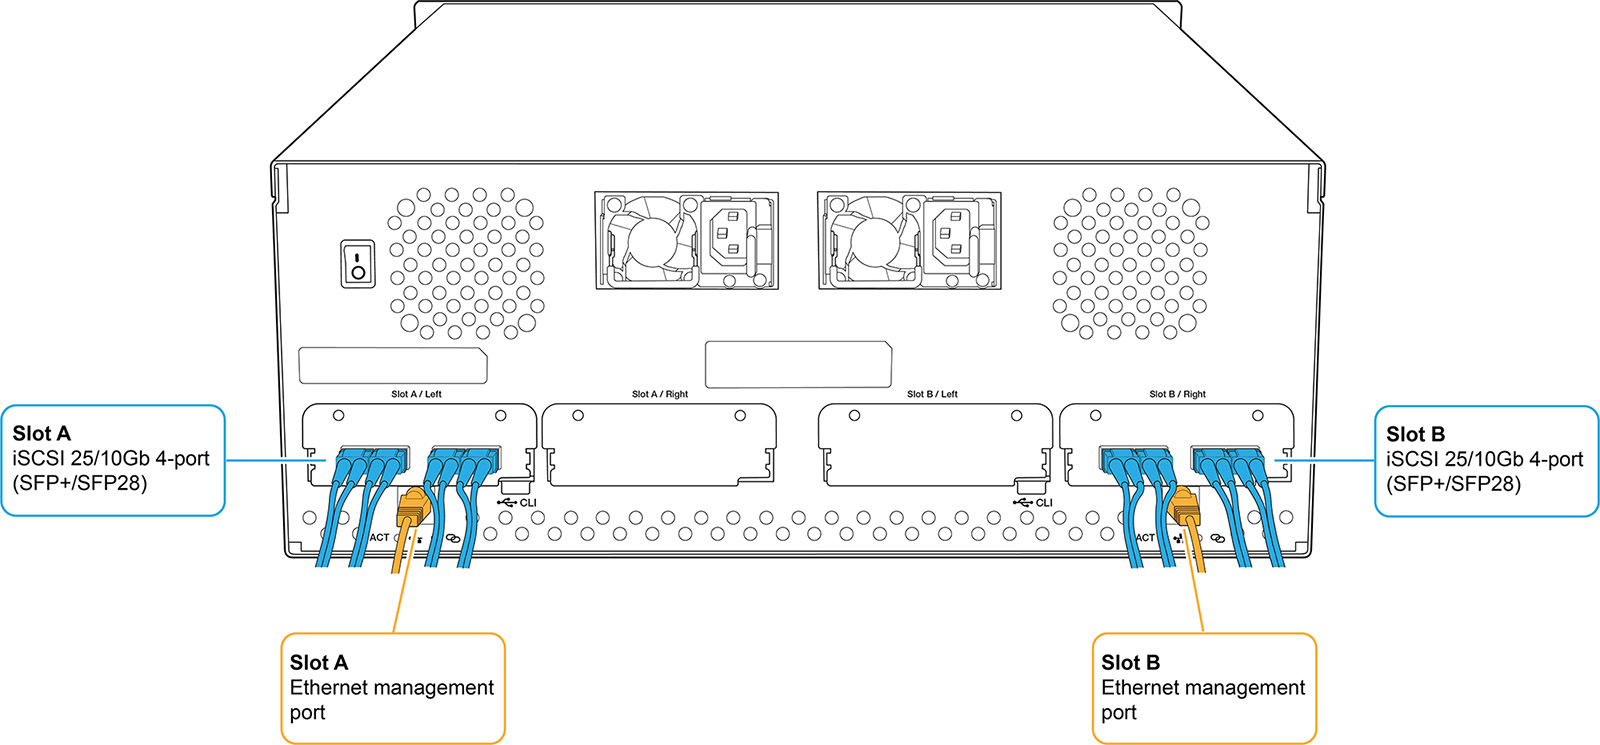
- Rackmount Receiver with iSCSI 25/10Gb 4-port (SFP+/SFP28) or iSCSI 10GBaseT 2-Port (RJ45) ports connected to the data network.
- Ethernet cable connecting the management network to the appropriate Ethernet management port (Slot A or B) on the back of Rackmount Receiver.

Software
- The Lyve Client app (available for Windows and macOS operating systems) is required to unlock Lyve Mobile Array devices. The app must be installed on a Windows or Mac computer connected to the management network.
Network protocols
Service Location Protocol (SLP)
The Lyve Client app relies on the Service Location Protocol (SLP) to discover Lyve Mobile devices on the network. For automatic detection, the following is required:
- SLP broadcast messages using UDP port 427 must be allowed in the network environment.
- IP assignments to all computers and devices are performed by a DHCP server on the network.
- The computer running Lyve Client and Lyve Mobile Rackmount Receiver's Ethernet management port must be connected to the same subnet.
If your company's IT policies prevent SLP network broadcasting, you can use other methods for detecting the device in Lyve Client. See Alternative methods for device detection below.
Pre-Setup
Before beginning the configuration, make sure a Windows or Mac computer that will run the Lyve Client Software app can access the same management network connected to the Ethernet management port on the back of Rackmount Receiver.
- Insert Lyve Mobile Array into slot A or B on Lyve Mobile Rackmount Receiver. Be sure to select the correct slot for the iSCSI connections behind Rackmount Receiver.

- Set the power switch on Lyve Mobile Rackmount Receiver to ON.
The LED on the device inserted in Lyve Mobile Rackmount Receiver blinks white during the boot process and will turn one of two colors, depending on your device's security settings:
Solid orange—Indicates the device is ready to be unlocked and is awaiting security credentials.
Solid green—Device is unlocked and ready for use.
Multipath Input/Output on the host side
If your network environment supports a Multipath I/O (MPIO) framework, ensure that MPIO is installed before configuring iSCSI.
To enable MPIO:
- On the Linux station, open a terminal session.
- Enter the following command:
sudo apt-get install –y multipath-tools
- Enter the following command:
sudo systemctl restart multipathd
Set up IP addresses for Lyve Mobile Rackmount Receiver iSCSI ports
Install Lyve Client Software app
Install the Lyve Client app on a Windows or Mac computer connected to the management network. Links to the installer can be found on Lyve Management Portal:
- Log in to lyve.seagate.com.
- On the Home page, click Downloads.
- At the prompt, click Download for either Windows® or macOS®.
- Go to the folder where you receive downloads and open the installer.
- Follow the onscreen instructions to complete the setup and open Lyve Client.
You can also download Lyve Client installers from the support page at www.seagate.com/support/lyve-client.
Unlock the device
Open the Lyve Client app.
Lyve Client will automatically unlock the device if the management computer was connected to Lyve Mobile Array in the past and is still authorized for security. If the management computer has never unlocked the device, you will need to enter your Lyve Management Portal username and password in the Lyve Client app.
Once Lyve Client has validated permissions for the device connected to the computer, the LED on the device turns solid green. The device is unlocked and ready for use.
Set up iSCSI
- The iSCSI setup sequence can be initiated from the Activity or Devices screen. In the Lyve Client app, click on the Activity or Devices tab.
Activity—An iSCSI Setup notification informs you that a setup is required.

Devices—The status indicator on the Device card informs you that a setup is required.
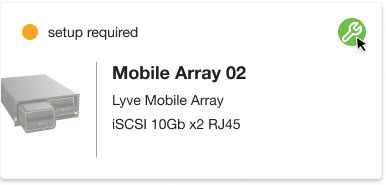
- Locate the card indicating the Lyve Mobile Array connected to the Rackmount Receiver's iSCSI ports. Click on the Setup icon.
![]()
- The port indices listed in the dialog match the port labels on the iSCSI FRAM on the back of Rackmount Receiver. Enter the IP address, subnet mask, and default gateway for each port.
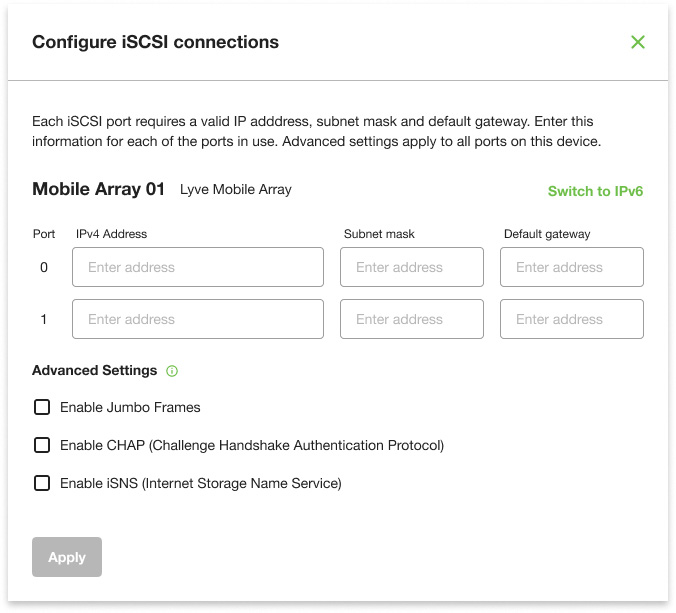
- Exceeds a permitted range (for example, entering a value greater than 256).
- Results in IP address/default gateway addressing inconsistencies not permitted by the defined subnet mask.
- Results in ports with identical IP addresses.
- Click Apply.
Configure iSCSI initiator/target(s) on the host side
Enable iSCSI upon startup
- On the Linux station, open a terminal session.
- To enable iSCSI, enter the following:
sudo apt install open-iscsi
sudo systemctl enable open-iscsi
sudo systemctl enable iscsid
- To edit the file /etc/iscsi/iscsid.conf, enter the following:
sudo vi /etc/iscsi/iscsid.conf
- Make node.startup automatic with the following edits:
-
- Delete the # character before node.startup=automatic
- Insert a # character before node.startup=manual
- Save and close /etc/iscsi/iscsid.conf.
Discover and map the initiator to the target
- To discover the iSCSI data port on Rackmount Receiver, enter the following:
sudo iscsiadm -m discovery -t st -p IP address
where IP address is one of the IP addresses on the Rackmount Receiver iSCSI data network, for example:
sudo iscsiadm -m discovery -t st -p 192.168.99.100
| Example output |
|---|
| 192.168.99.100:3260,1 iqn.1995-03.com.dothill:01.array.000000000000-00000000.a 192.168.99.101:3260,2 iqn.1995-03.com.dothill:01.array.000000000000-00000000.a |
- To specify the target, enter the following:
sudo iscsiadm -m node -T IQN -p IP address:port -l
where IQN is an iSCSI qualified name, IP address is a specific Rackmount Receiver data port IP address, and port is 3260. For example:
sudo iscsiadm -m node -T iqn.1995-03.com.dothill:01.array.000000000000-00000000.a -p 192.168.99.100:3260 –l
Both IQN and port can be found in the output from the previous discovery command.
The default port value must be 3260.
| Example output |
|---|
| Logging in to [iface: default, target: iqn.1995-03.com.dothill:01.array.000000000000-00000000.a, portal: 192.168.99.100,3260] (multiple) Login to [iface: default, target: iqn.1995-03.com.dothill:01.array.000000000000-00000000.a, portal: 192.168.99.100,3260] successful. |
- To complete the mapping of the initiator to the Lyve Mobile Array volume, the Lyve Client app must be refreshed. On the workstation used to manage Lyve Mobile devices, open the Lyve Client.
- Click on the Devices tab.
- In the Data Connections section, click Rescan Network.

Configure the iSCSI initiator
- On the Linux station, configure the iSCSI Initiator by entering the following:
sudo iscsiadm --mode node --target IQN --portal IP address:port -n discovery.sendtargets.use_discoveryd -v Yes
sudo iscsiadm --mode node --target IQN --portal IP address:port -n discovery.sendtargets.discoveryd_poll_inval -v 30
where IQN is an iSCSI qualified name, IP address is a specific Rackmount Receiver data port IP address, and port is 3260. For example:
sudo iscsiadm --mode node --target iqn.1995-03.com.dothill:01.array.000000000000-00000000.a --portal 192.168.99.100:3260 -n discovery.sendtargets.use_discoveryd -v Yes
sudo iscsiadm --mode node --target iqn.1995-03.com.dothill:01.array.000000000000-00000000.a --portal 192.168.99.100:3260 -n discovery.sendtargets.discoveryd_poll_inval -v 30
- Log out of the session by entering the following:
sudo iscsiadm -m node -T IQN -p IP address:port -u
where IQN is an iSCSI qualified name, IP address is a specific Rackmount Receiver data port IP address, and port is 3260. For example:
sudo iscsiadm -m node -T iqn.1995-03.com.dothill:01.array.000000000000-00000000.a -p 192.168.99.100:3260 -u
| Example output |
|---|
| Logging out of session [sid: 1, target: iqn.1995-03.com.dothill:01.array.000000000000-00000000.a, portal: 192.168.99.100,3260] Logout of [sid: 1, target: iqn.1995-03.com.dothill:01.array.000000000000-00000000.a, portal: 192.168.99.100,3260] successful. |
- Log in to each Rackmount Receiver target by entering the following:
sudo iscsiadm -m node -T IQN -p IP address:port -l
where IQN is an iSCSI qualified name, IP address is a specific Rackmount Receiver data port IP address, and port is 3260. For example:
sudo iscsiadm -m node -T iqn.1995-03.com.dothill:01.array.000000000000-00000000.a -p 192.168.99.100:3260 -l
Format and mount the disk
- If no GUI has been enabled for your Linux system, see Manual formatting.
- If a GUI is enabled for your Linux station, see Formatting using a GUI.
Manual formatting
Obtain device details
- Using the terminal, create a subfolder by entering the following:
sudo mkdir /mnt/SEAGATE
- List block device details by entering the following:
sudo blkid
| Example output |
|---|
| /dev/nvme0n1p1: UUID="40AA-21FC" TYPE="vfat" PARTUUID="e97d9f0d-c95d-4afd-a790-8abc41474070" /dev/nvme0n1p2: UUID="769fcf3e-1886-4cbb-b1f3-23745d390c96" TYPE="ext4" PARTUUID="8f8edcee-3f56-411a-a227-2bba1463bc25" /dev/nvme0n1p3: UUID="Z5wnnv-zSCu-cGD0-9ffc-37n1-1cKE-4usCIb" TYPE="LVM2_member" PARTUUID="b8f4bd59-c296-4e4d-9ad0-fc4cbb98a69f" /dev/mapper/ubuntu--vg-ubuntu--lv: UUID="882c9573-ea5e-4b8f-bb54-1aec9b1e8dea" TYPE="ext4" /dev/loop0: TYPE="squashfs" /dev/loop1: TYPE="squashfs" /dev/loop2: TYPE="squashfs" /dev/sdc2: LABEL="LYVE" UUID="22A6-E95E" TYPE="exfat" PARTLABEL="Basic data partition" PARTUUID="522a0547-f77f-4679-ae8a-2ded5b651f65" /dev/sdb2: LABEL="LYVE" UUID="22A6-E95E" TYPE="exfat" PARTLABEL="Basic data partition" PARTUUID="522a0547-f77f-4679-ae8a-2ded5b651f65" /dev/mapper/mpatha-part2: LABEL="LYVE" UUID="22A6-E95E" TYPE="exfat" PARTLABEL="Basic data partition" PARTUUID="522a0547-f77f-4679-ae8a-2ded5b651f65" /dev/sde2: LABEL="LYVE" UUID="22A6-E95E" TYPE="exfat" PARTLABEL="Basic data partition" PARTUUID="522a0547-f77f-4679-ae8a-2ded5b651f65" /dev/sdd2: LABEL="LYVE" UUID="22A6-E95E" TYPE="exfat" PARTLABEL="Basic data partition" PARTUUID="522a0547-f77f-4679-ae8a-2ded5b651f65" /dev/sdc1: PARTLABEL="Microsoft reserved partition" PARTUUID="78b2177e-c5a1-4b1f-8db3-6350ae11f05a" /dev/sdb1: PARTLABEL="Microsoft reserved partition" PARTUUID="78b2177e-c5a1-4b1f-8db3-6350ae11f05a" /dev/mapper/mpatha-part1: PARTLABEL="Microsoft reserved partition" PARTUUID="78b2177e-c5a1-4b1f-8db3-6350ae11f05a" /dev/mapper/mpatha: PTUUID="25a51dc7-9ffc-4000-b1dd-e7b9bd81a375" PTTYPE="gpt" /dev/sde1: PARTLABEL="Microsoft reserved partition" PARTUUID="78b2177e-c5a1-4b1f-8db3-6350ae11f05a" /dev/sdd1: PARTLABEL="Microsoft reserved partition" PARTUUID="78b2177e-c5a1-4b1f-8db3-6350ae11f05a" |
Format the disk for Linux
- Format the disk for Linux by entering the following:
sudo mkfs.ext4 -L LYVE /dev/disk/by-uuid/unique ID
where unique ID is the UUID for the Lyve disk listed in the blkid output, for example:
sudo mkfs.ext4 -L LYVE /dev/disk/by-uuid/22A6-E95E
| Example output |
|---|
| Creating filesystem with 23413075456 4k blocks and 1463318528 inodes Filesystem UUID: b2fc70de-a95e-43ef-9008-c8ec4a5a12c6 Superblock backups stored on blocks: 32768, 98304, 163840, 229376, 294912, 819200, 884736, 1605632, 2654208, 4096000, 7962624, 11239424, 20480000, 23887872, 71663616, 78675968, 102400000, 214990848, 512000000, 550731776, 644972544, 1934917632, 2560000000, 3855122432, 5804752896, 12800000000, 17414258688 Allocating group tables: 0/714511 658404/714511 done Writing inode tables: 0/714511 done Creating journal (262144 blocks): done Writing superblocks and filesystem accounting information: 0/714511 28/714511 done |
- Be sure to note the file system UUID, for example, b2fc70de-a95e-43ef-9008-c8ec4a5a12c6.
Edit the file system table
- Edit /etc/fstab, for example:
sudo vi /etc/fstab
- Add a comment to identify the disk, for example:
# SEAGATE iSCSI device
- Add a line for the new disk UUID by entering the following:
/dev/disk/by-uuid/unique ID /mnt/SEAGATE ext4 _netdev 0 1
where unique ID is the UUID for the Lyve disk listed in the blkid output, for example:
/dev/disk/by-uuid/b2fc70de-a95e-43ef-9008-c8ec4a5a12c6 /mnt/SEAGATE ext4 _netdev 0 1
Mount the drive
Mount the drive by entering the following:
sudo mount –a
Formatting using a GUI
- On the Linux station, open the Disks application.
- Select the Lyve disk and format it.
- Mount the Lyve disk.
- (Optional) The disk is available to the current user only. If you want to enable the disk for all users, edit mount options and disable User Session Defaults.
- Set user permissions as needed.
Change mode of access
Assign access permissions by entering the following:
sudo chmod permission /mnt/SEAGATE
where permission is the desired chmod setting in absolute or symbolic mode, for example:
sudo chmod 777 /mnt/SEAGATE