- ASEAN (English)
- Australia/New Zealand (English)
- Belgique (Français)
- België (Nederlands)
- Brasil (Português)
- Canada (English)
- Canada (Français)
- Deutschland (Deutsch)
- España (Español)
- France (Français)
- India (English)
- Indonesia (Indonesian)
- Italia (Italiano)
- Latinoamérica (Español)
- Middle East/North Africa (English)
- Nederland (Nederlands)
- Polska (Polski)
- Portugal (Português)
- Singapore (English)
- Türkiye (Türkçe)
- United Kingdom (English)
- United States (English)
- 中国 (简体中文)
- 台灣 (繁體中文)
- 日本 (日本語)
- 대한민국 (한국어)
- Home /
- Lyve Mobile Rackmount Receiver /
- SAS Network Setup for Windows
Was this content helpful?
How could we make this article more helpful?
- Welcome
- Setup Requirements
- Rackmount Kit
-
Rack Assembly
- Step 1 - Attach M4 rack screws to the front rails
- Step 2 - Attach M4 rack screws to the back rails
- Step 3 - Attach cage nuts to rack
- Step 4 - Attach the front rails to the back rails
- Step 5 - Attach the rails to the front of the rack
- Step 6 - Attach the back rails to the back of the rack
- Step 7 - Tighten rail attachments
- Step 8 - Install Lyve Mobile Rackmount Receiver
- Recommended clearance
- Freestanding Latch Assembly
- Data Connections
- Power Connections
- Device Connections
- FC Network Setup for Windows
- FC Network Setup for Linux (RHEL/CentOS 8)
- FC Network Setup for Linux (Debian/Ubuntu)
- iSCSI Network Setup for Windows
- iSCSI Network Setup for Linux (RHEL/CentOS 8)
- iSCSI Network Setup for Linux (Ubuntu/Debian)
- SAS Network Setup for Windows
- SAS Network Setup for Linux (RHEL/CentOS)
- SAS Network Setup for Linux (Debian/Ubuntu)
- Regulatory Compliance
SAS Network Setup for Windows
Requirements
The Lyve Client app is required to authorize a host computer to access Lyve Mobile Array and compatible devices. Download the Lyve Client installer for Windows and macOS at www.seagate.com/support/lyve-client and install it on the server. For more information, see the Lyve Client Software user manual.
SAS initial setup on the host side
- Connect an Ethernet cable to Ethernet management port A or B on Lyve Mobile Rackmount Receiver.
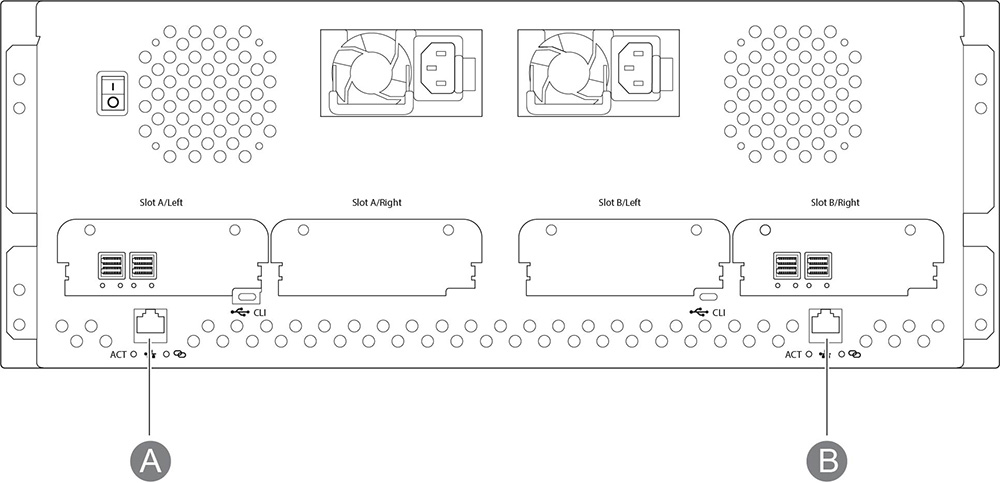
- Connect SAS cables to the server. Connect the other ends to SAS ports connected to slot A or B on Lyve Mobile Rackmount Receiver.
- Insert Lyve Mobile Array into slot A or B on Lyve Mobile Rackmount Receiver. Be sure to select the correct slot for the SAS connections behind Rackmount Receiver.
- Open Lyve Client. You may be prompted to unlock Lyve Mobile Array if this is the first connection to the host.
- Click the Devices tab.
- Click on the Mobile Array card with the Rackmount Receiver » SAS connection.
Lyve Client automatically completes your SAS connection configuration.
Manual SAS Setup
Typically, Lyve Client will configure SAS connections for Mobile Array devices in Mobile Rackmount Receivers. If an SAS connection must be manually configured, refer to the following instructions.
- Open Server Manager.
- Open Computer Management.
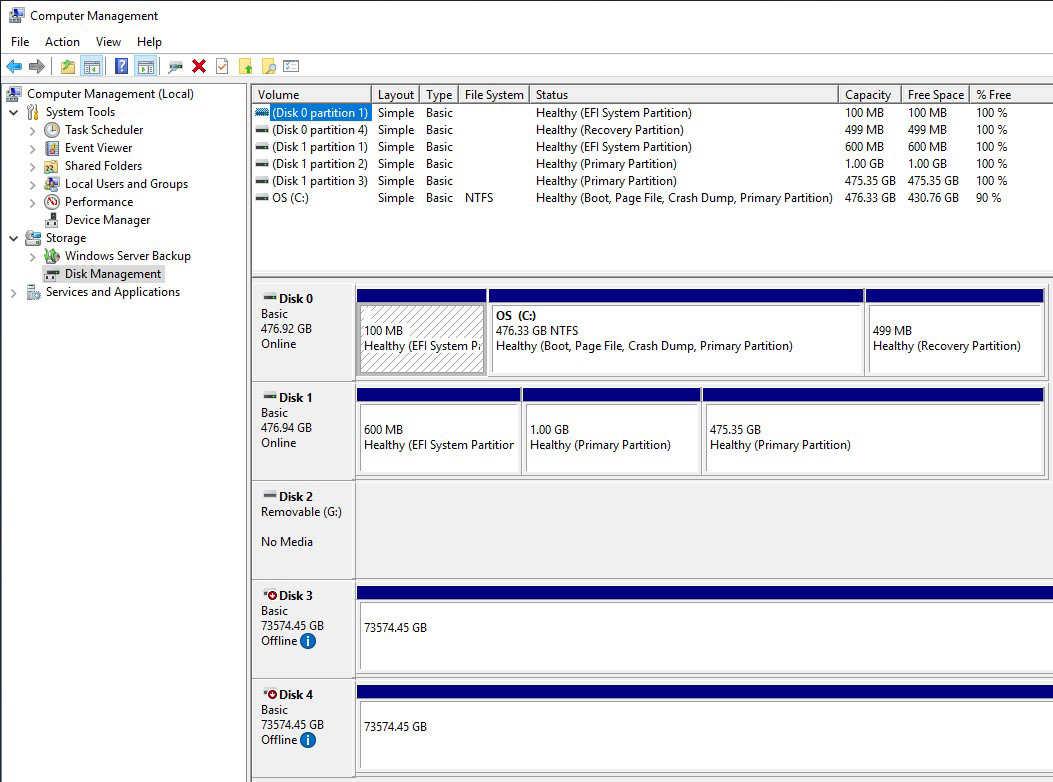
- Select Disk Management.
- If more than one Offline drive exists, continue steps 5-9. If there's only a single Offline drive, go to step 10.
- Open the Server Manager and install Multipath I/O (MPIO).
- Open MPIO.
- Click on the Discover Multi-Paths tab.
- Check Add support for SAS devices and click Add.

- Reboot the server.
- Open Disk Management.
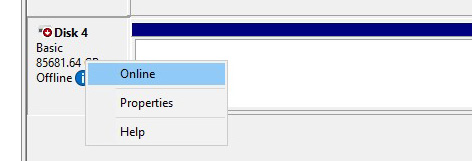
- Right-click the Lyve Mobile Array disk marked Offline and select Online.
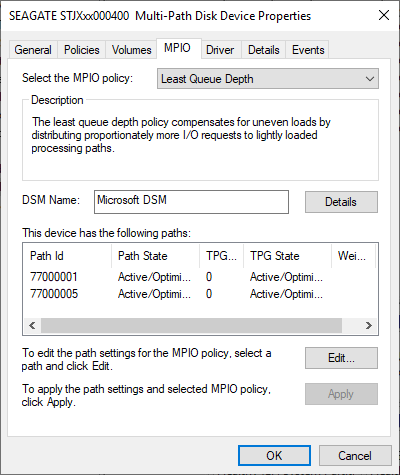
- If MPIO is enabled, right-click the Lyve Mobile Array disk and select Properties. If it is not enabled, go to step 15.
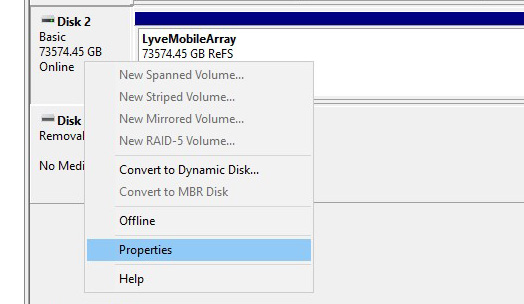
- Click on the MPIO tab.
- Select your preferred MPIO policy.
- Right-click on the Lyve Mobile Array volume and select Change Drive Letters and Paths....
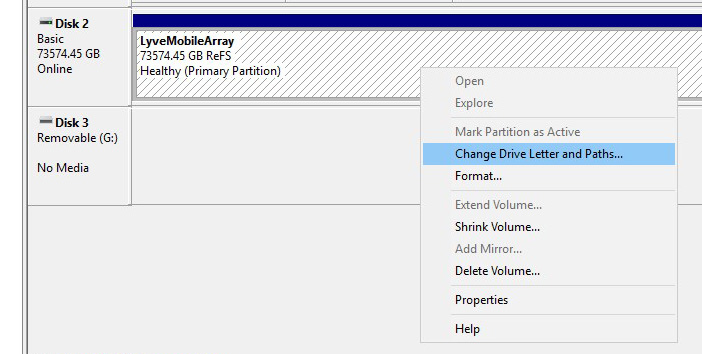
- Click Add and select your preferred letter.
Lyve Mobile Rackmount Receiver User Manual