Was this content helpful?
How could we make this article more helpful?
Views
Live
Live view is available on the NAS OS and desktop versions of Seagate Surveillance Manager.
Live interface – NAS OS app
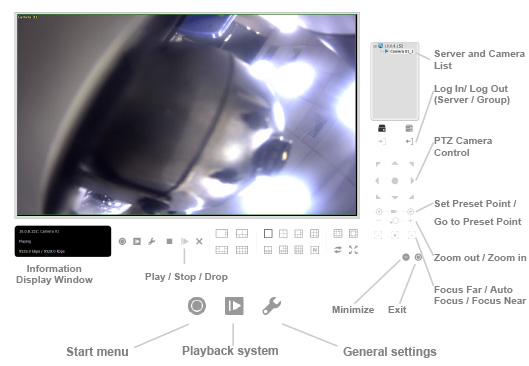
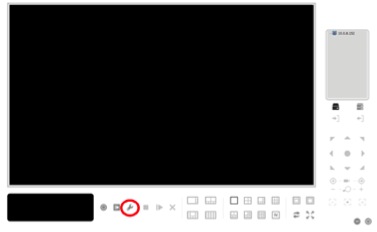
Select Live to view the images sent from all cameras connected to the NAS OS device and remote servers.

- Pan Tilt Zoom (PTZ) Camera Control–Control the camera’s view by using the PTZ camera control panel. The camera must support PTZ.
- Set Preset Point / Go to Preset Point–Adjust the camera view and make it a pre-set point. You can create multiple pre-set points.
- Zoom–Click + or – to zoom in or zoom out.
- Play / Stop / Drop–Select a camera and click this button to play/stop/disconnect a channel.
- Information Display Window–Displays video information including server name, status and bit rate for a selected channel.
- Start Menu > E-Map–E-Map is only available when using Internet Explorer as the browser for NAS OS. Upload a map and drag the camera or I/O box onto it to track the device location and alarm status.
- Start Menu > I/O Control Panel–Choose the I/O control panel to remotely adjust the Output Pins. Choose a server in the pull-down menu and click Output to turn it On or Off.
- Playback–Play video.
- Auto Scan (see zoomed image below)–Activate auto scan to rotate the channels on the display screen. For example, you can view a 4-split screen on the live view, while connecting 16 channels to the system. With auto scan, you can alternate how to display all 16 channels.
- Layout (see zoomed image below)–Click to change the layout.

Right-click on the camera’s screen to enable the following functions:
- Enable Audio–Enable audio on active channels.
- Enable Digital PTZ–Click + or – to zoom in or zoom out of the view. A square on the lower right indicates the camera’s view.
- Fix Aspect Ratio–Display the image in its native ratio.
- Fisheye Lens Setting–Select the lens mode (types of modes depend on the lens location.).
- Generic Dewarp–Original, Rectilinear, Quad and Dual-view panorama
- ImmerVision–Original, PTZ, Quad and Perimeter
- Vivotek Fish Eye–Original, Rectilinear, Full-view panorama and Dual-view panorama
- Stream Profile–Select the stream profiles
- Original
- Low
- Minimum
- Snapshot–Select Snapshot to capture a specific video frame.
- Toggle Fullscreen–View cameras in full screen. Choose Esc or right click to return to the original view.
Cameras that support PTZ allow for adjusting angles and positions. Drag the ![]() button on the display screen to adjust the PTZ camera’s view.
button on the display screen to adjust the PTZ camera’s view.
Right click on the camera’s list to duplicate, connect or disconnect it.
- Duplicate Camera–Create multiple camera views. The duplicate camera view has a green indicator on the right. Cameras that support PTZ can enhance the areas in the image and view them as separate channels. The standard camera view continues to be recorded when enhancing areas.
- Connect / Disconnect–Connect or disconnect the camera.
- Login / Logout Server–Log in or log out of the server.
- Connect All / Disconnect All–Connect or disconnect all cameras.
Enable Audio
- Click Live.
- Click General settings.
- Click the General tab.

- Select Enable audio on active channel to enable audio streaming.
- Select Synchronize video frames to avoid video display tearing issues. This problem can occur when high demands are placed on the CPU.
- Click OK.
Configure stream profile
You can select the default live view profile for each camera. Before selecting the profile, adjust the stream profile for each camera at Seagate Surveillance Manager > Camera > Video > Camera parameters.
- Click Live.
- Click General settings.
- Click the Camera tab.
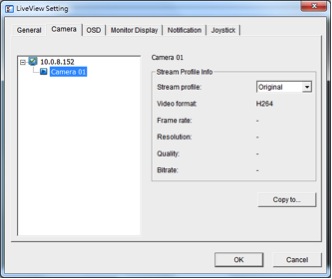
- Select a camera and select its stream profile.
- To apply this profile to other channels, click Copy to.
- Click OK.
Configure on-screen display
- Click Live.
- Click General settings.
- Click the OSD tab.
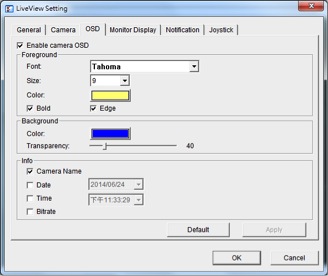
- Select Enable camera OSD.
- Select the foreground and background settings.
- Select the information that you want to display.
- To preview the settings, click Apply.
- To return to the default settings, click Default.
- Click OK.
Set the monitor display
- Click Live.
- Click General settings.
- Click the Monitor Display tab.

- Configure auto scan.
- Select the screen division from the NXN type pull-down menu.
- Click OK.
Configure notifications
- Click Live.
- Click General settings.
- Click the Notification tab.
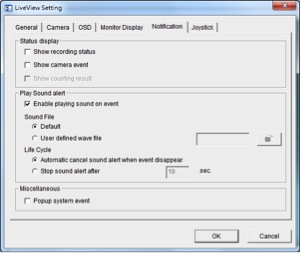
- For a visual indicator of the recording status, select Show recording status.
- To display text regarding a camera event, select Show camera event.
- To play sound alerts, select Enable playing sound on event and define the sound.
- To receive dialog warnings when system events are detected, select Popup system event.
- Click OK.
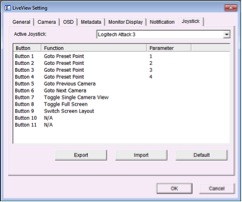
Configure joystick control
- Click Live View.
- Click General settings.
- Click the Joystick tab.
- Select each button’s function and parameters from the pull-down menus.

- Click OK.
Live view - Desktop app (Windows)
Application Control Panel
- Pan Tilt Zoom (PTZ) Camera Control–Control the camera’s view by using the PTZ camera control panel. The camera must support PTZ.
- Set Preset Point / Go to Preset Point–Adjust the camera view and make it a pre-set point. You can create multiple pre-set points.
- Zoom–Click the + or – button to zoom in or zoom out.
- Minimize–Minimize the Remote Live Viewer window.
- Exit–Shut down the application.
- Play / Stop / Drop–Select a camera and click this button to play/stop/disconnect a channel.
- Information Display Window–Displays video information including server name, status and bit rate for a selected channel.
- Start Monitor > Monitor–Select Open Monitor to view live video on multiple monitors.
- Start Menu > E-Map–Upload a map and drag the camera or I/O box onto it to track the device’s location and alarm status.
- Start Menu > I/O Control Panel–Choose the I/O control panel to remotely adjust the Output Pins. Choose a server in the pull-down menu and click Output to turn it On or Off.
- Playback–Play video.
- Auto Scan (see zoomed image below)–Activate auto scan to rotate the channels on the display screen. For example, you can view a 4-split screen on the live view, while connecting 16 channels to the system. With auto scan, you can alternate how to display all 16 channels.
- Layout (see zoomed image below)–Click to change the layout.

Right click on the camera’s screen to enable the following functions: - Enable Audio–Enable audio on active channels.
- Enable Digital PTZ– Click + or – to zoom in or zoom out of the view. A square on the lower right indicates the camera’s view.
- Fix Aspect Ratio–Display the image in its native ratio.
- Fisheye Lens Setting–Select the lens mode. The types of mode depend upon the lens’s location.
- Generic Dewarp–Original, Rectilinear, Quad and Dual-view panorama
- ImmerVision–Original, PTZ, Quad and Perimeter
- Vivotek Fish Eye–Original, Rectilinear, Full-view panorama and Dual-view panorama.
- Stream Profile–Select the stream profiles
- Original
- Low
- Minimum
- Snapshot–Select Snapshot to capture a specific video frame.
- Toggle Fullscreen–View cameras in full screen. Press Esc or right click to return to the original view.
Cameras that support PTZ allow for adjusting angles and positions. Drag the button on the display screen to adjust the PTZ camera’s view.
Right click on the camera’s list to duplicate, connect or disconnect it. - Duplicate Camera–Create multiple views. The duplicate camera view has a green indicator on the right. Cameras that support PTZ can enhance areas in the image and view them as separate channels. The standard camera view is recorded when enhancing areas.
- Connect / Disconnect–Connect or disconnect the camera.
- Login / Logout Server–Log in or log out of the server.
- Connect All / Disconnect All–Connect or disconnect all cameras.
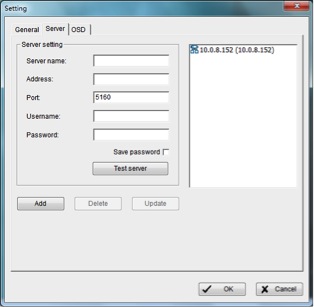
Add a server
- Click Remote Live Viewer.
- Click General settings.
- Click the Server tab.
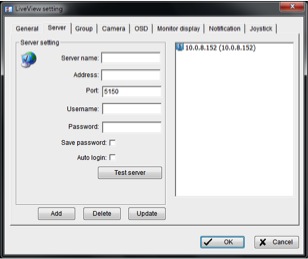
- Enter the server information.
- To test the connection between the local application and the remote server, click Test server.
- Click Add to add the server to the remote server list.
- Click OK.
General settings
- Click Remote Live Viewer.
- Click General settings.
- Click the General tab.
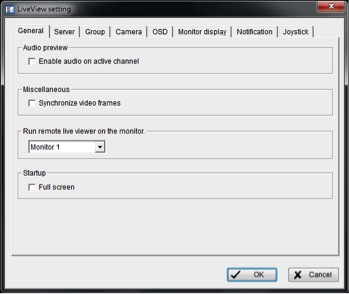
- Select Enable audio on active channel to enable audio streaming.
- Select Synchronize video frames to avoid video display tearing issues. This problem can occur when high demands are placed on the CPU.
- Select the monitor to run Live View from the pull-down menu.
- Select Full screen for Live View to enter full screen upon start up.
- Click OK.
Create camera groups
You can create one or more groups of cameras. Before creating a group, you must log in to the servers that connect to the cameras you want to add.
- Click Remote Live Viewer.
- Click General settings.
- Click the Group tab.
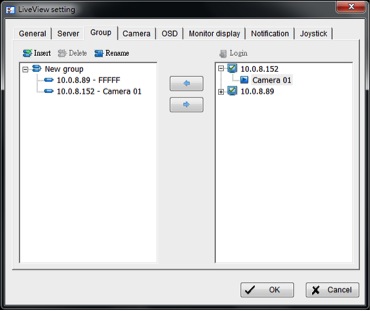
- Click Insert and name the group.
- Select the cameras to add to the group and then click the left arrow icon (
 ) .
) . - Repeat these steps to create additional groups.
- Click OK.
Delete or rename a camera group
- Click Remote Live Viewer.
- Click General settings.
- Click the Group tab.
- Click the group you want to modify.
- To permanently remove a group, click Delete.
- To rename the group, click Rename enter the new name.
- Click OK.
Stream a profile setting
You can select a the default live view profile for each camera. Before selecting the profile, adjust the stream profile for the applicable cameras. See Camera parameters.
- Click Remote Live Viewer.
- Click General settings.
- Click the Camera tab.
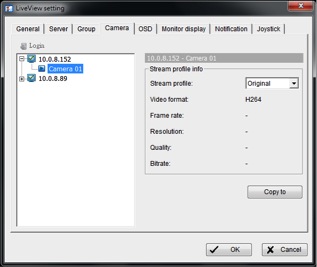
- Click a camera and select its stream profile.
- To apply this profile to other channels, click Copy to.
- Click OK.
Configure on-screen display
- Click Remote Live Viewer.
- Click General settings.
- Click the OSD tab.
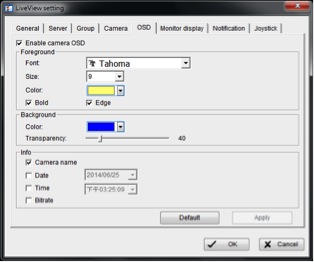
- Select Enable camera OSD.
- Select the foreground and background settings.
- Select the information that you want to display.
- To preview the settings, click Apply.
- To return to the default settings, click Default.
- Click OK.
Set the monitor display
- Click Remote Live Viewer.
- Click General settings.
- Click the Monitor display tab.
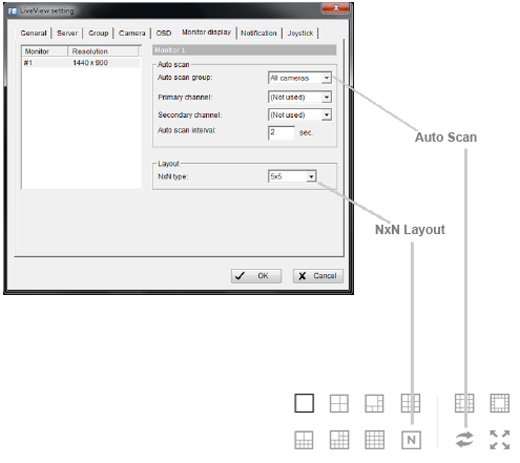
- Configure auto scan.
- Select the screen division in the NxN type pull-down menu.
- Click OK.
Configure notifications
- Click Remote Live Viewer.
- Click General settings.
- Click the Notification tab.
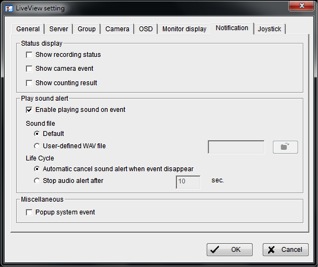
- For a visual indicator of the recording status, select Show recording status.
- To display text regarding a camera event, select Show camera event.
- To play sound alerts, select Enable playing sound on event and define the sound.
- To receive dialog warnings when system events are detected, select Popup system event.
- Click OK.
Configure joystick control
- Click Remote Live Viewer.
- Click General settings.
- Click the Joystick tab.
- Select each button’s function and parameters from the pull-down menus.
- Click OK.
Playback
Playback is available on the NAS OS and desktop versions of Seagate Surveillance Manager.
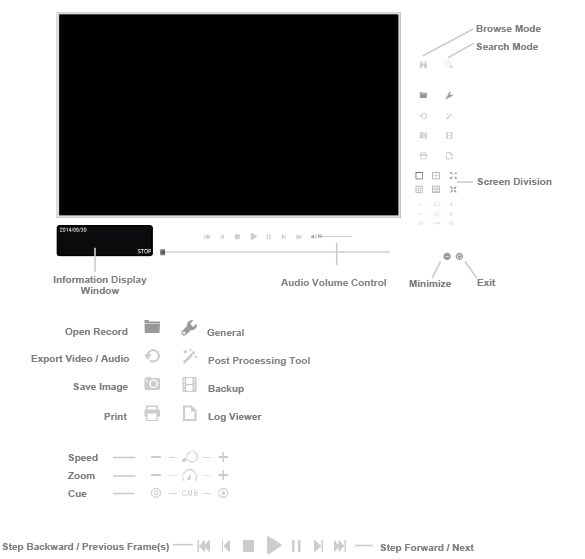
Playback interface
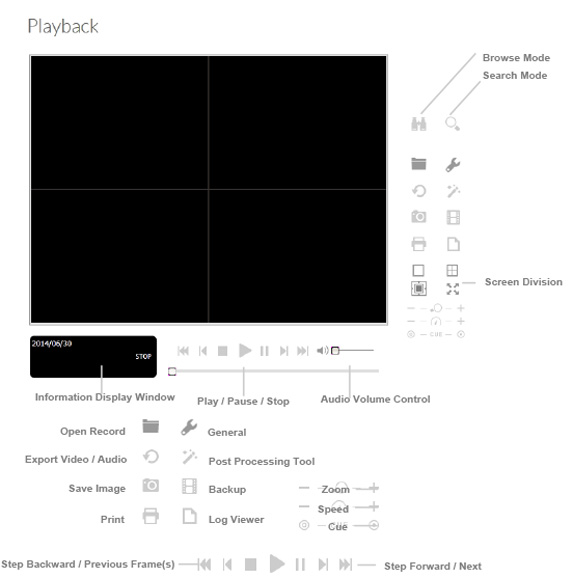
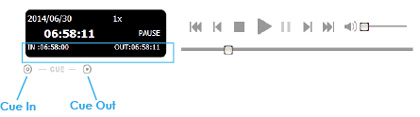
- Information Display Window:
- Date and time
- Cue-in / Cue-out points
- Speed
- Audio Volume Control–Adjust the volume.
- Screen Division–Adjust the sub-screen display by clicking on the desired layout icon. To switch to a single camera display, double click the preferred sub-screen. Double click the screen again to return to the previous layout.
- Browse Mode–Play the recorded video while in Search Mode.
- Open Record–Click Open Record to access the Date-Time Panel. You can select video to play.
- General settings:
- Record Display
- Calendar View–View the Record Display Window as a calendar.
- List Control–View the Record Display Window as a list.
- Play
- Play when open–Check this option to automatically play a video when it is opened.
- Auto-skip when recording in motion-only mode–Check this option to automatically skip to the points where motion was detected.
- Next interval–Set the interval for the Next button.
- Previous interval–Set the interval for the Previous button.
- Capture Image
- Save in clipboard–Save the image to the clipboard.
- Manually save the image file–Browse to a location to save the image. You can also name the image file and choose its format.
- Automatically save the image file–Configure a default local path or URL and image format. Images are saved according to the default settings when Save Image is selected.
- Record Display
Right click on the camera screen to choose the following functions:
- Toggle Fullscreen–View cameras in full screen. Press Esc or right click on the full screen to return to the original view.
- Fix Aspect Ratio–View the original image.
- Enable Fisheye PTZ–Adjust PTZ in PTZ mode.
- Fisheye Lens Setting–Choose a lens mode.
- Original
- PTZ
- Quad
- Perimeter
Search video files

- Choose the Refresh icon to reload the Record Display Window.
- Choose the Previous or Next icons when reviewing recording dates.
- Record Display Window-Display the information for recorded video.
- Date Time Period–Select the period you want to view from the selected cameras.
- Video Preview–Check the Enable Preview option to view the selected video.
- Time Table–Set the recording schedule. You can select or deselect all channels and use the scale bar to modify the time.
- Recording Types:
- Red line in bold–Always record.
- Blue line in bold–Record on event.
- Red thin line–Recording data.
- Black thin line–There are multiple video clips within the same period. This is due to a time change (e.g. daylight saving time).
- Show Recording Schedule–Show the recording schedule in the timetable.
- Show Event Log–Show the time of event detection in the timetable. The color of the event type can be defined by preference.
Select a video
- From the Record Display Window at the top left of the Date Time Panel, select the date you want to search. The red lines on the timetable indicate available video files.
- Left-click the video clip you want to review and drag the time period. After you have selected a camera, you can use set the start and end times in the Date Time Period Section. You can also modify the scale of the timetable with the icons on the bottom left.
- If the time period has multiple videos, you are prompted to select a camera.
- To preview the video, select Enable Preview.
- Click the camera names to increase or decrease the cameras you want to play.
- Click OK.
Play a video
- Confirm that you have set the schedule / recording event.
- Click Playback.
- Click Open Record.
The Record Display Window shows the video clips. - Select the date to search.
- Select the video you want to view.
- Click OK.
Intelligent search
You can search for specific events and motion events in a video using the Intelligent Search Tool.
- Open the video file and click Search Mode
- Select an alarm event type.
- General Motion—Detect movement in the defined area.
- Foreign Object—Detect foreign objects in the defined area.
- Missing Object—Detect objects that have been removed from the defined area.
- Focus Lost—Detect when cameras lose their focus.
- Camera Occlusion— Detect when cameras are blocked.
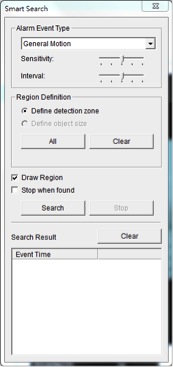
- Define the area to search by dragging the cursor to draw a detection zone. You can define more than one zone.
- Set the sensitivity with the slider. Moving to the right increases the sensitivity, which means a relatively small movement triggers an alarm.
- Set the motion interval with the slider. Moving to the right increases the time interval, which means that longer movements trigger an alarm.
- To list all discovered events, select Stop when found.
- Click Search.
Enhance recorded video
- Click Playback.
- Click Open Record.
- Click the Notification tab.
- In the Record Display Window, select a date.
- Select the video you want to enhance and click OK.
- Click Enhancement.
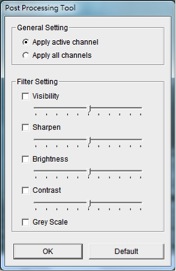
- Select whether to apply the settings to all channels or only the active channel.
- Adjust the Filter Settings sliders.
- Visibility–Adjusts the image’s gamma value of the image. This option can help clean the image.
- Sharpen–Moving to the right sharpens the image. Moving to the left softens it.
- Brightness–Moving to the right brightens the image.
- Contrast–Moving to the right increases the contrast.
- Grey Scale–Select to display the image in black and white.
- Click OK.
Save a video file
- Click Playback.
- Click Open Record.
- Select a date.
- Select a video and click OK.
- Select the camera display to save as a video clip.
- Select the cue in and cue out points in the information window.

- Click Save Video.
- In the Export Video/Audio window, select where to export the file.
- Name the file and click Save.
- Select the export format.
Important info: It is recommended to use the .asf format. The .avi format increases the frame rate and forces the video to run faster than normal. - Select the use profile.
- Select whether you want to export the recorded video with its audio and OSD data.
- Click OK.
Save an image in a video
- Click Playback.
- Click Open Record.
- Select a date.
- Select a video and click OK.
- Select the camera display and review the video.
- Click Save Image when the image appears.
- Select where to save the file.
- Select the image format, BMP or JPEG.
- Name the file and click Save.
Print an image in a video
- Click Playback.
- Click Open Record.
- Select a date.
- Select a video and click OK.
- Select the camera display and review the video.
- Click Print when the image appears.
- Configure the print setup.
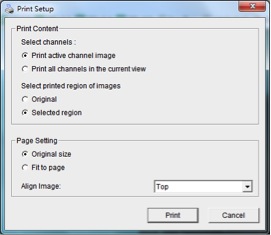
- Click Print.
Back up video files
Backup saves all the video files within a set period of time.
- Click Open Record.
- Click Backup.
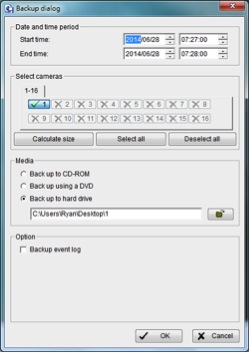
- Set the start and end times.
- Select the cameras to back up.
- Select the media format and a path to back up the files.
- Click OK. The amount of time to back up files depends on the length of the time period, number of recordings, and number of channels.
Playback – Desktop App
Application Control Panel
The desktop app’s Playback System is similar to the playback panel in NAS OS.
Add a server
Before using the Playback System, you must set a connection to a server that manages one or more cameras.
- Select Playback System.
- Click General settings.
- Click the Server tab.
- Enter the server information.
- To test the connection between the local application and the remote server, click Test server.
- Click Add to add the server to the remote server list.
- Click OK.
Search video files

- Click Playback System.
- Click Open Record.
- Click the Home
 icon on the top left of the Date-Time Panel. The Remote Playback Site Management dialog opens.
 - Select the server you want to access.
- Select the recording you want to view in the Time Table.
- Set the Date Time Period.
The search function in the desktop app’s Playback System is similar to the NAS OS. See Search the Recorded Video for details.
Play a video
- Confirm that you have set the schedule / recording event.
- Click Playback System.
- Click General settings and select the Server tab to set the connection to one or more servers. See Add Server.
- Click Open Record.
- Select a date. See Search the Recorded Video for more information.
- Select the video you want to review.
- Select the start and end points of the viewing period.
- Click OK.
Intelligent Search
You can search for specific events and motion events in a video using the Intelligent Search Tool.
- Click Playback System.
- Click Open Record.
- Select a date. See Search the Recorded Video for more information.
- Select the video you want to review.
- Select a camera display.
- Click Search Mode to open the Intelligent Search Tool panel.
- See Intelligent Search for more instructions.
Save a video file
- Click Playback System.
- Click Open Record.
- Select a date. See Search the Recorded Video for details.
- Select a video and click OK.
- Select the camera display to save as a video clip.
- Select the cue in and cue out points in the information window.
- Click Save Video.
- In the Export Video/Audio window, select where to export the file.
- Name the file and click Save.
- Select the export format.
- Select the use profile.
- To include the recorded audio, select Export Audio.
- Click OK.
Save an image in a video
- Click Playback System.
- Click Open Record.
- Select a date. See Search the Recorded Video for details.
- Select a video and click OK.
- Select the camera display and review the video.
- Click Save Image when the image appears.
- Select where to save the file.
- Select the image format, BMP or JPEG.
- Name the file and click Save.
Print an image in a video
- Click Playback System.
- Click Open Record.
- Select a date.
- Select a video and click OK.
- Select the camera display and review the video.
- Click Print when the image appears.
- Configure the print setup.
- Click Print.
Back up video files
Backup saves all the video files within a set period of time.
- Click Playback System.
- Click Open Record.
- Click Backup.
- Set the start and end times.
- Select the cameras to back up.
- Select the media format and a path to back up the files.
- Click OK. The amount of time to back up files depends on the length of the time period, number of recordings, and number of channels
Remote Live Viewer and E-Map
E-Map lets you track live events with instant alerts. The arrows and lightening icons represent cameras and I/O devices. The icons turn red when the app receives an alert.
E-map has two modes:
| Icon | Feature | Description |
|---|---|---|
| Edit Mode | Add, edit, or delete maps and indicators. | |
| Browse Mode | During live viewing, you can confirm alert hierarchies, the device list, indicators and other settings. You cannot adjust E-map settings during a live event. |
E-map is available in:
- NAS OS–It is recommended that users access NAS OS using Internet Explorer.
- Desktop app–The desktop app is compatible with Windows.
E-Map - NAS OS app
- Click Live.
- Click Start menu and select Open E-Map.
E-Map Control Panel
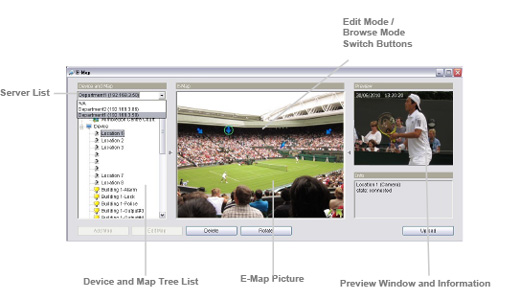
| Icon | Feature | Description |
|---|---|---|
| Map | Select a map. | |
| Camera | Select a camera to preview video or to mark an indicator on E-map. | |
| Digital Input | Select a device to review its status. IP cameras display live video. | |
| Digital Output | Select a device to review its status. IP cameras display live video. | |
| Map Indicator | Click to review the next map layer. To return to the previous layer, click the back arrow icon. | |
| Back arrow | Click to return to the previous window. | |
| Camera Indicator | Shows the cameras dragged from the Device and Map Tree List. This indicator provides preview video and related information. The camera indicator turns red when an event occurs. | |
| Digital I/O Indicator | Shows the I/O devices dragged from the Device and Map tree list. This indicator provides information about the devices. The digital I/O indicator turns red when an event occurs. |
Add a map
- Select Edit Mode.
- Make sure that all devices are ready.
- Right-click the Map icon (
 ) in the Device and Map tree list or click Add Map.
 - Select a Map Image File, name it, and then click OK.
The new map appears in the Device and Map tree list. - Drag the map indicator (
 ) to the desired position on the map.
 - Repeat the steps to add more maps.
- Click Upload to enable the settings.
Edit a map
- Select Edit Mode.
- Make sure that all devices are ready.
- Right-click the Map icon () in the Device and Map tree list, or click Edit Map.
- Adjust the map’s settings.
- Repeat the steps to edit more maps.
- Click Upload to enable the settings.
Delete map
- Select Edit Mode.
- Make sure that all devices are ready.
- Right-click the Map icon () in the Device and Map tree list, or click Delete.
- Repeat the steps to delete more maps.
- Click Upload to confirm the map removal.
Add a device indicator
- Select Edit Mode.
- Make sure that all devices are ready.
- Select a map.
- Select a device from the list and drag it to the desired location on the map.
- Repeat the steps to add more indicators.
- Click Upload.
Rotate a device indicator
- Select Edit Mode.
- Make sure that all devices are ready.
- Select a map.
- Right-click a camera indicator, or click Rotate to adjust its direction.
- Repeat the steps to rotate more indicators.
- Click Upload.
Delete the device indicator
- Confirm that Edit Mode is selected and that all devices are ready.
- Right click on the indicator, or click Delete.
- Repeat step 2 to delete additional indicators.
- Click Upload to confirm the settings.
Layout Adjustment

| Icon | Feature | Description |
|---|---|---|
| Adjust the Layout | Click the triangle to hide or reveal the Device and Map Tree List / Preview and Information Window. | |
| Maximize the Map | Click the square icon on the upper right to enter full screen. |
Relative configuration and application
E-Map alerts and dialog windows appear when events occur. See Notification for details on alerts.
E-Map – Desktop app
- Click Remote Live Viewer.
- Click Start menu.
- Click Open E-Map.
E-Map Control Panel
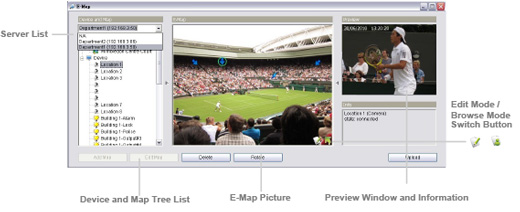
Server List–Select a server to display its E-map settings.
E-Map for the desktop app is similar to the NAS OS app. See E-Map - NAS OS app for instructions.