Was this content helpful?
How could we make this article more helpful?
Dashboard tour
Use the Windows Storage Server 2012 R2 Essentials dashboard to manage your device and review its features.
To launch dashboard, click twice on its icon, located on the upper left of the desktop.
Dashboard is composed of the following sections:
- Home
- Users
- Devices
- Storage
- Applications
- Monitor (Seagate’s WSS NAS monitor)
Dashboard interface
While dashboard sections can vary by features, tables are consistent. The screenshot below offers an example of the general interface for all sections.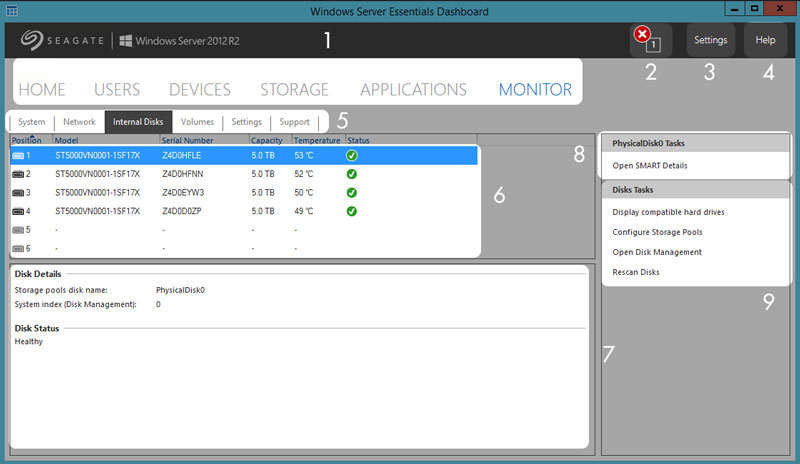
- Sections–Choose a section to manage and review its settings.
- Notifications–Click notifications to view Home > Health Monitoring.
- Settings–Open settings for date/time and Anywhere Access (remote access).
- Help–Search for help topics related to your product.
- Tabs–Choose a sub-category for the section.
- Select–Choose an item.
- Information–Review the details of the selected item.
- Related links–Click a link to access related information or, to perform an alternate action to the selected item.
- Action links–Click a link to perform an action to the selected item.
Dashboard sections
Home
The Home section includes three tabs:
- Get Started
- Health Monitoring
- Health Report
Get Started
After completing the steps in the Setup Assistant, you can choose this tab for ideas and links that help you further configure your WSS NAS.
- Set Windows Update.
- Add user accounts.
- Add server folders.
- Configure remote access via Anywhere Access.
- Set up email notifications.
- Connect PCs on the network to the WSS NAS.
Heath Monitoring
Review and troubl4shoot alerts and warnings.
Health Report
Customize the types of alerts listed in Health Monitoring and configure email notifications. You can also download a log of the health report.
Users
Add new users and create groups.
Users, groups and server folders
Allotting storage and network permissions for multiple departments and users in a branch office or corporate network can be complicated. It takes forethought and planning to configure which user is part of what user group with access to how many server folders. For this reason, the Users section is closely linked to the Storage > Server Folders tab. The administrator can:
- Create new server folders in the Storage > Server Folders tab.
- Set access rights to the shared folders when adding users and user groups in the Users section.
Though each setting can be revised at any time, it is highly recommended that the administrator plan ahead when first adding users, user groups and server folders. With a map that lists all users, user groups and server folders, the administrator can simplify access rights. See the example below.
Example: users, user groups and server folders
Based upon a branch office’s departments, an administrator maps permissions for 40 server folders, 20 users and 10 user groups.
To get started, the administrator adds the 20 server folders using the Add a folder wizard at Storage > Server Folders. All folders should be kept on volumes with large capacities. The system volume should not be used to host server folders.
Next, the administrator adds the 20 users using the Add a user account wizard in the Users section. Using this workflow, the administrator has the option to wait before setting server folder permissions.
Finally, the administrator adds the 10 user groups using the Add a new user group wizard at Users > User Groups. In this step, the administrator assigns:
- Each user to a specific group.
- Server folder permissions for each group.
The User Groups setting is the last step since it can cover more users at one time rather than assigning server folder permissions for each new user.
The generic sample setup may not apply to all environments. However, Windows Storage Server 2012 R2 Essentials gives the administrator free reign to configure permissions for all users and server folders.
To learn more about user accounts, see the Microsoft Technet overview.
For additional links pertaining to users and groups, see the Microsoft Technet list.
Recovering the administrator password
To have full access to the NAS, the administrator signs in with the domain’s administrator password. If you forget the administrator’s password, you can use a password reset disk to create a new one. As an important backup measure, Seagate recommends that you create a password reset disk when you initially create your password.
Create a password reset disk
To create a reset disk, you need a USB key or flash drive.
- In the Control Panel, select User Account.
- Select the administrator account.
- Select Create a password reset disk.
- Follow the on-screen instructions.
Keep the USB key or flash drive in a safe location.
Devices
Use this section to configure and manage backups for:
- Seagate WSS NAS. Back up the WSS NAS to desktop attached storage (DAS) connected to one of the USB ports.
- Compatible PCs on the network. PCs must use the Windows Server Essentials Connector to connect to the WSS NAS before configuring client backups. PCs running Windows 7 and higher are compatible with the WSS NAS.
To learn more about the Windows Server Essentials Connector, see the Microsoft Technet overview.
For instructions on how to connect a PC on the network, see Windows Server Essentials Connector.
Storage
This section includes two tabs:
- Server Folders
- Hard Drives
Server Folders
Create and manage server folders. For an example on planning server folders, users and user groups, see Users.
To learn more about server folders, see the Microsoft Technet overview.
Hard Drives
Create and manage the WSS NAS’s storage spaces. Use this tab to:
- Increase the capacity of a storage pool.
- View the properties of a grouped hard drive. Access the properties to review the settings for Shadow Copies.
To learn more about Shadow Copies, see the Microsoft Technet overview.
Applications
Use this section for Add-ins, compatible apps that can be installed on your WSS NAS. Go to the tab Applications > Microsoft Pinpoint to access the marketplace for Windows Storage Server 2012 R2 Essentials.
Monitor
This section is unique to the Seagate WSS NAS. It includes tabs to help you manage your WSS NAS’s storage as well as locate resources and links. Review the details below for each tab.
System
Check the status of the WSS NAS’s:
- CPU
- Memory
- Casing
- Up time
Network
Check the status, speed and address information for the Ethernet ports. An active Ethernet port shows a green status light while an inactive port is grey. Select a port to view its details in the lower window, including MAC and IP addresses.
The name in the lower window is the network name of your WSS NAS.
Internal Disks
Check the temperature and health of the WSS NAS’s hard drives. You can also review the SMART status of a disk by selecting it and clicking Open SMART Details on the right.
Volumes
Check the status, health and available storage capacity of the network volumes. Use Volumes to gather all the details and links pertinent to your storage.
Click the volume to reveal its disks in the photo image. Black disks are part of the volume.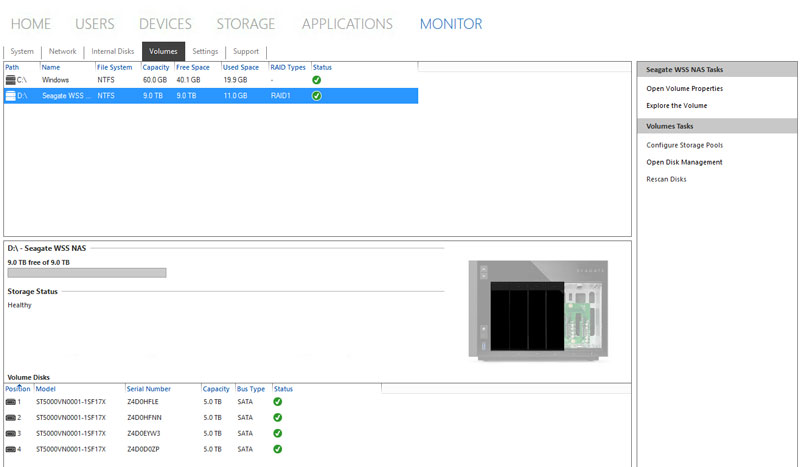
Grey disks are not part of the volume.
Settings
- Hardware Settings–Use the pull-down menu to make the WSS NAS’s LEDs flash. This is helpful when attempting to identify the WSS NAS when it sits in a rack or next to similar devices.
- Software Settings–Use the pull-down menu to change the temperature unit.
- HTTP Proxy–Configure your NAS to connect to the Internet using a proxy server.
Support
- Seagate WSS NAS–Review your device’s operating system, serial number and model.
- Seagate Software–Review the version of the Seagate Monitor tab. You can also check for an update to Monitor.
- Logs–Download system logs.