Was this content helpful?
How could we make this article more helpful?
Devices
Manually add a network device
- Click on the Devices tab.
- Click on the Add icon.
- Enter the appropriate IP address or hostname.
- Enter the device serial number.
If you don’t know a device’s serial number, you can find it by scanning the QR code on the left side of the Lyve Mobile Array handle.
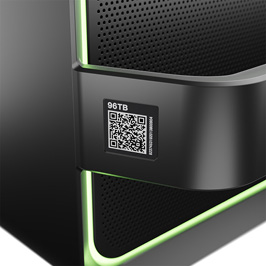
Do not confuse the QR code on the handle with the QR code on the back of Lyve Mobile Array, which is clearly marked PSID. The PSID is not the same as the serial number.
If the serial number on the handle is unreadable or doesn’t work, use theClick Connect. Lyve Virtual Assistant icon to start a support session. - Click Connect.
- After the device is found, click Confirm.
![]()
View device details
To view device details:
- Click on the Devices tab.
- Hover your cursor over a device card and click on the Inspect icon.
- View device details. See below.
![]()
Device
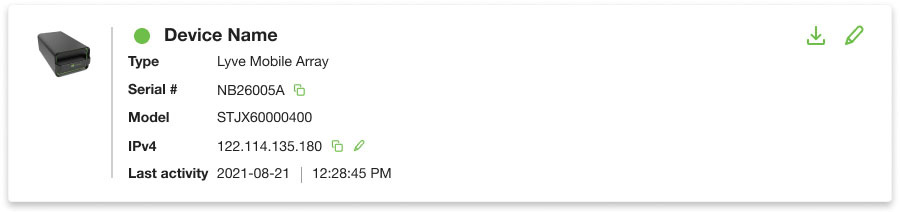
| Click to download an activity log (used for troubleshooting issues). | |
| Click to rename device. |
| Device details | Notes | |
| Device name | ||
| Type | ||
| Serial # | Click to copy serial number to clipboard. | |
| Model | ||
| IPv4 | Click to copy IP address to clipboard. | |
| Click to edit IP address. | ||
| Last activity | Date | Time | |
Data Connections
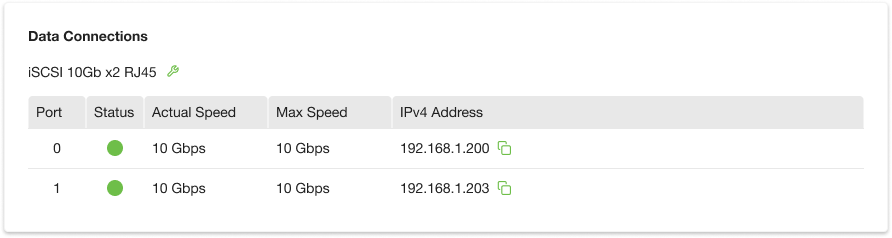
| Click to edit iSCSI setup. |
| Data connection details | Notes | |
| Port | ||
| Status | Good connection | |
| Degraded connection | ||
| No connection | ||
| Actual Speed | Click to copy serial number to clipboard. | |
| Max Speed | ||
| IPv4 Address | Click to copy IP address to clipboard. | |
Cryptographic Erase

Click to begin a cryptographic erase of data in the device. See Cryptographic Erase. |
LED

| Turn LED on/off. | |
| View LED states | View information on LED states. |
Disks and Spares

| # disks | Disks in device |
| Connected and healthy | |
| Disconnected | |
| Connected but read/write degraded (for example, RAID initialization in progress or drive errors) | |
| Connected but read/write severely diminished (for example, drive errors) | |
| # available | Number of available disks for spares |
Disk Group
If the device is currently configured with a disk group (RAID array):

| Change the disk group (RAID) configuration. See Configure Disk Group (RAID). |
If no disk group (RAID) has been configured:

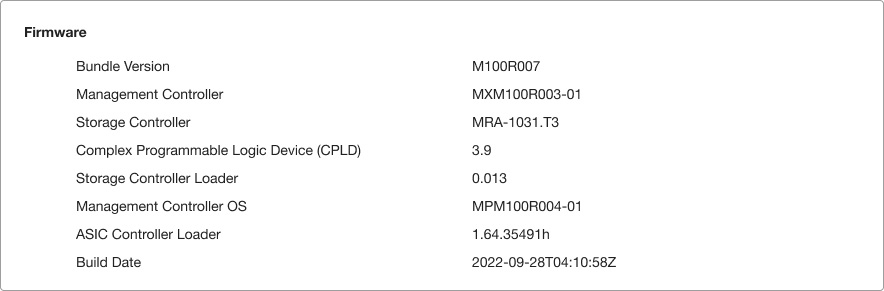
Firmware
Identify a device
Lyve Client can identify a connected Lyve Mobile device for you by having it temporarily flash its LED. This is useful if you have a large bank of connected Lyve Mobile devices and you need to identify a particular device. You can identify the device regardless of whether it is locked or unlocked.
- Click on the Devices tab.
- Hover your cursor over a connected device card and click the Identify icon.
- Observe the front faces of your devices to spot the one with the flashing purple LED.
- Click the Identify LED icon a second time to turn off the identification.
![]()
Rename a device
You can change the name of connected unlocked device.
- Click on the Devices tab.
- Hover your cursor over a connected device card and click the Edit icon.
- Enter a new device name and click Rename.
![]()
Forget a device
If you no longer want a disconnected device to appear in Lyve Client, you can make the app ‘forget’ the device.
- Click on the Devices tab.
- Hover your cursor on a disconnected device card and click the Forget Device icon.
- Click Forget Device to confirm.
![]()