Was this content helpful?
How could we make this article more helpful?
System Overview
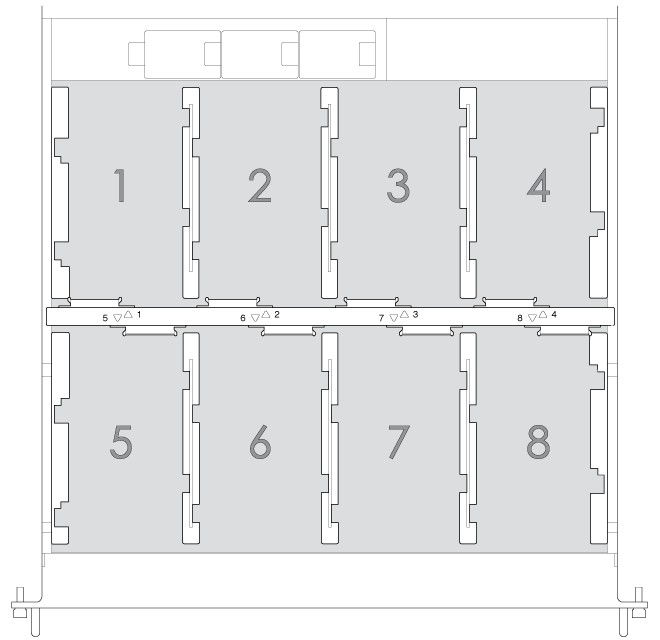
The 8-bay Rackmount NAS is a 1U-sized hard drive enclosure. It houses up to eight 3.5-inch hard drives in its front chassis (see the illustration above).
Enclosures shipped with hard drives feature Seagate's high-end nearline hard drives. For more information on nearline hard drives, go to Seagate Enterprise Drives.
New or replacement hard drives must meet the following requirements:
- SATA I or higher
- 3.0Gb/s or higher
- Spin up to 7200 RPM
In case of disk failure or, the need to expand storage capacity, each individual hard drive is hot-swappable and field replaceable. When adding hard drives to the enclosure, consider using Seagate nearline storage.
Seagate NAS OS
The 8-bay Rackmount NAS is managed by Seagate NAS OS. Written to all drives within the enclosure, NAS OS helps you to create volumes with RAID protection. Direct attached storage (DAS) can be connected to the enclosure's external ports for NAS backup. However, it is not possible to expand volumes using DAS.
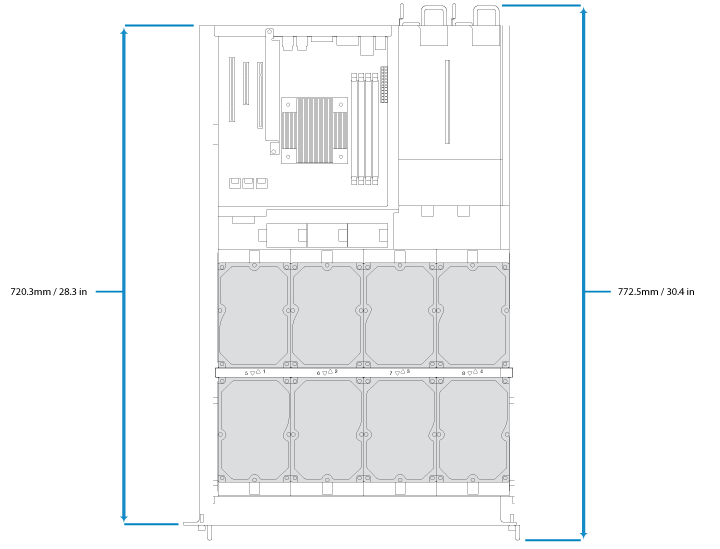
Enclosure dimensions
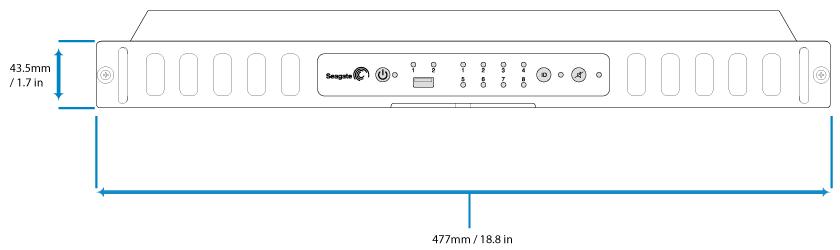
Front panel view
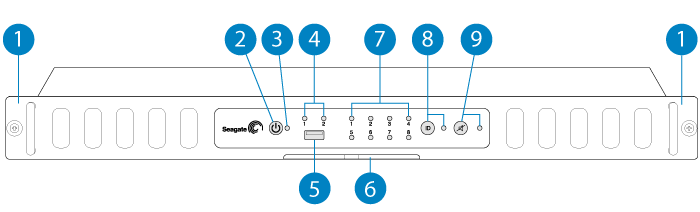
- Rackmount brackets: Attaches your Seagate 8-bay Rackmount NAS to standard, 19-inch computer equipment racks. See Setting Up.
- Power button: Used to turn the system on and off. See Operation.
- Status LED: Indicates that the device is powered on and provides status signals. See System LEDs.
- Ethernet LEDs 1 and 2: A LED will turn blue when its respective port is connected to the network. Blinking indicates activity on the LAN.
- USB 2.0 port: Connect compatible USB devices to the port.
- MAC address label: Slide the label toward you to view the MAC addresses for the Ethernet ports. The MAC addresses are also listed on a sticker located on the rear cover. MAC addresses are requested when running the NAS OS Installer to reinstall the operating system or to repair or rescue the system.
- Disk LEDs: Indicates the status and activity for the drives in the enclosure.
- Identification button: Pushing this button will cause the identification LEDs in the front and rear of the device to flash amber and the alarm to sound. The flashing LEDs allow you to identify the 8-bay Rackmount NAS among a group of racked devices. There is another identification button on the rear of the device that can also be pushed to turn on the identification LEDs and sound the alarm. Both buttons work in tandem, allowing you to turn the visual and audio identifications on and off. For example, you can use the identification button on the front of the device to turn them on and then turn them off via the rear identification button. A third identification option is available in the NAS OS administration tool.
- Mute button: Push the button to turn off an existing audio alarm or, to prevent the system from sounding an audio alarm. An audible alarm will sound when someone pushes an identification button or chooses the option in the NAS OS administration tool. It will also sound if the unit senses a problem with the hardware, such as a faulty power supply unit or elevated temperatures. When the Mute button is pushed, its LED will turn amber, indicating that the alarm will not sound, even if the NAS experiences hardware errors.
For details on LED behavior. See System LEDs.
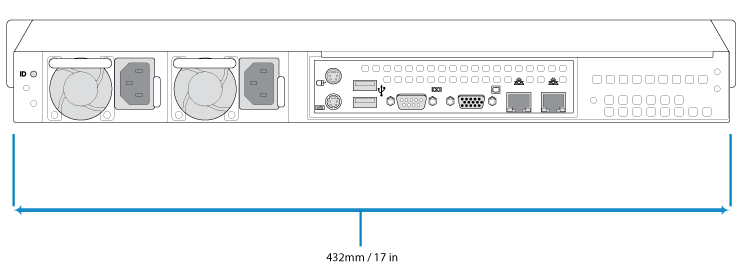
Rear panel view
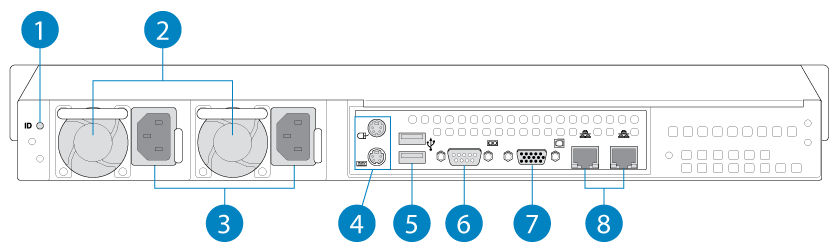
- Identification Button and LED: Pushing this button will cause the identification LEDs in the front and rear of the device to flash amber and the alarm to sound. The flashing LEDs allow you to identify the 8-bay Rackmount NAS among a group of racked devices. There is another identification button on the front of the device that can also be pushed to turn on the identification LEDs and sound the alarm. Both buttons work in tandem, allowing you to turn the visual and audio identifications on and off. For example, you can use the identification button on the front of the device to turn them on and then turn them off via the rear identification button. A third identification option is available in the NAS OS administration tool.
- Ventilation: Helps to keep your NAS's power supply units cool during operation. Be sure not to block this fan when using the product.
- Power inputs: Where you plug in the AC adapter supplied with the drive. See Setting Up.
- PS/2 ports: Connect a mouse and keyboard for maintenance.
- Hi-Speed USB 2.0 ports: Can be used for direct-attached storage (DAS) or USB devices such as a mouse and keyboard.
- RS-232: Serial communications port.
- VGA video port: Connect a VGA display for maintenance.
- Gigabit Ethernet ports: Connect Ethernet cables from the device to your network. See Setting Up.
USB ports
The 8-bay Rackmount NAS has three USB 2.0 ports, which lets you connect DAS or other USB devices:
- Storage devices connected to a USB port should be formatted using one of the following file systems: FAT32, NTFS, HFS+, EXT2, EXT3, EXT4, and XFS. Other storage formats will not be recognized by the NAS. No capacity limitations apply.
- You can connect any USB keyboard, USB mouse, or USB accessories.
Drive frames
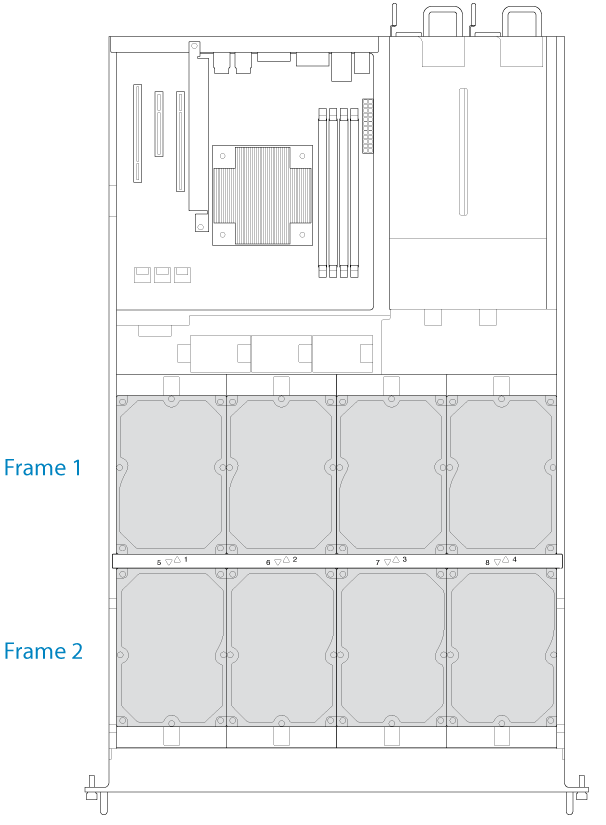
The 8-bay Rackmount NAS has two drive frames, each housing four 3.5-inch form factor disk drives. The frame has mounting locations for SATA drives. The drive frame provides thermal conduction, radio frequency, and electro-magnetic induction protection and affords the drives physical protection.