Was this content helpful?
How could we make this article more helpful?
RAID
Refer to the table below for an overview of the RAID modes available to your NAS OS device. Note that the levels of performance and protection will differ based upon the number of drives in the volume. The NAS OS New network volume wizard includes a helpful tooltip with star ratings for performance and protection based upon the amount of disks in the volume.
| RAID mode | Minimum hard drives |
|---|---|
| SimplyRAID | 1 (no data protection) or 2 (with data protection) |
| SimplyRAID dual | 3 |
| JBOD | 1 |
| RAID 0 | 2 |
| RAID 1 | 1 (no data protection) or 2 (with data protection) |
| RAID 5 | 3 |
| RAID 6 | 4 |
| RAID 10 | 4 |
The factory default RAID for a NAS OS device varies upon the amount of hard drives in the enclosure:
- 0 hard drives: SimplyRAID with single-disk protection will be configured during the NAS OS installation.
- 2 hard drives: SimplyRAID with single-disk protection
- 4 hard drives: SimplyRAID with single-disk protection
- 8 hard drives: SimplyRAID dual with double-disk protection
Single-disk protection: data is safe if one hard drive fails.
Double-disk protection: data is safe if two hard drives fail.
Note on enclosures with one hard drive: You can create a SimplyRAID or a RAID 1 volume with a single hard drive. However, there is NO DATA PROTECTION when the volume has only one hard drive. Therefore, when new hard drives in the enclosure are available, it is highly recommended that you expand the single-disk volume to protect your data (see Single-disk and unprotected volumes:expansion).
Important info on NAS backup: To further protect data against the loss of a hard drive or secondary points of failure (e.g. hardware, network, etc.), it is recommended that all users back up data to a DAS or another NAS. See Backup Manager for details.
Get help choosing your RAID
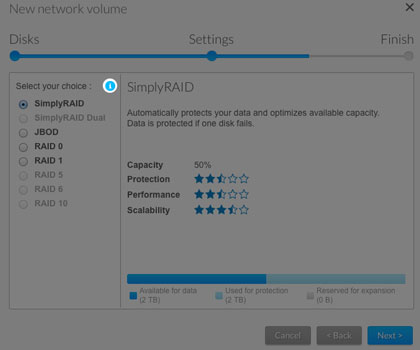
Tooltip: star ratings for RAID
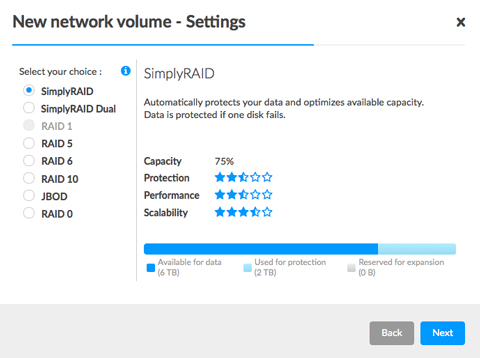
Understanding NAS OS RAID is critical when deciding how best to apportion the hard drives in your NAS. To help administrators configure RAID volumes, the NAS OS New network volume wizard provides a star rating system with an intuitive storage capacity bar. The star ratings are available within the tooltip on the RAID selection step. Click on the i next to Select your choice to review the ratings.
Note: Step-by-step instructions on how to create a new volume are available in New network volume wizard.
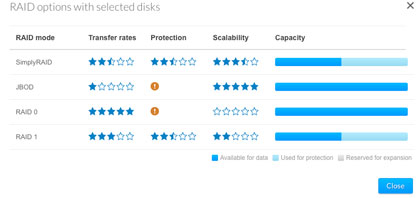
RAID comparisons
The level of RAID available to a volume is contingent upon the amount of hard drives in the enclosure. For example, a volume with four hard drives supports all levels of RAID except for RAID 1, which is not compatible with volumes greater than three hard drives. The New network volume wizard offers star ratings for each RAID at the RAID selection step. Choose a RAID's radio button to review its strengths and weaknesses in the center of the window.
Example 1: When making comparisons in a volume with four hard drives, RAID 0 is the best choice for storage capacity. However, it has a major weakness: no data protection. Further, RAID 0 performance approximates that of RAID 5, which provides data protection if a hard drive fails.
Example 2: Both RAID 6 and SimplyRAID Dual offer data protection even if two hard drives fail. However, SimplyRAID will optimize storage capacity far better than RAID 6 in mixed capacity configurations.
RAID levels
NAS OS SimplyRAID
Most RAID modes use equal disk capacities among the pool of hard drives to protect data. Rather then lose storage capacity overhead in mixed hard drive environments, SimplyRAID preserves the extra space for use when new hard drives are added to the enclosure. This means that, unlike standard RAID models, you can easily expand the array without losing data. For example, two 1TB hard drives will create a RAID 1 array without any storage capacity overhead. However, one 1TB hard drive paired with one 2TB hard drive only creates 1TB of protection since data cannot surpass the storage capacity of the smallest hard drive. SimplyRAID will calculate the overhead and prepare it for future expansion.
JBOD (Just a Bunch of Disks)
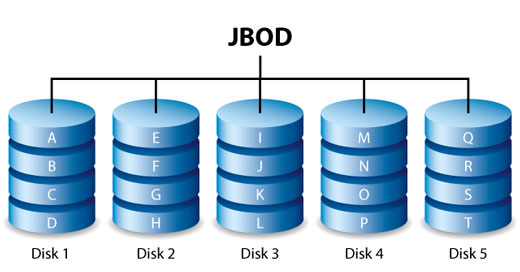
Hard drives in a JBOD configuration store data sequentially. For example, data is written to Disk 1 first. Once Disk 1 is full, data will be written to Disk 2, then Disk 3, etc. Two advantages to this level of RAID are:
- 100% availability of the hard drives' total storage capacity
- Easy expansion
JBOD’s weakness is that it has no data protection. Should a hard drive fail, all data on that hard drive will be lost.
RAID 0

RAID 0 is the fastest RAID mode since it writes data across all of the volume's hard drives. Further, the capacities of each hard drive are added together for optimal data storage. However, RAID 0 lacks a very important feature: data protection. If one hard drive fails, all data becomes inaccessible. A recommended option is SimplyRAID or RAID 5, which offer comparable performance and data protection in case a single hard drive fails.
RAID 1
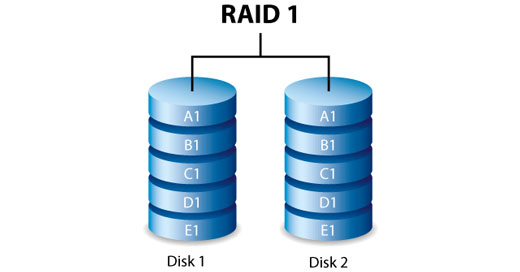
RAID 1 provides enhanced data security since all data is written to each hard drive in the volume. If a single hard drive fails, data remains available on the other hard drive in the volume. However, due to the time it takes to write data multiple times, performance is reduced. Additionally, RAID 1 cuts storage capacity by 50% or more since each bit of data is stored on all disks in the volume.
Note on RAID 1 hard drive requirements: A standard RAID 1 configuration includes two hard drives of equal capacity. However, NAS OS allows you to create a RAID 1 volume with up to three hard drives or, three hard drives plus a spare. It is also possible to create a RAID 1 volume using a single hard drive. While a volume with one hard drive cannot provide data protection, it is ready for expansion when new hard drives are available. Data protection would become available once a second hard drive is added to the RAID 1 volume.
RAID 5
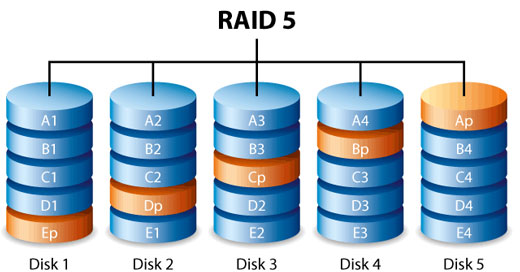
RAID 5 writes data across all hard drives in the volume and a parity block for each data block. If one hard drive fails, the data can be rebuilt onto a replacement hard drive. No data is lost if a single hard drive fails. However, if a second hard drive fails before data can be rebuilt on the replacement hard drive, all data in the array is lost. A minimum of three hard drives is required to create a RAID 5 volume.
RAID 5 offers performance that can approach RAID 0. The strong advantage that RAID 5 gives you is data protection. Additionally, you still have approximately 75% of the storage capacity of a RAID 0 array (based upon total available hard drives and storage capacities). The equation for determining the storage is:
(The size of the hard drive with the smallest capacity in the array)*(Total hard drives-1).
Example 1: An array is assigned five 3TB hard drives for a total of 15TB. The equation is: 3TB * 4= 12TB.
Example 2: An array is assigned three 2TB hard drives and one 3TB hard drive for a total of 9TB. The equation is: 2TB * 3= 6TB.
RAID 6
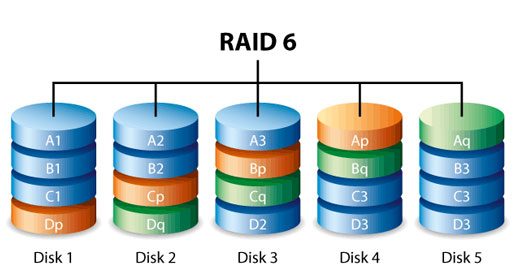
RAID 6 writes data across all hard drives in the volume and two parity blocks for each data block. If one hard drive fails, the data can be rebuilt onto a replacement hard drive. With two parity blocks per data block, RAID 6 supports up to two hard drive failures with no data loss.
RAID 6 synchronizing from a failed hard drive is slower than RAID 5 due to the use of double parity. However, it is far less critical due to double-disk security. A minimum of four hard drives is required to create a RAID 6 volume.
RAID 6 offers very good data protection with a slight loss in performance compared to RAID 5.
RAID 10

RAID 10 combines the protection of RAID 1 with the performance of RAID 0. Consider a volume with four hard drives. RAID 10 creates two RAID 1 segments, and then combines them into a RAID 0 stripe. With eight hard drives, the RAID 0 stripe will include four RAID 1 segments. Such configurations offer exceptional data protection, allowing for two hard drives to fail across two RAID 1 segments. Additionally, RAID 10 writes data at the file level and, due to the RAID 0 stripe, gives users higher performance when managing greater amounts of smaller files. This means a more generous input/output per second for data (IOPS).
RAID 10 is a great choice for database managers that need to read and write many small files across the volume. The impressive IOPS and data protection offered by RAID 10 gives database managers impressive reliability both in keeping files safe and rapid access.
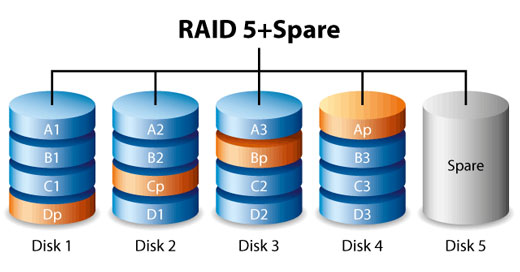
RAID 1+Spare(s), RAID 5+Spare(s), RAID 6+Spare, and RAID 10+Spare
| RAID Mode | Maximum Spare Drives |
|---|---|
| RAID 1 | 5 |
| RAID 10 | 4 |
| RAID 5 | 5 |
| RAID 6 | 4 |
- RAID 1: The same data is written across all hard drives in the volume, protecting data against the loss of one hard drive.
- RAID 10: Comprised of two or more RAID 1 segments, RAID 10 allows for single-disk failure in each segment.
- RAID 5 and RAID 6: Data is written in parity blocks on all hard drives in the volume. Files are protected against single- or double-disk failure, respectively.
A RAID+Spare volume gives you a "hot-spare" that is ready to synchronize data immediately should a hard drive fail. If a hard drive fails, the data starts to synchronize with the spare. The clear advantage for a RAID volume with a spare is that you do not have to wait for a replacement hard drive.
When the failed hard drive is replaced, the replacement hard drive becomes the new hot spare.
To create a volume with a spare hard drive, you must choose Custom in the New network volume wizard. Selecting Quick setup in the New network volume wizard will automatically configure a volume with SimplyRAID and single disk protection. SimplyRAID optimizes disk space across all hard drives to maximize data storage. Therefore, it does not include the option to add a spare drive. See New network volume wizard for instructions on creating volumes.
Important info: For RAID+Spare volumes, data remains intact when a single disk fails and the spare begins synchronizing automatically. If a second disk in the volume fails before synchronization is complete, all data in the volume will be lost. RAID 6 allows for two disks to fail.
New network volume wizard
Build one or more volumes using the New network volume wizard. You can select:
- Quick setup: Skip multiple configuration steps with NAS OS SimplyRAID, Seagate's smart RAID. SimplyRAID will review the amount of hard drives in the volume and the total storage to optimize data capacity and protect your data. To provide the most storage space for your data, Quick setup configures a SimplyRAID volume with single-disk security. For additional protection, SimplyRAID is also available with double-disk security when selecting Custom.
- Custom: Configure a volume using NAS OS SimplyRAID or standard RAID models. Custom offers a wide range of RAID configurations:
- SimplyRAID with single-disk protection (minimum of two hard drives for data protection)
- SimplyRAID Dual with double-disk protection (minimum of three hard drives) JBOD
- RAID 0 (minimum of two hard drives)
- RAID 1 (minimum of two hard drives for data protection)
- RAID 1+Spare (minimum of three hard drives). Additional steps required for the spare. RAID 5
- (minimum of three hard drives)
- RAID 5+Spare (minimum of four hard drives) Additional steps required for the spare. RAID
- 6 (minimum of four hard drives)
- RAID 6+Spare (minimum of five hard drives). Additional steps required for the spare. RAID
- 10 (minimum of four hard drives)
- RAID 10+Spare (minimum of five hard drives). Additional steps required for the spare.
SimplyRAID and spare disks: NAS OS optimizes storage capacity using all the hard drives in a SimplyRAID volume. Therefore, a spare hard drive is not supported with SimplyRAID.
- You must use Custom to configure SimplyRAID Dual.
- The New network volume wizard does not offer a migration path from SimplyRAID to SimplyRAID Dual.
New network volume wizard steps
Consider the following when creating a new volume:
- Volume names: The default names for newly created volumes are Volume 1, Volume 2, etc. For instructions on how to change the name of the volume, see Storage. An encrypted volume retains the default name and it cannot be changed.
- Planning for volume expansion:
- Apart from RAID 0 and RAID 10, RAID volumes can be expanded with new hard drives. However, it is not possible to add new hard drives with inferior capacities. For example, a RAID 5 or SimplyRAID volume with three 2TB hard drives supports the addition of a fourth hard drive that is 2TB or higher.
Quick setup
- Go to Device Manager > Storage > Storage Overview.
- NAS OS detects new hard drives in the enclosure. Choose Manage to launch the New network volume wizard.
- In the Select disks window, hard drives with white checkboxes can be selected for the new volume. An existing volume is using hard drives with grey checkboxes. Select the white checkbox under the hard drives you want to use for the new volume and choose Next.Important : All data on the selected hard drives is deleted to create the RAID volume.
- Select Quick setup to create a SimplyRAID volume. With two or more hard drives, SimplyRAID creates a RAID volume using single security. If you choose Custom, refer to the instructions below.
- Choose Next.
- Review the summary window then choose Finish. A popup window cautions you that all data on the selected hard drives will be deleted to create the volume. Select Yes to build the SimplyRAID volume.
You can start using the volume immediately. See Shares for instructions on how to create new shares on the volume to store and share data.
Custom
Your options to select the level of RAID are predicated upon the number of hard drives in the array. For example, a three-disk configuration allows you to select from SimplyRAID, JBOD, RAID 0, RAID 1, and RAID 5. A four-disk configuration offers SimplyRAID, JBOD, RAID 0, RAID 5, RAID 6, and RAID 10.
Adding a spare
If you intend to create a volume with a spare hard drive, you must leave at least one hard drive free. For example, a four-disk RAID 6+Spare would require that you create the RAID 6 volume with the first four hard drives before adding the fifth hard drive as the spare. See the next section for details on adding the spare.
Build a RAID volume:
- Go to Device Manager > Storage > Storage Overview.
- NAS OS detects new hard drives in the enclosure. Choose Manage to launch the New network volume wizard.
- In the Select disks window, hard drives with white checkboxes can be selected for the new volume. An existing volume is using hard drives with grey checkboxes. Select the white checkboxes under the hard drives you want to use for the new volume and choose Next.Important info: All data on the selected hard drives is deleted to create the RAID volume.
- Select Custom and choose Next.
- The RAID selection window helps you choose the optimal configuration for your environment: Select a
- RAID mode's radio button to view an explanation of its strengths and weaknesses.
- Use the cursor to choose the i tooltip to see a graphic summary of the strengths and weaknesses of each RAID level.
- RAID mode's radio button to view an explanation of its strengths and weaknesses.
- Select your level of RAID and choose Next.
- Choose No encryption to move to the summary page or, Encrypt the volume. When choosing encryption, you have two options to unlock the volume: password only or, a password plus a USB device. Enter the password and/or insert a USB device into one of the NAS's USB ports. Choose Next.Important info: An encrypted volume can experience a reduction in performance.
- Choose Next.
- Review the summary window then choose Finish. A popup window cautions you that all data on the selected hard drives will be deleted to create the volume. Select Yes to build the volume.
Custom+Spare
A spare drive can be added to RAID 1, RAID 5, RAID 6, and RAID 10 volumes. Before adding a spare hard drive, you must follow the instructions above (Custom) to create the RAID volume. When creating the volume, leave a minimum of one hard drive free for the spare. For example, a four-disk RAID 6+spare would require that you create the RAID 6 volume with the first four hard drives. Once the RAID has been synchronized, review the steps in this section to add the fifth hard drive as the spare. A spare hard drive must have a capacity equal to or greater than the largest hard drive in the RAID volume.
- On the Storage section at the lower left, choose the volume add a spare disk.
- Choose Manage.
- Select Add drive and choose Next.
- NAS OS detects hard drives in the enclosure that are not in use by other volumes. Check the box under the hard drive to use as the spare. You can add more than one spare.
- Choose Next.
- Select Custom and choose Next.
- Select Add spare drives and choose Next.
- Review the summary and choose Finish. A popup window cautions you that all data on the selected hard drives will be deleted. Choose Yes to continue.
Single-disk volume
NAS OS allows you to create a volume with only one hard drive and then expand as you add hard drives to the enclosure. A volume with a single hard drive can be configured for SimplyRAID (single-disk security only), JBOD, or RAID 1. Each level of RAID has its own advantages, as described in RAID Modes.
SimplyRAID
- Go to Storage > Storage Overview.
- Choose Manage to launch the New network volume wizard.
- In the Select disks window, hard drives with white checkboxes can be selected for a new volume. Hard drives with grey checkboxes are being used by volumes and cannot be selected. Select the box under a free hard drive for the new volume and choose Next.Important : All data on the selected hard drive is deleted to create the RAID volume.
- Select Quick setup and then choose Next.
- Choose No encryption to move to the summary page or, Encrypt the volume. When choosing encryption, you have two options to unlock the volume: password only or, a password plus a USB device. Enter the password and/or insert a USB device into one of the NAS's USB ports. Choose Next.
- Review the summary window and then choose Finish. A popup window cautions you that all data on the selected hard drive will be deleted to create the volume. Select Yes to build the SimplyRAID volume.Important : A volume with only one hard drive cannot protect data. Consider adding new hard drives as soon as possible.
To expand a single-disk volume, see Single-disk and unprotected volumes: expansion.
RAID 1 or JBOD
- Go to Storage > Storage Overview.
- NAS OS detects new hard drives in the enclosure. Choose Manage to launch the New network volume wizard.
- In the Select disks window, hard drives with white checkboxes can be selected for a new volume. Hard drives with grey checkboxes are being used by volumes and cannot be selected. Select the box under a free hard drive for the new volume and choose Next.Important : All data on the selected hard drive will be deleted to create the RAID volume.
- Select Custom and then choose Next.
- Select JBOD or RAID 1 and then choose Next.
- Choose No encryption to move to the summary page or, Encrypt the volume. When choosing encryption, you have two options to unlock the volume: password only or, a password plus a USB device. Enter the password and/or insert a USB device into one of the NAS's USB ports. Choose Next.
- Review the summary window and then choose Finish. A popup window cautions you that all data on the selected hard drive will be deleted to create the volume. Select Yes to build the SimplyRAID volume.Important : A volume with only one hard drive cannot protect data. Consider adding new hard drives as soon as possible.
To expand a single-disk volume, see Single-disk and unprotected volumes: expansion.
Multiple volumes
You can create multiple volumes on one NAS OS device. While this manual cannot list every option for multiple volumes, you can use the steps below as a guide.
This example demonstrates the creation of two volumes using RAID 5 (performance and protection) and SimplyRAID (protection).
Create the first volume (RAID 5):
- Go to Storage > Storage Overview.
- NAS OS detects new hard drives in the enclosure. Choose Manage to launch the New network volume wizard.
- In the Select disks window, hard drives with white checkboxes can be selected for a new volume. Hard drives with grey checkboxes are being used by volumes and cannot be selected. Select the boxes under the hard drives for the new volume and choose Next. Important: All data on the hard drives that you select is deleted to create the RAID volume.
- Select Custom and then choose Next.
- Select your preferred level of RAID and choose Next. In this example, it is RAID 5.
- Choose No encryption to move to the summary page or, Encrypt the volume. When choosing encryption, you have two options to unlock the volume: password only or, a password plus a USB device. Enter the password and/or insert a USB device into one of the NAS's USB ports.Choose Next.
- Review the summary window then choose Finish. A popup window cautions you that all data on the selected hard drives will be deleted. Choose Yes to build the volume.
Create the second volume (SimplyRAID):
- Go to Storage > Storage Overview.
- NAS OS detects new hard drives in the enclosure. Choose Manage to launch the New network volume wizard.
- In the Select disks window, hard drives with white checkboxes can be selected for a new volume. Hard drives with grey checkboxes are being used by volumes and cannot be selected. Select the boxes under the hard drives for the new volume and choose Next. Important: All data on the hard drives that you select is deleted to create the RAID volume.
- Select Quick setup to create a SimplyRAID volume. With two or more hard drives, SimplyRAID creates a RAID volume using single security. Choose Next.
- Choose No encryption to move to the summary page or, Encrypt the volume. When choosing encryption, you have two options to unlock the volume: password only or, a password plus a USB device. Enter the password and/or insert a USB device into one of the NAS's USB ports. Choose Next.
- Review the summary window then choose Finish. A popup window cautions you that all data on the selected disks will be deleted to create the volume. Select Yes to build the SimplyRAID volume.
Synchronizing times
Synchronizing a volume can take from five minutes to many hours, depending on:
- The level of RAID
- The capacities of the hard drives in the volume
- The NAS's available resources (concurrent tasks such as backups or downloads will slow synchronizing)
For example, creating an unprotected RAID volume takes less than five minutes while RAID 6 with large capacity hard drives can run for many days. You can access the volume while it is synchronizing.
It is important to note that during synchronization:
- NAS performance is reduced due to a heavier demand upon the CPU RAID
- protection is not available until the synchronization is complete
- Older hard drives can fail, especially models that are not constructed for NAS
Single-disk and unprotected volumes: Expansion
Important info on NAS backup: It is recommended that all users back up data to DAS or another NAS as further protection against the loss of a hard drive and secondary points of failure (e.g. hardware, network, etc.). See Backup Manager for details.
Removing healthy hard drives from an unprotected volume
An unprotected volume can be:
- SimplyRAID single-disk
- RAID 1 single-disk
- JBOD
- RAID 0
Removing a healthy hard drive from an unprotected volume while the NAS OS device is powered on will delete all of the volume's data. While removing healthy hard drives is not recommended, you can avoid losing data by shutting down the NAS first. Return the hard drives to their proper bays before powering on the NAS.
Additionally, powering on the NAS with a missing hard drive in an unprotected volume will break its RAID and all data will be lost.
Volume expansion
Apart from RAID 0, RAID volumes can be expanded with new hard drives. However, it is not possible to add new hard drives with inferior capacities. For example, a RAID 5 or SimplyRAID volume with three 2TB disks supports the addition of a fourth hard drive that is 2TB or higher.
Choose your RAID and follow the instructions on expanding the volume. RAID 0 does not support volume expansion.
Encrypted volume: Unlock the volume before following the steps below.
SimplyRAID
- On the Storage section at the lower left, choose the SimplyRAID volume you want to expand.
- Choose Manage.
- Choose Add drive and Next.
- In the Select disks window, hard drives with white checkboxes can be selected for the existing volume. Hard drives with grey checkboxes are being used by volumes and cannot be selected. Select the boxes under the hard drives that you want to add to the existing volume and choose Next.
Important : All data on the selected hard drives is deleted.
- Review the summary and then choose Finish. A popup window cautions you that all data on the selected hard drives will be deleted. Choose Yes to continue.
You can use the volume during the RAID synchronization.
RAID 1
When adding a hard drive to a RAID 1 volume, you can:
- Increase security to protect data.
- Change the RAID to SimplyRAID.
Important: Data stored on the volume is deleted when changing RAID levels.
- On the Storage section at the lower left, choose the RAID 1 volume you want to expand.
- Choose Manage.
- Choose Add drive and then Next.
- In the Select disks window, hard drives with white checkboxes can be selected for the existing volume. Hard drives with grey checkboxes are being used by volumes and cannot be selected. Select the boxes under the hard drives that you want to add to the existing volume and choose Next.
Important : All data on the selected hard drives is deleted.
- Select one of the following:
- Increase security to enable protection on the RAID 1 volume.
- Custom to change the RAID to SimplyRAID.
Important : Data stored on the volume is deleted when changing RAID levels.
- Choose Next.
- Review the summary page and then choose Finish. A popup window cautions you that all data on the selected hard drives will be deleted. Choose Yes to continue.
You can use the volume during the RAID synchronization.
JBOD
- On the Storage section at the lower left, choose the JBOD volume you want to expand.
- Choose Manage.
- Choose Add drive and Next.
- In the Select disks window, hard drives with white checkboxes can be selected for the existing volume. Hard drives with grey checkboxes are being used by volumes and cannot be selected. Select the boxes under the hard drives that you want to add to the existing volume and choose Next.
Important : All data on the selected hard drives is deleted.
- Review the summary page and then choose Finish. A popup window cautions you that all data on the selected hard drives will be deleted. Choose Yes to continue.
Protected volumes: Expansion and hard drive replacement
Removing healthy hard drives from a protected volume
A protected volume can be:
- SimplyRAID (single-disk or double-disk security)
- RAID 1/RAID 1+Spare (two hard drives minimum)
- RAID 5/RAID 5+Spare
- RAID 6/RAID 6+Spare
- RAID 10/RAID 10+Spare
Removing a healthy hard drive from a protected volume while the NAS OS device is powered on will render the volume unprotected. If the volume has double-disk security, removing two healthy hard drives while the device is powered on will render the volume unprotected. While removing healthy hard drives is not recommended, you can avoid breaking the RAID by shutting down the NAS first. Return the hard drives to their proper slots before powering on the NAS.
If a healthy hard drive has been removed while the NAS is powered on, you can reinsert it into its slot. NAS OS synchronizes the RAID following the reinsertion of the hard drive. It is important to note that during synchronization:
- NAS performance is reduced due to a heavier demand upon the CPU
- RAID protection is not available until the synchronization is complete
- Older hard drives can fail, especially models that are not constructed for NAS
Important info on NAS backup: It is recommended that all users back up data to DAS or another NAS as further protection against the loss of a hard drive and secondary points of failure (e.g. hardware, network, etc.). See Backup Manager for details.
Hard drive expansion and replacement
Apart from RAID 10, protected RAID volumes can be expanded with new hard drives. However, it is not possible to add new hard drives with inferior capacities. For example, a RAID 5 or SimplyRAID volume with three 2TB hard drives supports the addition of a fourth hard drive that is 2TB or higher.
Expand a volume's storage capacity: add hard drives to the enclosure
The instructions below pertain to storage expansion in a NAS OS device with available or empty drive slots. If you are exchanging an existing hard drive in your enclosure for a hard drive of greater capacity or, repairing a failed hard drive, follow the instructions in Repair a failed hard drive or expand storage capacity.
NAS OS gives you the freedom to configure RAID volumes for your network. While it is not possible to list every option for expansion, review the examples below and apply them to your NAS OS device.
Important info on adding hard drives: Make certain to add a new hard drive without data. While data on the NAS OS volume is safe, performing the steps below will delete files stored on the new hard drive you are adding to the volume.
Encrypted volume: Unlock the volume before following the steps below.
SimplyRAID
- Insert one or more hard drives into available bays on your NAS. Review your NAS’s hardware user manual for instructions.
- On the Storage section at the lower left, choose the SimplyRAID volume you want to expand.
- Choose Manage.
- Choose Add drive and then Next.
- In the Select disks window, hard drives with white checkboxes can be selected to expand the volume. Hard drives with grey checkboxes are being used by volumes and cannot be selected. Check the boxes under the hard drives you want to use and choose Next.
Important : All data on the selected hard drives is deleted when expanding the volume.
- Review the summary and choose Finish. A popup window cautions you that all data on the selected disks will be deleted. Choose Yes to continue.
You can use the volume while it synchronizes the data. NAS performance can be affected during synchronization
Custom RAID: RAID 1, RAID 5, and RAID 6
- Insert one or more hard drives into available hard drive slots on your NAS. Review your NAS’s hardware user manual for instructions.
- On the Storage section at the lower left, choose the volume you want to expand.
- Choose Manage.
- Choose Add drive and Next.
- In the Select disks window, hard drives with white checkboxes can be selected to expand the volume. Hard drives with grey checkboxes are being used by volumes and cannot be selected. Check the boxes under the hard drives you want to use and choose Next.
Important: All data on the selected hard drives is deleted when expanding the volume.
- You can select:
- Expand storage capacity to add the new hard drives to the RAID. Data is synchronized with the new hard drives.
- Increase security to migrate the RAID to another level. For example, upgrade the level from RAID 1 to RAID 5/6 or, RAID 5 to RAID 6. Data is synchronized to the new hard drives.
- Custom to create a new RAID volume. All data on the existing volume is deleted to create the new RAID volume.
- Review the summary and choose Finish. A popup window cautions you that all data on the selected disks will be deleted. Choose Yes to continue.
The total capacity of the volume will be available once the synchronization is complete.
Repair a failed hard drive or expand storage capacity
Follow the instructions below to:
- Replace a failed hard drive.
- Expand a volume's total storage capacity by replacing a hard drive with a larger capacity hard drive.
Important info: If a hard drive that you purchased from Seagate fails, contact Seagate customer support.
Hot-swapping
When replacing or expanding hard drives in a protected RAID volume:
- Perform the operation while the NAS is powered on, also known as hot swapping.
- Use hard drives that do not contain important data, also known as clean hard drives.
If a volume is protected, you can remove an existing hard drive and replace it with a new hard drive while the product is turned on. This process is referred to as hot swapping. It is highly recommended that you hot swap when replacing or expanding hard drives.
Important info:
- It is not possible to replace existing hard disks with lower capacity hard disks.
- All data stored on the replacement hard drive will be deleted.
Hard drive replacement and expansion
Important info on expanding storage capacity on more than one hard drive: A volume can be expanded one hard drive at a time. Follow the steps below for each hard drive that you add to the volume. Performing the steps on multiple hard drives at the same time will break the RAID.
Encrypted volume: Unlock the volume before following the steps below.
SimplyRAID
- Remove the hard drive that you want to replace.
- Go to Device Manager > Storage Overview.
Important: Do not choose Manage on the Storage Overview page.
- On the Storage Overview page, choose the volume that you want to expand or repair with the new hard drive. If you are replacing a failed or missing disk, the NAS’s image shows the missing hard drive.
- Insert the replacement hard drive into the enclosure per the instructions provided in the NAS's hardware user manual.
- Choose Manage on the volume’s storage page.
- Select Repair and choose Next.
- In the Select disks window, hard drives with white checkboxes can be selected to expand the volume. Hard drives with grey checkboxes are being used by existing volumes and cannot be selected. Select the box under the hard drive that you want to use to expand or repair the volume and choose Next.
Important : All data on the selected hard drive is deleted when repairing or expanding the volume.
- Review the summary and choose Finish. A popup window cautions you that all data on the selected hard drive will be deleted. Choose Yes to continue.
You can access files stored on the volume while it synchronizes data. Consider the following:
- The time to synchronize depends upon the amount of hard drives in the volume and its total capacity. NAS performance can be reduced due to a heavier demand upon the CPU.
- RAID protection is not available until the synchronization is complete.
- Older hard drives can fail, especially models that are not constructed for NAS.
- The volume’s storage page will update its capacity following the synchronization.
Custom: RAID 1, RAID 5, and RAID 6
Use the instructions below when swapping an existing hard disk in your custom RAID for a failed or higher capacity hard drive.
Important info on expanding storage capacity on more than one hard drive: A volume can be expanded one hard drive at a time. Follow the steps below for each hard drive that you add to the volume. Performing the steps on multiple hard drives at the same time will break the RAID.
Important info on Custom RAID (1, 5, and 6) expansion and synchronizing: The volume must synchronize twice when expanding capacity on a Custom RAID volume. SimplyRAID expansion requires a single synchronization.
Encrypted volume: Unlock the volume before following the steps below.
- Remove the hard drive that you want to replace according to the instructions on the NAS’s hardware user manual.
- On the Storage section at the lower left, choose the volume you want to repair.
- If you are replacing a failed or missing disk, the NAS’s image shows the missing hard drive. Insert the replacement hard drive into the enclosure per the instructions provided in the NAS's hardware user manual.
- Choose Manage.
- Select Repair and choose Next.
- In the Select disks window, hard drives with white checkboxes can be selected to expand the volume. Hard drives with grey checkboxes are being used by existing volumes and cannot be selected. Select the box under the hard drive that you want to use to expand or repair the volume and choose Next.
Important : All data on the selected hard drive is deleted when repairing or expanding the volume.
- Review the summary and choose Finish. A popup window cautions you that all data on the selected hard drive will be deleted. Choose Yes to continue.
- Depending upon the amount of hard drives and the total capacity, the synchronization can run for a few hours to several days. The synchronization is complete once the Status is OK. If you inserted a larger capacity hard drive, the volume’s storage page does not reflect the additional storage. Continue with the next steps to optimize the additional capacity.
- On the Storage Overview page, click on the volume. The volume's storage page will load in the browser.
- Choose Manage.
- Select Optimize storage capacity and choose Next.
- Choose Finish.
- The volume will synchronize once more to update the storage capacity.
You can access files stored on your NAS during the RAID synchronization.
No replacement disk: reset the volume's RAID
If a hard drive in a protected volume fails and you do not have a replacement hard drive, you can reset the RAID using the New network volume wizard. Resetting the RAID deletes all data stored on the volume. Make certain to back up your files before you reset the RAID.
To reset the RAID:
- On the Storage section at the lower left, choose the volume you want to reset.
- Choose Manage.
- Choose Delete and select Yes at the popup window.
- Go to the New network volume wizard for instructions on how to create a new RAID volume.