- ASEAN (English)
- Australia/New Zealand (English)
- Belgique (Français)
- België (Nederlands)
- Brasil (Português)
- Canada (English)
- Canada (Français)
- Deutschland (Deutsch)
- España (Español)
- France (Français)
- India (English)
- Indonesia (Indonesian)
- Italia (Italiano)
- Latinoamérica (Español)
- Middle East/North Africa (English)
- Nederland (Nederlands)
- Polska (Polski)
- Portugal (Português)
- Singapore (English)
- Türkiye (Türkçe)
- United Kingdom (English)
- United States (English)
- 中国 (简体中文)
- 台灣 (繁體中文)
- 日本 (日本語)
- 대한민국 (한국어)
- Home /
- Lyve Cloud Object Storage Resources Guide /
- Dell Networker Data Domain
Was this content helpful?
How could we make this article more helpful?
- Acronis
- ActiveImage Protector
- Apostrophe CMS
- Bacula
- BorgBackup
- CloudBoost
- Cohesity
- Commvault
- CrossFTP
- Data Migration Overview
- Data Migration with AWS CLI
- Data Migration with Cloudsfer
- Data Migration with Flexify.IO
- Data Migration with Movebot
- Data Migration with Rclone
- Data Migration with StorageDNA Fabric
- Dell Networker Data Domain
- Duplicacy
- FileBrowser
- How to Create a Pre-Signed URL
- IBM Aspera HSTS Server and Desktop
- IBM Aspera with HSTS
- IBM Spectrum Protect
- Laravel
- LucidLink
- MinIO Client
- NAKIVO Backup and Replication
- qBackup
- Restic
- Rubrik
- S3cmd
- S3FS
- s5cmd
- ShareX
- Signiant Media Shuttle
- SmartFTP
- Starfish
- SyncBackPro
- Syncovery
- tntDrive
- Transmit
- UpdraftPlus
- Using SSE-C to Encrypt Objects
- Veritas Backup Exec
- Veritas NetBackup Media Server Deduplication (MSDP)
- Video Library
- WebDrive
- Commvault
- LucidLink
Lyve Cloud with Dell Networker Data Domain
Dell NetWorker and Data Domain Cloud Tier are validated for use with Lyve Cloud Object Storage.
Prerequisites
The following are prerequisites to add a cloud bucket to the Data Domain Cloud Tier. For more information on Data Domain prerequisites, please refer to the DDOS Administration Guide.
- A configured Lyve Cloud storage account.
- An enabled and configured Cloud Tier.
- A Lyve Cloud endpoint SSL CA certificate (See Retrieve Lyve Cloud SSL certificate of Lyve Cloud Endpoint for more information)
Configuration overview
You can achieve the configuration for Lyve Cloud and Dell Networker in two simple steps.
- Add Lyve Cloud bucket to Data Domain Cloud Tier.
- Create a Data Domain Cloud Tier device in NetWorker.
Add Lyve Cloud bucket to Data Domain Cloud Tier
- Import Lyve Cloud endpoint CA certificate.
Log in to the Data Doman System Manager portal and proceed with the following:
- Select Data Management > File System > Cloud Units.
- Select Manage Certificates from the toolbar.
- Select Add from the Manage Certificates for Cloud dialog.
- Choose I want to upload the certificate as a .pem file.
- Browse to locate the certificate file, and then select Add.
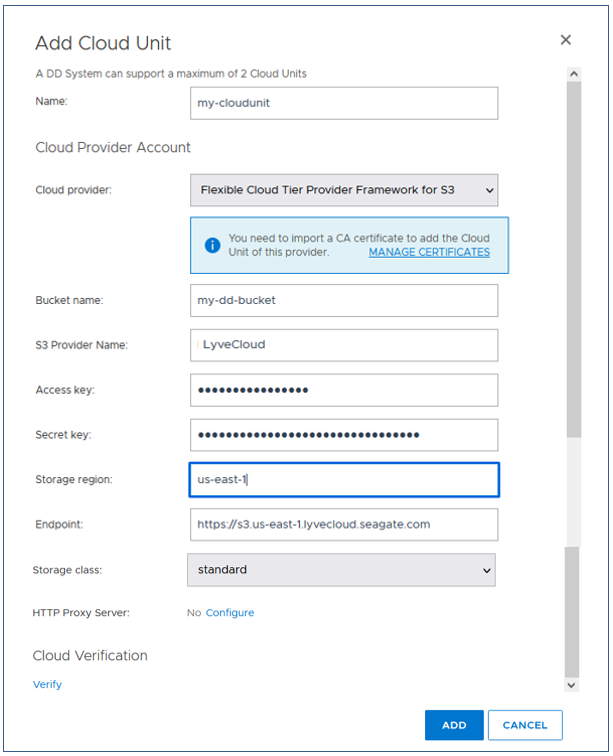
- Add a Lyve Cloud bucket.
To add a Lyve Cloud bucket to Data Domain Cloud Tier, select Add to enter the Storage region, and then select Add to complete. The new Cloud Unit should appear.

Create a Data Domain Cloud Tier device in NetWorker
NetWorker can protect data by generating a copy of data and sending it to a remote destination. The remote copy (archive copy) is kept off-premises using Cloud storage. For quick recovery, you can save the first backup copy on-premises. In this section, you will learn how to create a device located on Lyve Cloud for an archive clone repository.
To create a data domain cloud tier device:
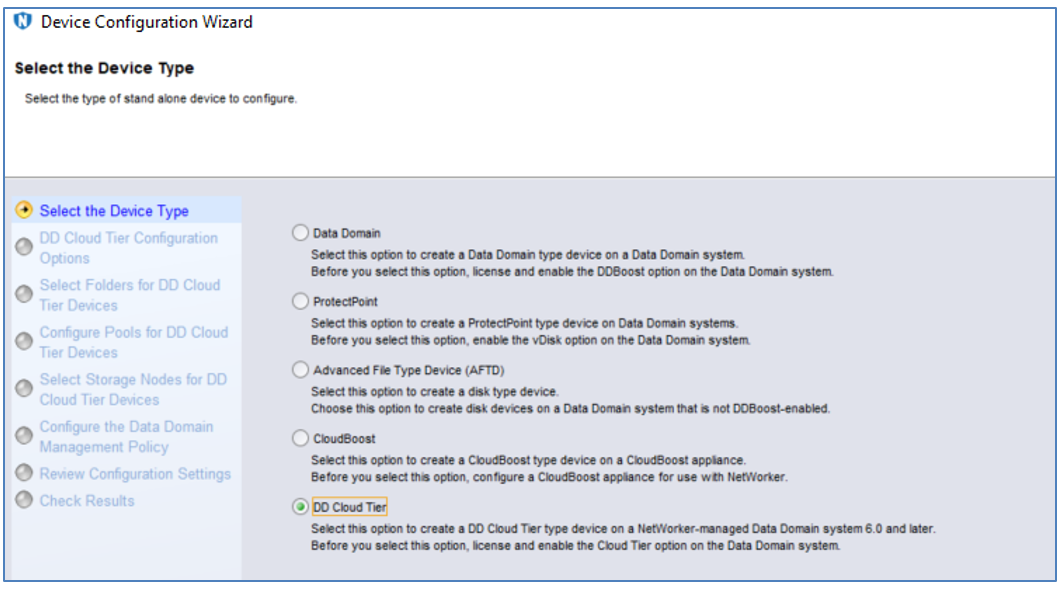
- Open Network Administrator. Click Devices and select New Device Wizard.
- Select DD Cloud Tier as the Device Type. Select Next.
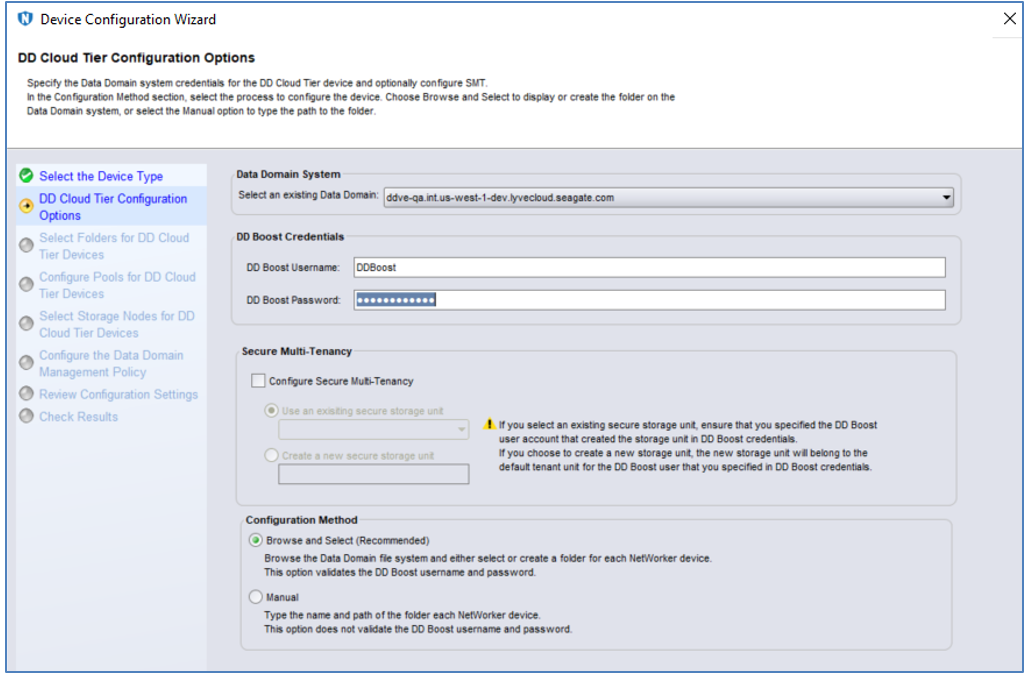
- Enter Data Domain DD BOOST Username and Password. Select Next.
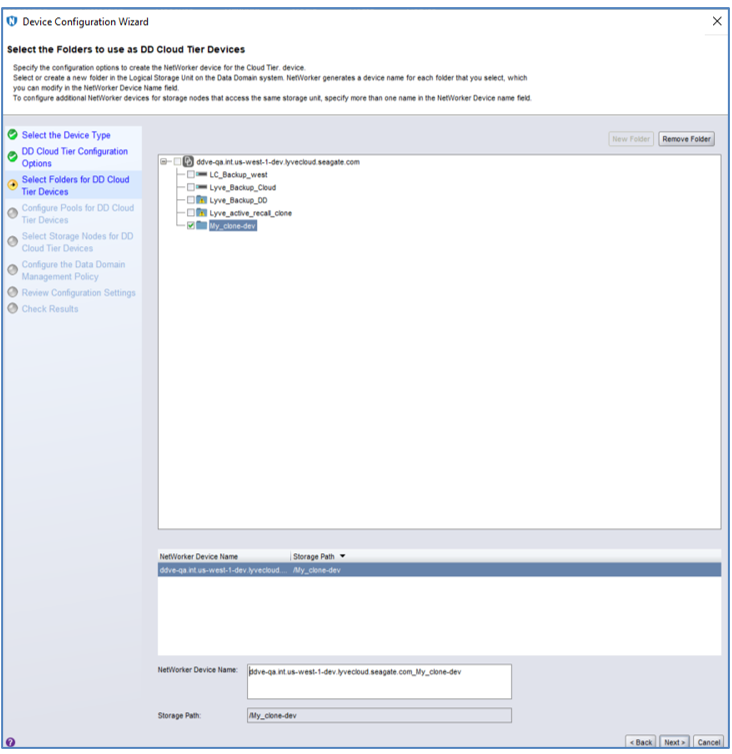
- Choose an existing folder or create a new folder.
- Choose an existing pool or create a new pool.
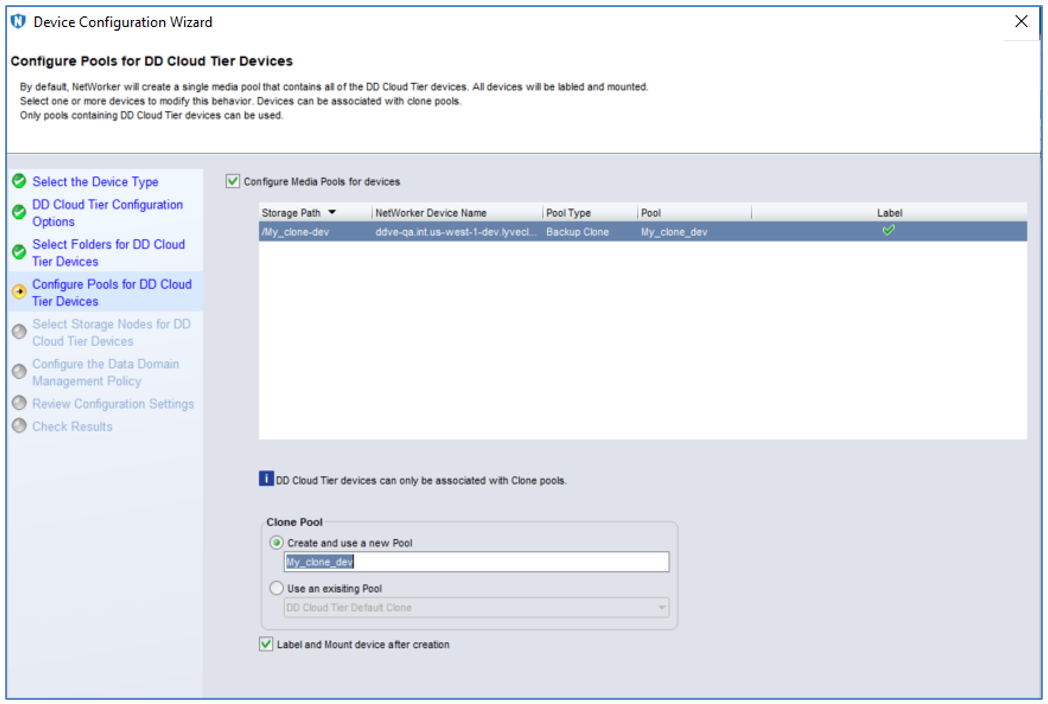
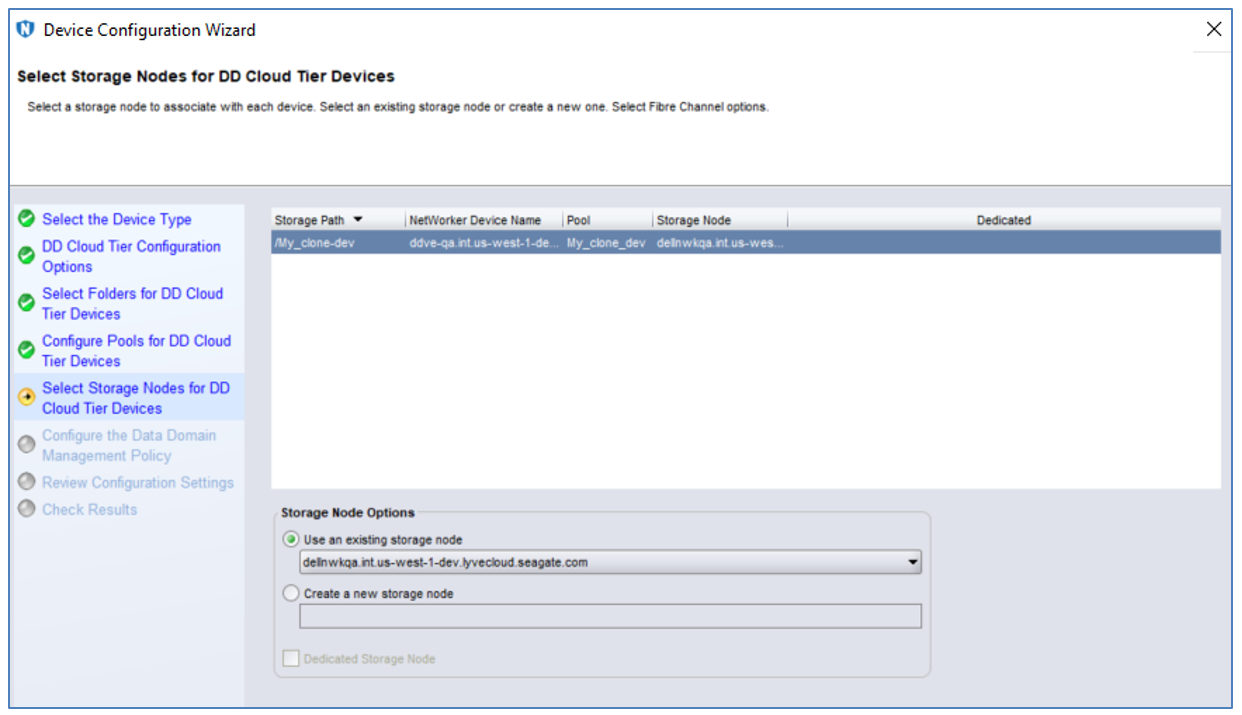
- Choose a storage node.
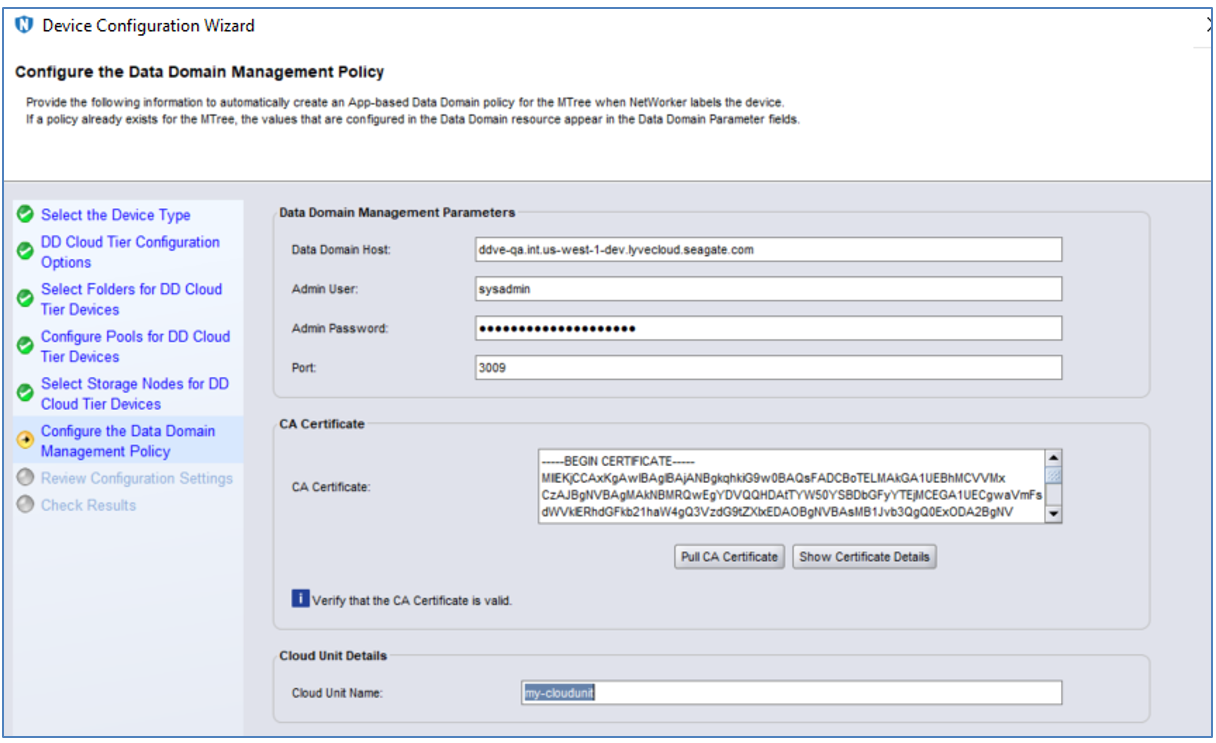
- Configure the Data Domain management user and choose a cloud unit. In the CA Certificate section, select Pull CA Certificate to get a Data Domain certificate.
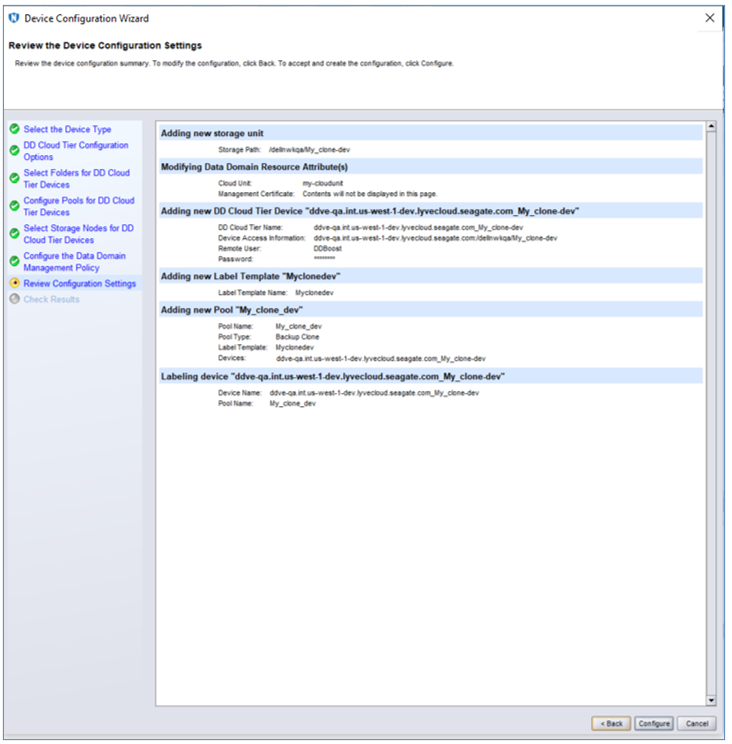
- Select Configure and Finish to create a clone pool.
Video: Lyve Cloud - How to log in and add a CloudBoost device
Seagate on Vimeo: Lyve Cloud - How to log in and add a CloudBoost device
Exporting a certificate using the Chrome browser
- Connect to the S3 endpoint website using SSL, for example, https://s3.ap-northeast-1.ap.lyve.seagate.com. An error page is displayed, but this is expected.
[ INSERT certificate-error-message.png ]
- Click Chome's More (three-dot) menu and select More Tools > Developer Tools. Select the Security tab.
- On the Security Overview page, select View certificate.
- A modal window is displayed. The upper pane displays the root and intermediate certificates as well as the trust hierarchy of the site's certificate.
- Click on the certificate's icon in the trust hierarchy. The certificate is displayed in the lower pane.
- Select the certificate in the lower pane and drag it to your desktop, or click the Export certificate button.
Lyve Cloud Object Storage Resources Guide