Was this content helpful?
How could we make this article more helpful?
Remote Access
Remote access to your NAS OS device is available using:
- Sdrive
- MyNAS
- FTP (see FTP)
While Sdrive and MyNAS are easy to configure, they differ in accessing data and managing the NAS from remote locations:
- Sdrive is an application with file system integration. Once Sdrive is launched, a separate volume becomes available on your computer similar to a standard DAS or NAS. Sdrive also gives you access to NAS OS.
- MyNAS provides direct access to NAS OS using an Internet browser and does not require additional software. However, file integration is not available with MyNAS so files must be uploaded and downloaded via the File Browser (see File Browser).
Sdrive
Sdrive and Seagate Access
Sdrive is now linked to a Seagate Access account. Generally, an administrator creates a Seagate Access account for a user. The administrator’s Seagate Access account is created automatically when first configuring the NAS. Administrators who upgrade the NAS from earlier versions of NAS OS can create Seagate Access accounts in Device Manager > Users.
A standard user can also create a Seagate Access account using Sdrive. See Invitation sent to a user without a Seagate Access account for instructions.
Your Seagate Access account can be used with the following applications:
- Sdrive–Available for Windows and Mac.
- Seagate Media app (Seagate Personal Cloud only)–Available for Android and iOS mobile devices.
Sdrive: PC/Mac
Sdrive is an application for your PC/Mac in the office, at home and anywhere with a connection to the Internet. It creates a special Sdrive volume with all the files stored on your compatible Seagate NAS devices. The Sdrive volume is easy to access since it appears on your computer like a standard hard drive.
Administrators can also use Sdrive to access the NAS’s management tool.
Example: You have important work files that you backed up to your Seagate NAS at the office. Only upon arriving home do you realize that you forgot to copy them to make final edits. Fortunately, Sdrive is installed on your work and home computers and both are linked to your Seagate Access account. You open the Sdrive volume and copy the important files from your NAS to your home computer.
How do I get started?
I started with NAS OS 4.1 and higher
The NAS OS setup wizard for version 4.1 prompts the administrator to create a Seagate Access account. If you created the account, skip to Download and install Sdrive.
If you did not create a Seagate Access account during the setup wizard, go to Create a Seagate Access account in NAS OS.
I upgraded from NAS OS 4.0.x
Administrators upgrading from an earlier version of NAS OS, 4.0 and below, can begin with Create a Seagate Access account in NAS OS.
Create a Seagate Access account in NAS OS
Administrators can create Seagate Access their accounts from the Users page. Once an administrator has a Seagate Access account, invitations to join the device can be sent to users. Follow the applicable instructions below to add Seagate Accounts for administrators and users.
NAS OS administrator: create a Seagate Access account
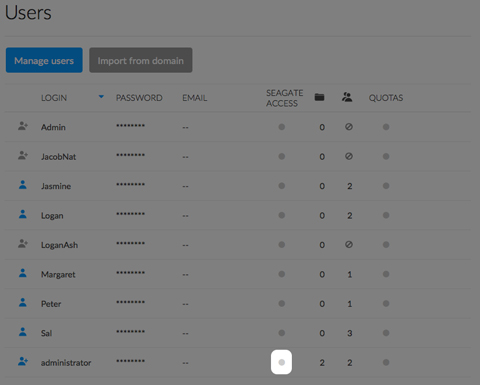
- Go to Device Manager > Users.
- Find the administrator’s Login name and then click the white circle in the Seagate Access column.
- Complete the fields in the Seagate Access wizard and then click Next.

- An email has been sent to the address that you entered in the previous step. Open your email and check for the confirmation code. If you do not see an email, check your spam folder.
- Copy the confirmation code in the email and paste it to the Confirm email window in NAS OS.
- Click Finish.
NAS OS user: invite to join the device
The administrator can invite a user to join the NAS. An invitation is sent to the user with instructions on how to create a Seagate Access account.
- Go to Device Manager > Users.
- Find the user’s Login name and then click the white circle in the Seagate Access column.
- Enter the user’s email address.
- Enter the administrator’s Seagate Access password.
- An email is sent to the user. The user follows the directions below based upon having or not having a Seagate Access account:
- Has an account: see Invitation sent to a user with a Seagate Access account
- Does not have an account : see Invitation sent to a user without a Seagate Access account
Download and install Sdrive
Follow the directions below to install Sdrive.
- Download Sdrive for your device:
- Check the Downloads folder for the Sdrive installer and open it.
- Follow the Sdrive installer to completion. You are prompted to restart your computer.
Connect to your Seagate NAS
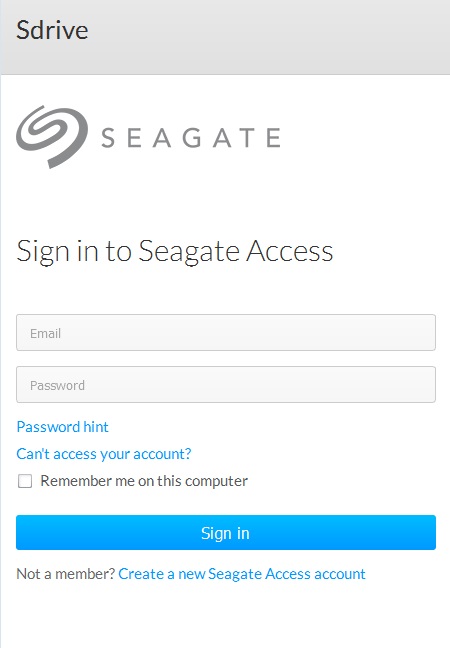
The Sdrive login window launches automatically each time you boot your computer. You can enter your Seagate Access account to mount the Sdrive volume or close the window.
Once it is launched, Sdrive takes on two roles:
- Administrator and users: an Sdrive volume to access content at the file level. This means that you can open your NAS’s folders and see your files on any computer with a connection to the Internet.
- Administrator: an application to manage your compatible Seagate NAS devices.
Forgotten password
If you forgot your password, enter your Seagate Access sign-in and click “Can’t access your account?” An email is sent with a link to reset your password.
Sdrive volume
Following a successful login, the Sdrive volume is available in the following locations:
- PC: Explorer window > Network location
- Mac: Desktop
The Sdrive volume gives users quick access to their files on the NAS. Users can access:
- Public shares
- Shares they have been given permission to open (read or read+write)
Users with Seagate Access accounts associated with multiple Seagate NAS devices can access all of them in the Sdrive volume.
Mac: missing Sdrive volume
If the Sdrive volume does not appear on your desktop after you successfully log in with your Seagate Access account, there may be a setting to change. Review the instructions below.
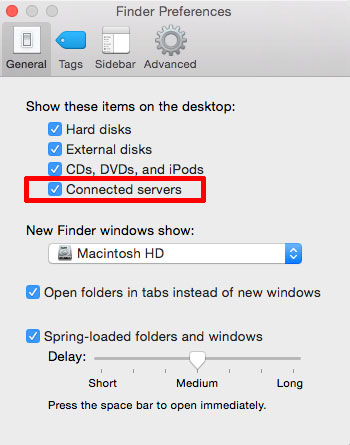
- On your Mac desktop, go to Finder > Preferences.
- Make certain that the box next to Connected servers is checked.
Sdrive application
Click the Sdrive application icon to access its features. The application icon location differs by operating system:
- Windows: System tray > Hidden icons (up arrow in the system tray). See below for instructions on how to move the Sdrive application icon to the system tray for easy access.
- Mac: Menu bar.

Similar to most applications in the system tray or menu bar, actions are dependent upon the operating system. For example, Windows users must apply a right click on the Sdrive application icon to access most of its features. A left click in Windows launches the Sdrive volume in an Explorer window. Mac users can use a standard left click.
Windows: move the Sdrive application icon to the system tray
- In the system tray, click Hidden icons (up arrow).
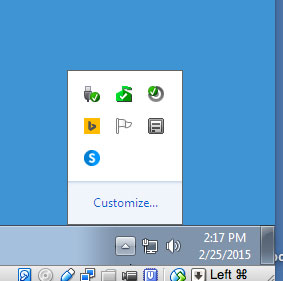
- Choose Customize.
- Click the pull-down menu for Sdrive and choose Show icon and notifications.

- Choose OK.
- Sdrive is available in the system tray. Right click it to access folders or manage your Seagate NAS devices.
Sdrive features
Sdrive can help administrators and users perform the following actions:
- Accept invitations to join Seagate NAS devices
- Change the Seagate NAS / Seagate Access password
- Manage Seagate NAS (administrator)
Accept an invitation
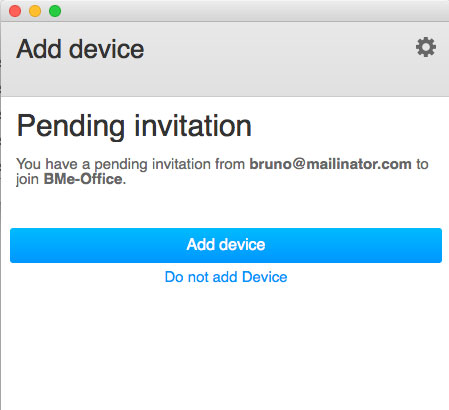
An administrator can invite users who work inside and outside the office to join the NAS. An email is sent to the user with instructions on how to confirm the invitation. The instructions below offer the same steps found in the email.
Invitation sent to a user with a Seagate Access account:
- Click Sdrive in the system tray (PC) / menu bar (Mac).
- Choose Add device. If you do not see the Add device window, look behind open applications or windows.
- The pending invitation should be listed. Choose Add device to add the NAS or Do not add Device to refuse the invitation.
Invitation sent to a user without a Seagate Access account
A user who does not have a Seagate Access account must first create one. Once the Seagate Access account is created, the user can accept the invitation using the code sent in the email.
- Download and install Sdrive per the instructions in the invitation email.
- Upon reboot, the Sdrive sign in window opens. Choose Create a new Seagate Access account.
- Complete all fields and choose Create account. An email has been sent to the address you entered.
- The verification window opens. Check your email for the confirmation code and copy it to the applicable field. If the email does not appear in your Inbox, check your Spam.
- Choose Verify to create your Seagate Access account.
- At the sign in window, enter your Seagate Access credentials and choose Sign in.
- Choose Sdrive and select Add device. Sdrive is available in the following locations.
- Windows: hidden icons (up arrow in the system tray). Right click Sdrive to choose Add device. For instructions on how to move Sdrive to the system tray for easy access, see Windows: move the Sdrive icon to the system tray.
- Mac: menu bar. Left click Sdrive to choose Add device.
Note: If you do not see the Add device window, look behind open applications or windows.
- Copy the code found in the invitation email to the field in the Add device window.
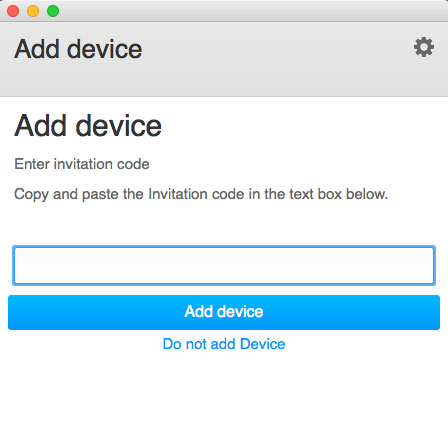
- Choose Add device.
Invitation sent to a user with a Seagate Account but to the wrong email address
Many people have multiple email accounts but only one is linked to Seagate Access. Follow the directions below if you receive an invitation at an email account that is not linked to Seagate Access.
- Click Sdrive and select Add device.
- Windows: hidden icons (up arrow in the system tray) or system tray. Right click Sdrive to choose Add device. For instructions on how to move Sdrive to the system tray for easy access, see Windows: move the Sdrive icon to the system tray.
- Mac: menu bar. Left click Sdrive to choose Add device.
- Copy the code found in the invitation email.
- Choose Add device.
Change your Seagate Access password
You can change your Seagate Access password in Sdrive. The change does not apply to the password that you use when signing into NAS OS, also known as the web board.
- Click Sdrive and select Change password.
- Windows: hidden icons (up arrow in the system tray) or system tray. Right click Sdrive to choose Add device. For instructions on how to move Sdrive to the system tray for easy access, see Windows: move the Sdrive icon to the system tray.
- Mac: menu bar. Left click Sdrive to choose Add device.
- Complete all the fields.
- Choose Change password.
Manage your Seagate NAS devices (administrator)
Use Sdrive to access your NAS’s management tool, also known as the web board.
- Click Sdrive and select [NAS Name] > Manage Device or [NAS Name] > Users.
- Windows: hidden icons (up arrow in the system tray) or system tray. Right click Sdrive to choose [NAS Name] > Manage Device. For instructions on how to move Sdrive to the system tray for easy access, see Windows: move the Sdrive icon to the system tray.
- Mac: menu bar. Left click Sdrive to choose [NAS Name] > Manage Device.
- Choose your NAS and select Manage device or Users.
- Manage device: your default browser opens to the NAS’s Overview page.
MyNAS
MyNAS provides direct access to NAS OS using an Internet browser. However, MyNAS does not offer the type of file integration found with Sdrive. Therefore, files must be uploaded and downloaded via the File Browser (see File Browser).
Set up MyNAS remote access
- Go to NAS OS > Device Manager > Network > Remote access.
- In the Remote access drop-down menu, choose Seagate MyNAS.
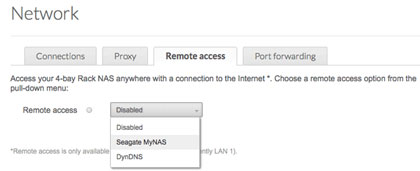
- Type a name for the NAS OS device in the Name field. The name should be different than the NAS OS device’s network name.

- Choose Apply. NAS OS will query the MyNAS server to see if the name is available. If so, a message appears confirming the connection.
If the name is already chosen, type a new one and choose Apply.
Failed connection
If you receive an error that the NAS is unable to connect to the Internet:
- Check if a proxy server is required to access the Internet. Contact your network administrator or Internet provider then review Network for further instructions on how to add your proxy server's address.
- Port forwarding may be required on your router. See the steps below.
Router
If the issue is related to your router, you will need to access its administration page in order to forward a port (by default, 8080). Once the port is opened for the NAS, MyNAS can gain access to it anywhere with a connection to the Internet. From the router's administration page, select its port forwarding tab to assign a port to the NAS. Refer to your router's documentation for details.
Once a port has been selected on your router, you must assign the port on the NAS:
- Go to NAS OS > Device Manager > Network > Remote access.
- Pass the cursor next to the Name field to enable the edit pull-down menu.
- Choose Advanced settings.
- In the dialogue window, choose Manual.

- Enter the port you forwarded on your router.
- Choose Apply.
Using MyNAS remote access
Once MyNAS is configured, type your NAS's URL into any browser: http://mynas.seagate.com/name.
The name is the name selected on the remote access page and not the NAS's network name.
After entering the URL, you are prompted to log in to NAS OS. Enter the username and password created by the administrator in NAS OS > Users.
Once logged in, an administrator can access NAS OS to administer the NAS. Users and administrators can use File Browser to upload and download files (see File Browser).