Using the NAS API
To use the NAS API, one needs to:
- Add the
com.nasos.unicorn_apiutility package to the app’s depends property - Add the API configuration to the app:
/etc/unicorn_api.conf - Register the app against the NAS backend during
post-install
API Utility Package
The API utility package provides helpers to make accessing the API easier and
more straightforward. To use it, one simply needs to add the latest
com.nasos.unicorn_api package to the app’s
depends property.
To find out the version of the API package to use, look at the containers section and choose the latest one available.
In our case, this would be com.nasos.unicorn_api_7.0.0, which results in the
following property in the app’s package.json file:
{
    "depends": [
        "org.debian.wheezy-lamp-1.2",
        "com.nasos.unicorn_api_7.0.0"
    ]
}
Warning
Please refer to the Available Containers section in order to find out which API package version to use, depending on the target NASOS version.
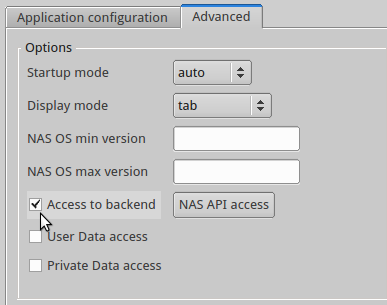
If you’re using the NAS OS SDK graphical tool, this is done automatically once
you check the Access to backend box in the Advanced tab:
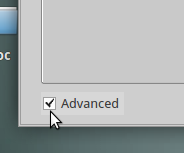
Note
In order to access this setting, you will first need to enable the advanced
settings by checking the Advanced box in the lower left of the window:
Configuration file
The /etc/unicorn_api.conf file defines the app’s capabilities:
- The
mandatory_permsfield defines the capabilities the app requires - The
optional_permsrepresents the capabilities that can be disabled
They are both an array of strings corresponding to the requested capabilities.
The list of capabilities can be found in the
NAS API Reference. Each service represents a
capability. To find out the capabilities you need, identify the service you
wish to use, e.g. user_group_share.UserAdministration. Then on the service
page, you will see the list of available methods, and their URLs. This could
be for example api/external/7.0/authentication.users.Administration.list.
From this, you can infer the corresponding capability, which has the following form:
v<API_VERSION>.<SERVICE_NAMESPACE>
In our case, the version is 0.7, and the service namespace
authentication.users.Administration, so the corresponding capability would be
v7.0.authentication.users.Administration.
This would give the following unicorn_api.conf file:
{
    "mandatory_perms": [
        "v7.0.authentication.users.Administration"
    ]
}
Another way to select the app’s capabilities is using the NAS OS SDK graphical
tool. After checking the Access to backend box, click the NAS API access
button to open a capability selection window:
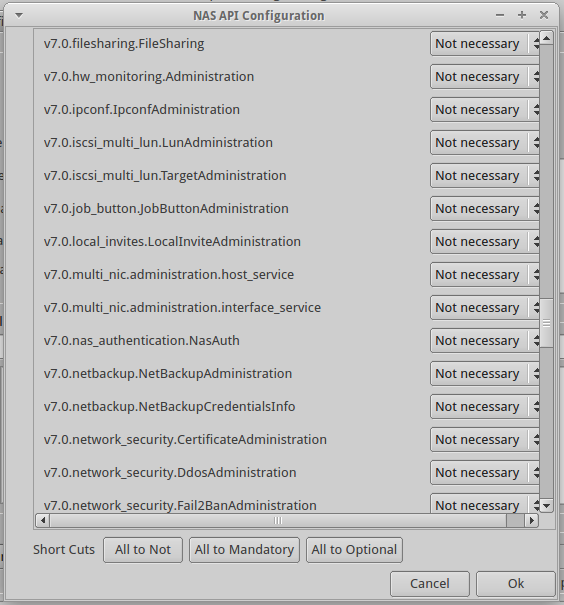
From there, you can select the capabilities you want, which will automatically
be included in the app’s unicorn_api.conf file.
The configuration file has to be integrated to the app’s package during the
package build. This must be done by the build.sh script. For example, if the
unicorn_api.conf file is in the source directory in the app’s directory
project, the following line in build.sh will allow installing it at the
appropriate location:
install -m 644 /home/source/unicorn_api.conf /etc/
Note
See the app building section for more details on the app building process.
Registering the App
In order for the app to be able to access the API, it has to register against the NAS configuration backend.
The com.nasos.unicorn_api utility package provides the unicorn_helper tool,
which makes it very straighforward.
This tool reads the unicorn_api.conf and performs the registration with the
requested capabilities.
All is required is to have the following line in the app’s post-install script:
unicorn_helper --register
Similarly, the app needs to unregister when it is uninstalled, which is done
as follows in the pre-remove script
unicorn_helper --unregister
Note
See the app running section for more details on the app scripts execution.
After registration, the unicorn_helper tool will update the unicorn_api.conf
file with the app’s registration information, such as:
{
  "nas_ip": "127.0.0.1",
  "ip": "127.0.0.1",
  "mandatory_perms": [
    "v7.0.sharing.shares.Administration"
  ],
  "token": "467e2fe04bb935ca14c9f515c9fecf8d4af03013",
  "install_id": "my_app-0f56ea0",
  "path": "/apps/my_app",
  "port": "10000"
}
Note
Using the unicorn_api.conf file and unicorn_helper isn’t mandatory to
register your app. It’s possible to register directly using the
/api/external/authenticate/application URL, by providing the app_id,
mandatory_perms and optional_perms in the POST data. You will find more
information on the app registration process in the
NAS API Protocol and
NAS API Reference sections.
Opening a Session
An important information obtained after registering the app is the app
token, that was stored in the unicorn_api.conf file. This token will be
required to open a session for the app to access the API.
Indeed, when calling API methods, the app doesn’t use the app token, but a
session token, that can be obtained using the
/api/external/authenticate/app_login URL. This URL is first called to get
a challenge, that is then combined to the app token to generate a secret.
This secret must be then sent to the same URL, along with the app id and
challenge id. When validated, a session token is returned.
See the NAS API Protocol and NAS API Reference sections for details on session opening.
Here is how to open a session using the Python bindings provided by the
com.nasos.unicorn_api package:
from transformer.transport.client_http import HTTPClient
from transformer.plugins.application import ApplicationClientAuthentication
import json

app_id = json.load(open('/app.json'))['id']
app_token = json.load(open('/etc/unicorn_api.conf'))['token']

client = HTTPClient("127.0.0.1", 8888)
app_auth = ApplicationClientAuthentication()
app_auth.set_app_id(app_id)
app_auth.set_app_token(app_token)
client.set_authentication(app_auth)
app_auth.open_session()
From this point, the Python bindings will automatically use the sessions token when issuing API calls.
Calling the API
It’s possible to call the API methods, after opening a session, by providing the session token in a special header of the HTTP POST request.
This header shall be as follows:
Authentication: APP_AUTH <session_token>
The session_token must be provided in every API request.
The Python bindings from the com.nasos.unicorn_api package take care of
this, which allows using the API in a simple way.
For example, after opening the session above, here is the Python code that is required to list the shares available on the NAS:
from unicorn_api.v7.sv0.user_group_share.Sharing import Sharing
from transformer.lib import ListInfo, List, Dict

try:
    sharing = Sharing()
    with_parameters = List(unicode)
    list_info = ListInfo()
    list_info.limit = -1
    list_info.offset = 0
    list_info.search_parameters = Dict(unicode)
    shares = sharing.list(with_parameters, list_info, client)
    print str(shares)
except Exception, exc:
    print "Error : " + str(exc)
User Authentication
The user authentication requires the user to log with the webboard. In order to do so the application needs to redirect to the webboard, using a URL of the following form:
/?app_session_token=<app_session_token>&app_path=<app_path>
- The
app_session_tokenis the one obtained when opening the session - The
app_pathis the path where the webboard will redirect after login - If the app is using transparent
redirect_mode, the app path will be
/apps/<app_short_id>whereapp_short_idis the last field for theapp_id(e.g:com.seagate.my_app->my_app) - If the app is using custom
redirect_mode, the app path will be
<redirect_protocol>://<nas_ip>:<web_ui_port>/<redirect_path>. Determining thenas_ipcan be challenging here, since it’s in fact the IP as seen by the client, which can involve several redirections. It can be necessary to check theHTTP refererin the requests headers in order to retrieve the correct value.
Once the user logs is, the dashboad will call the app_path url with the following GET parameters:
- app_user_status: if it equals 1 then everything is fine. Otherwise, the app should check the error_id and error_text parameters
- app_user_token: the token that should be used in each request
- error_id:
- 6: unknown application token
- 7: token has expired
- error_text: a human readable error message
Warning
After some time an expired token becomes unknown so application should check both error codes. When experiencing an error, then the application should open a new session and perform another authentication attempt.
Once the user token has been retrieved, the user can make some calls to the API. Only calls to the services specified by the application will be allowed. Those calls will have the rights of the currently authenticaed user (admin or regular user).
To perform a call as a given user, another special header has to be provided to
convey the app’s user token, along with the APP_AUTH header:
APP_USER <app_user_token>
You can look at the tutorials to have examples of use. See Advanced Python Web App or Using the Simple module for an exemple with the Python language. See Advanced PHP Web App for an exemple with the PHP language.
Using the CLI
The com.nasos.unicorn_api provides a command line helper than allows accessing
the NAS API from a shell script or interactive session.
It is called unicorn_api, and when launched without any parameter, it displays
a help message with the list of global parameters and the list of services.
For more help about a given service, type the following command:
unicorn_api SERVICE --help
Note
Accessing the NAS API requires a device running NASOS. The most obvious use
it to call unicorn_api directly from the NAS, using an ssh session. For
development purposes, one could want to use it in the SDK Virtual Machine,
in which case the address of a NAS running NAS OS must be specified with
the -i option.
The complete syntax to use unicorn_api is :
unicorn_api [global parameters] SERVICE method [input]
Here is how the call to system_System.get_infos:
unicorn_api system_System --get_infos

product:6-Bay NAS Pro
product_id:superbee6
vendor_name:Seagate
...
And volumes_VolumeAdministration.list_volumes:
unicorn_api volumes_VolumeAdministration --list_volumes "offset:0,limit:-1"

total_items:2
[
  friendly_name:Volume 1
  id:1
  ...
----
  friendly_name:Volume 2
  id:2
  ...
]
If you need to perform requests that require registration, you need to open
a session. You will need to get the app_token and install_id from the
/etc/unicorn_api.conf file and then:
unicorn_api --app <install_id> <app_token> --open_session
This should return something like:
expiration_date: 1442397467
session_token: 174e2cc43748095ac52437261fca0102341c8874
You can then use this session_token to issue API requests, e.g. to create a share on Volume 1:
unicorn_api --app <install_id> <app_token> --app_session <session_token> \
    sharing_shares_Administration --add '{"comment": "Test Share", "name": "Test"}' 1
Note
This example implies that the v7.0.sharing.shares.Administration has been
granted to the app during registration.
Now that you know how to use the NAS API, you can head to the next section where you will learn to use NAS events.