Understanding Apps
Apps are additional software that can be installed and run in a NAS OS environment. They are based on a container system which allows isolating them from the underlying NAS OS system.
In this regard, an app contains its own libc, runtime libraries, webserver, etc., distinct from the ones native to NAS OS and other apps.
The NAS OS SDK provides some base containers that can be used as a reference to create apps. The base system can be a well-known Linux distribution such as Debian or Ubuntu or a bare Buildroot system, which only contains a minimal system. It’s up to the developer to select the best suited container for their apps.
Creating an app consists in, by using the SDK, adding the necessary content to the container. This additional content is stored in a package, that allows distributing the app, along with the container package. See the App Packages section for a detailed description of the package format.
The app package contains all the files that are required to run the apps such as binaries or resources, and not already present in the container.
Note
For example, a webapp using Apache and MySQL won’t need to provide them in the app’s package, since they’re already in the container. What would need to be in the app’s package are its HTML/CSS/Javascript content as well as images, database scripts, startup script, configuration files, etc.
The lifecycle of an app can be split in the following stages:
- Creating an app: building and packaging
- Publishing an app: signing and publishing info
- Running an app: install, start, stop, update, remove
We will take a closer look at Creating an App and Running an App. Publishing will be described in the Publishing your App section. We will also talk here about Accessing NAS Resources.
Creating an App
Project file
To create an app, one has to create a new project using the SDK, either with the
graphical tool (see the Getting Started section),
or by using the rainbow command line interface.
Creating an app project merely means writing a package.json file. This is a
standard JSON file that needs to create at least the following information:
- The package id: see app id description
- The package version: see app version description
- The package dependencies: see app dependencies description
The dependencies describe the base container that the app uses. In the
Getting Started section, we used the
org.debian.wheezy-lamp-1.2 container. Please refer to
Available Containers for a list of supported containers.
Here is the package.json file resulting from our sample app:
{
    "type": "application",
    "id": "com.seagate.myapp",
    "version": "1.0",
    "architecture": "x86_64",
    "depends": [
        "org.debian.wheezy-lamp-1.2"
    ],
    "startup_mode": "auto",
    "settings": {},
    "network_ports": {
        "WEB_UI": 8888
    },
    "port_mapping": [],
    "fixed_ports": [],
    "display_mode": "tab",
    "redirect_mode": "transparent",
    "user_data_access": false,
    "private_data_access": false,
    "app_data": []
}
The graphical NAS OS SDK tool has taken care of creating this file for us. It could just as well be created manually, or by using the rainbow command line:
rainbow --init <directory>
This will prompt you for the basic parameters and create a package.json file as well as a very basic project structure.
Note
The graphical NAS OS SDK tool is the recommended way of bootstraping a
project, as it performs more tasks than the rainbow --init command.
Environment Variables
As we have seen, an app project defines a lot of settings, which are stored
in the package.json file. Now, as will be seen later in this document,
the app creation and runtime processes involve a lot of shell scripts execution.
Some of these scripts may require access to the app settings of the JSON project
file.
This is made possible through the use of environment variables. Most of the
content of the package.json file is available as environment variables
during the execution of every app script, either at build or execution time.
The rule here is as follows:
- Every setting that is not an array or a dict (except for
settingsandnetwork_ports) is exported as an environment variable, prefixed by$RAINBOW_and followed by the setting key in upper case. The value of the variable is the string value of the setting - The same applies to every entry in the custom
settingsdict of the JSON file (See the Custom App Settings description) - The same applies also to every entry in the
network_portsdict of the JSON file, except the prefix for them is$RAINBOW_PORT_
The available variables are:
| Name | Description | Example value |
|---|---|---|
| RAINBOW_ARCHITECTURE | See architecture | x86_64 |
| RAINBOW_DISPLAY_MODE | See display_mode | tab |
| RAINBOW_ID | See id | org.jenkins-ci.jenkins |
| RAINBOW_INSTALL_ID | See Install | jenkins-5324b40 |
| RAINBOW_PORT_WEB_UI | See Web Interface Access | 8080 |
| RAINBOW_REDIRECT_MODE | See redirect_mode | transparent |
| RAINBOW_STARTUP_MODE | See startup_mode | auto |
| RAINBOW_TYPE | See type | application |
| RAINBOW_USER_DATA_ACCESS | See user_data_access | true |
| RAINBOW_VERSION | See version | 3.6.0 |
| RAINBOW_OLD_VERSION | See Update | 3.6.0 |
| RAINBOW_NEW_VERSION | See Update | 3.6.1 |
| RAINBOW_WEB_PATH | The web path for the app | /apps/jenkins |
Building
Once the package.json file is created, the next step is to create a build
script for you app. The build script’s task is to create the app’s package
content.
At this point, it’s important to understand that, both in the app creation and
the app runtime contexts, every app operation is performed in a chroot
environment. What it means is basically that, once the app’s container has been
unpacked, the build script is run via a chroot command inside the container.
The filesystem root seen by the build script is in fact the container’s root.
This also means that the build script only has access to the container content.
To allow access to external content, the /home/source directory inside the
app is bound to the source directory in the app’s project directory.
As seen in the Getting Started tutorial, the NAS OS SDK graphical tool created a default build script, which is as follows:
#!/bin/bash

install -m 755 /home/source/etc/rc.local /etc
install -m 644 /home/source/etc/default.apache_template /etc/default.apache_template
install -m 644 /home/source/etc/ports.conf.apache_template /etc/ports.conf.apache_template
cp /home/source/var/www/index.html /var/www/index.html
api_conf="/home/source/unicorn_api.conf"
[ -e "$api_conf" ] && cp $api_conf /etc/

exit 0
We can see that some files are copied from the /home/source folder inside the
app, under /etc/. This means you should put the files your app needs in the
source folder of your app’s project directory, and use the build.sh script
to copy them inside your app at the appropriate location.
This is the main goal of the build script, putting everything into place to build the app.
Warning
Do not use the build.sh script to delete files from the container. It
will have no effect. Instead, files can be deleted from the post-install
script.
The build can be invoked from the NAS OS SDK graphical tool, or via the command line using:
rainbow --build <directory>
This will create a build directory in your app’s project directory. It
contains a sub-directory that is named after the architecture for the package.
Since we didn’t specify an architecture, we’re using the default value, which is
the architecture of the system used for building, in our case x86_64. You can
have more information about the supported architectures in the documentation for
the architecture package setting.
Note
If you’re willing to build for another architecture, please refer to the Multi-Arch Support section.
Packaging
Once the build script has been run, the NAS OS SDK is able to build a package with the app’s content. Only the files added to the container are actually packaged. This is achieved through the use of an overlay mount point.
What actually happens when running the app’s build is as follows:
- The container referenced as a dependency is unpacked in the build dir, in a read-only layer
- A read-write layer is overlayed on top of the container, which will contain the files generated by the build script
- The overlay presents a unified view of both the read-only and read-write layers
- Once the build is done, the layers are unmounted, separating the app’s content from the container content
After a build, the project directory should look like this:
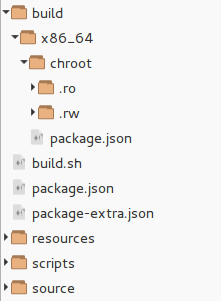
The x86_64 directory mentioned above can be seen, in which we have the
chroot directory, containing the .ro layer (for the container) and the .rw
layer (for the app content).
During the build, the chroot directory presents a unified view of those 2
directories. After the build, they are separately accessible.
The build process only generates the app content, it doesn’t actually create
a .rbw file. To generate the .rbw file for you app, either use the Pack
menu entry in the NAS OS SDK graphical tool or, via the command line:
rainbow --pack <directory>
This will generate a .rbw file in the build dir, such as:
build/<package_architecture>/<package_id>-<package-version>-<package-architecture>.rbw
For example:
build/x86_64/com.seagate.myapp-1.0-x86_64.rbw
The pack process actually simply takes the content of the .rw directory and
generates a package with it.
Running an app
So far, we have covered app creation. You should be able to create a package for your app. Once the package is built, it needs to be installed and run. This is all part of the app runtime stage, that we will cover here. Just like the app creation stage, the runtime stage is defined by a combination of scripts that are launched during each step of the app’s lifecycle.
Startup
One of the most important scripts is the startup script for the app. It is in
fact the only mandatory runtime script for the app (the mandatory build script
being the build.sh). If no startup script is defined, the app won’t do
anything on startup.
It is named rc.local and must be installed in etc (which is the first thing
our build.sh script above does).
The default startup script created by the NAS OS SDK graphical tool looks like:
#!/bin/sh -e
#
# rc.local
#

# Update config files with NASOS informations
APACHE_TEMPLATE_DEFAULT_SITE="/etc/default.apache_template"
APACHE_TEMPLATE_PORTS_CONF="/etc/ports.conf.apache_template"

sed "s,{RAINBOW_WEB_PATH},$RAINBOW_WEB_PATH,g" $APACHE_TEMPLATE_DEFAULT_SITE > /etc/apache2/sites-available/default
sed "s/{RAINBOW_PORT_WEB_UI}/$RAINBOW_PORT_WEB_UI/g" $APACHE_TEMPLATE_PORTS_CONF > /etc/apache2/ports.conf

service apache2 $1

exit 0
An interesting line is the one stating:
service apache2 $1
The rc.local is invoked during the app startup or shutdown, and given an
argument that can be start or stop, respectively. This argument is available
under the $1 environment variable in the startup script.
The script must:
- Confirm that the app is correctly configured for every network port assigned by rainbow (lines 6 to 11 in our script above) . See the Network section for details on port handling
- When given the
startparameter, start the app, and wait for it to be fully started - When given the
stopparameter, stop the app, and wait for it to be fully stopped - Make sure that the services started by the app run in the background or are
daemonized, e.g. by using
start-stop-daemonornohupif the services don’t natively support daemonizing
In our case, we can see that the script takes care of configuring apache with
the correct ports, and then start (or stop, depending on the value of $1) the
apache2 service, which is the main service of the app.
An app can launch more than one service, depending on its needs. The only requirement is that they run in the background or a daemonized, and that all the app’s processes are correctly stopped on shutdown.
Here the service command actually calls the script in /etc/init.d, in our
case /etc/init.d/apache2, and passes the value of the $1 parameter.
To start an app, you can use the following command:
rainbow --start <app_id>
For example in our case:
rainbow --start com.seagate.myapp
Install
Apart from the startup script, there are various package scripts that can be
implemented, depending on the app’s needs. See the Package Format
section for a list of the scripts included in a .rbw package.
When bootstraping a project, either by using the NAS OS SDK graphical tool, or
the rainbow command line tool, some placeholder scripts are generated.
We will cover here the pre-install and post-install scripts.
As their names imply, they are called during the package installation. Let’s see what happens during package creation:
- An
install_idis generated for the app. It’s created by taking the short app id (e.g. if the app id iscom.seagate.myappthe short id ismyapp) and appending the 7 first characters of a randomly generated UUID. An example value would bemyapp-e62f215 - An installation directory is created for the app in the root app manager
install directory, and named with the app’s
install_id. We’ll refer to this directory as the app’sinstall_path - The dependencies (base container) for the app are installed in the
app’s
install_path - The
pre-installscript is run. If it returns anything else than 0, the install will fail and abort - The content of the app is installed in the app’s
intall_path - The
post-installscript is run. If it returns anything else than 0, the install will fail and abort
Note
Due to the implementation of apps, the pre-install script can only be
run after the container has been installed, since it’s executed in
the context of the container, and needs a shell in order to run.
As seen in the Environment Variables section, the
pre-install and post-install scripts both have access to the app settings
through environment variables.
Depending on the app needs, pre and post install scripts can be required, but they are not mandatory. It’s OK to keep the default, empty scripts if no particular actions are required for the app.
Here are some use case examples where such scripts could be useful:
- If anything could prevent the app from installing correctly, using the
pre-installscript could allow making the necessary checks beforehand. - If some files or directories need to be created after the app install, the
post-installscript could be used - Same goes with any kind of initialization like database creation, file generation, configuration files patching
- The app may require registering with some online services which can be
performed by the
post-installscript - When some files from the container need to be deleted. Since this is not supported at build time, it’s possible to do this after the install
To install a .rbw package, use the following command:
rainbow --install <filename>.rbw
For example:
rainbow --install com.seagate.myapp-1.0-X86_64.rbw
Update
We will now present the app update process and how the update scripts are involved.
After creating a first version of an app, it’s possible to create successive
versions, in which case a new .rbw file can be used to update a previously
installed older version of the app.
Let’s see what happens during an app update:
- A new update directory is created, alongside the current app’s
install_path. For example, if the app in installed in<install_root>/myapp-e62f215, the update directory will be<install_root>/myapp-e62f215.update - In this directory, the package for the new version of the app is installed.
For this part, everything happens exactly as described in the
Install section, except for the fact that the
pre-updateandpost-updatescripts are executed instead of the install scripts - During the installation, the data listed in the
app_datasetting is copied over from the old installation to the new one (See the description of the app_data setting) - Once this process is completed, the old installation is removed, and replaced by the new one
This means that, to correctly handle update support, an app needs to define its app_data setting. It’s up to the developer to exhaustively identify every file or directory that needs to be kept in order for the app to function properly, and not lose any data or configuration.
In the case where an app requires to store a large amount of data internally,
this copying process can happen to be troublesome. In such case, the app can use
the private_data_access setting, in
order to request a private data directory, that is separate from the app’s
install_path. This directory is made accessible to the app using a bind mount,
which means that no copying is necessary, the directory is simply mounted in the
new install.
Before proceeding to the update, the pre-update script is run. It can be used
e.g. to check version information using the special environment variables
$RAINBOW_OLD_VERSION and $RAINBOW_NEW_VERSION which describe the previous
and new app version respectively.
Note
The $RAINBOW_OLD_VERSION and $RAINBOW_NEW_VERSION variables are only
available during the execution of the pre-update and post-update
scripts.
For example, an application could refuse downgrades by doing the following in
its pre-update script:
#!/bin/sh
dpkg --compare-versions $RAINBOW_OLD_VERSION lt $RAINBOW_NEW_VERSION
exit $?
Here we make use of the dpkg tool, which is available in the Debian and Ubuntu containers, and offers an easy way to compare version strings.
Rather than refusing a downgrade, one could imagine the following use cases:
- Refusing updating a version that would be too old
- Any other version related checks
- Check that some conditions required by the app are met
- Make sure enough disk space is available for the app’s needs
Warning
By default, the pre-update script always fails. This means app update is
not supported out of the box. It is up to the developper to explicitely
implement update support and modify the pre-update script accordingly.
This is intentional and aims to raise awareness about the need to define the
app_data setting and post-update scripts in order for an app to be
properly able to update itself.
The post-update is executed at the end of the update process. The main purpose
of this script is to perform any kind of data migration required to be
compatible with the new version.
Here are some use cases where the post-update script could prove useful:
- The app’s database need some kind of migration to become compatible with the new app version
- The app’s configuration files need to be patched or modified to take into account new features for the updated app
- Remove any file in the
app_datathat would no longer be necessary, more generally perform any relevant kind of cleanup
It’s also important to note, that, as the update is in fact a new install
on which the app data has been migrated, any relevant step performed during the
post-install script must also be done in the post-update. In fact, most
of the content of the post-install should be in the post-update as well, the
only exceptions being steps that need to be performed only once in the lifecycle
of the app, such as registering a web service or any oneshot action.
Warning
Make sure you include all relevant steps from the post-install script
(default app configuration, config file copying/patching, directory
creation, etc.) in the post-update script as well.
To update an app, you can use the following command:
rainbow --update <new_package_filename>.rbw
For example :
rainbow --update com.seagate.myapp-1.1-X86_64.rbw
Of course, the app needs to be already installed for this to work.
Uninstall
Removing an app is pretty straightforward. It merely consists in the following steps:
- The app is stopped
- The
pre-removescript is run - The app’s
install_pathis removed
The pre-remove script is again optional, and can be used for any particular
step required prior to removing the app. Those could be:
- Removing some files created outside the app (e.g. in the user data), since they won’t be necessary anymore
- Unregistering an online service
- Prevent from removing the app for some reason
Warning
Once an app is removed, any data stored inside the app is definitively lost.
Error Handling
Several scripts are used to install, remove, start or stop an app. The return code of these scripts must be different of zero when an error occurs and a generic message informs that the action failed.
Messages can also be personalized. The message has to be send to the error output using the following format:
RAINBOW_ERROR:ERR_CODE:TEXT
Where:
RAINBOW_ERRORis a key string to inform that this line is an error messageERR_CODEis a system error code. Find the complete list hereTEXTis an optionnal text to complete the error message
The following exemple produces the error : No space left on device (/opt/)
echo "RAINBOW_ERROR:ENOSPC:/opt/" >&2
exit 1
A special error code allows using a custom error : ECUSTOM
For example, to produce the error : This is a special error use the following
code:
echo "RAINBOW_ERROR:ECUSTOM:This is a special error" >&2
exit 1
Recovery Handling
When NAS OS performs a Reset to factory operation, the app manager’s database is lost, and needs to be recovered. The recovery procedure consists in locating installed apps and rebuilding the app manager’s database.
In that case, the retrieved apps have their startup_mode
set to manual. This is to prevent unwanted errors to happening. The apps
will have to be explicitely started by the user, which will then switch back to
auto.
During an app’s recovery, the post-install script is executed. Indeed some
operations like registering with the NAS OS backend need to be redone.
This means that the post-install script has to be reentrant: it should
gracefully handle situations where an operation has potentially already been
done during the actual install of the app.
For example, if the post-install script creates some directories using mkdir,
it should make sure to use the -p option, in order not to fail if the
directory already exists.
Accessing NAS Resources
User Data
Apps that require access to user data can request it by enabling the user_data_access setting in their configuration.
In that case, every NAS share is bind mounted inside the app’s directory,
which provides read-write access to user data. The shares are available to
the app under the /shares directory.
When writing to user shares, the app must respect the ownership of the share’s files. Most apps run either as the root user or a dedicated user. Since containers have their own user databases, problems can arise:
- When data is written as root. It may not be accessible to standard users from file sharing services
- Requests to delete data may be rejected or ignored due to file permissions and ownership issues
- Some files may appear as belonging to unknown users
To avoid such problems, apps should include a well-known user guaranteed to
exist in both the NAS OS environment and the app containers. In NAS OS, this
user’s name is rainbow and it belongs to the users group.
Every app writing to user data must ensure that its files are owned by rainbow
and the users group. The app can do one of the following:
- Run as
rainbow - Transfer file ownership when required
Network
Port assignment
Since apps run in a simple chroot environment, they share the same network
configuration as the underlying NAS OS system. Therefore, extra care is needed
for network port access since each port can only be used by one app at any given
time. The NAS OS SDK manages network port access by assigning unique port
numbers to apps that request it, thus preventing conflicts.
The network_ports setting allows configuring the requested ports for the app.
To prevent conflicts when several apps request the same port, the NAS OS SDK handles port assignment as follows:
- If an app requests a port that is not in use by another app, the port is granted
- If a port is already in use, another port is assigned to the app, between the 10000-20000 range. The assignment starts at 10000 and is increased by 1 with each new request
In case an app has a strong need for a given port value, and cannot cope with the port being reassigned, it can declare the port in the fixed_ports setting. In case more than one app request the same fixed_port, they will conflict, and only one will be able to run at the same time.
In case an app needs automatic port forwarding for some of its ports, it can declare them in the port_mapping setting. Those ports will be communicated to the NAS OS Device Manager and handled alongside the other NAS OS ports for automatic port forwarding (UPNP/IGD, NAT- PMP), thus providing WAN access for the app.
Web Interface Access
WEB_UI is a unique port in the network_ports
setting. It describes the port that is used to access the app’s main user
interface (when applicable).
In case where the app presents a user interface using the HTTPS, and requires
a different port for this, the WEB_UI_HTTPS port allows defining this port
as well.
The NAS OS HTTP server functions as a reverse proxy and provides a simple URL for the app. This allows hiding the port information from the user, and providing a URL of the form:
http://<NAS_IP>/apps/<APP_SHORT_ID>
The APP_SHORT_ID is the short version of the app ID (e.g. com.seagate.my_app
becomes my_app). In the case of a collision, the install_id will be used.
The reverse proxy redirects this URL to the actual WEB_UI port.
When the app doesn’t support being behind a reverse proxy, it can set the
redirect_mode setting to custom. In that
case, it needs to define the
redirect_protocol and
redirect_path settings accordingly. The app
will then be accessed with the following URL:
<REDIRECT_PROTOCOL>://<NAS_IP>:<WEB_UI_PORT>/<REDIRECT_PATH>
Port Configuration
Port assignment is performed each time an app is started. This means the startup
script for the app must make certain that every port setting is correctly
applied. For instance, an apache2 server running would require the following
command for the correct WEB_UI port value to be applied:
sed -i "s/Listen 80/Listen 127.0.0.1:$RAINBOW_PORT_WEB_UI/" /etc/apache2/ports.conf
This uses the sed command with the -i option, which requests an in place
substitution for the file /etc/apache2/ports.conf.
What is does is replace the string Listen 80 by Listen
127.0.0.1:$RAINBOW_PORT_WEB_UI where $RAINBOW_PORT_WEB_UI contains the value
assigned by rainbow for the WEB_UI port.
All ports would require the same setting. The $RAINBOW_WEB_PATH property, which
defines the path that is used to access the app, must also use the same kind
of configuration, so that the correct value ends up in the app’s configuration
files, where required.
Note
Patching configuration files isn’t the only way to configure the correct ports. It’s only a convenience when using third-party services such as apache2. Since the ports are available via environment variables, the app could just as well use those variables to apply the correct port values on startup.
Dynamic Port Opening
New in SDK 0.7, requires NASOS ≥ 4.2
In case the app requires some ports to be opened at runtime, and not declared during install/startup, it can request new ports dynamically.
Doing so requires using the NAS API. Please refer to the Using the NAS API to learn how to generally use the API.
Dynamic port opening can be done using the app_manager.AppManager service, which offers the following methods:
- open_port
- This can be used to request a port without specifying a value. It should always succeed and return the first available port in the 10000-20000 range. Use this method if you don’t care about the port value
- open_specific_port
- This method allows requesting a given port. If the port is available, the call will succeed. Otherwise it will fail. Use this if you have a strict need for a given port value.
Those methods take a boolean argument to specify if the port should be
external, which means handled by the automatic port forwarding feature for
ouside access. See the port_mapping setting
for details.
Warning
When using open_specific_port, you must make sure to graciously handle
the case where the requested port isn’t available.
Here is an example usage of those methods, in Python code:
import json
from transformer.transport.client_http import HTTPClient
from transformer.plugins.application import ApplicationClientAuthentication
from unicorn_api.v7.sv0.app_manager import AppManager

config = json.load(open('/etc/unicorn_api.conf'))
client = HTTPClient("127.0.0.1", 8888)
app_auth = ApplicationClientAuthentication()
client.set_authentication(app_auth)
app_auth.set_app_id(config["install_id"])
app_auth.set_app_token(config["token"])
app_session_token = app_auth.open_session()["session_token"]
app_auth.set_session(app_session_token)

app_manager = AppManager.AppManager()

try:
    app_manager.open_specific_port("MY_PORT", False, 2255, client)
except:
    print "Error opening port..."

other_port = app_manager.open_port("OTHER_PORT", False, client)
NAS Configuration
New in SDK 0.7, requires NASOS ≥ 4.2
JSON file
To access a subset of the NAS configuration, the NASOS SDK provides a JSON
file at the following location:
/etc/unicorn/unicorn_simple.json
You can simply parse this file using any JSON parser to get the information
you need.
For example, from the command line, one can use the jq tool, to perform things like, to retrieve the device’s current IP address:
cat /etc/unicorn/unicorn_simple.json | jq .network.interfaces.eth0.ipv4
Which would give something like:
"10.21.59.100"
Or to list the available shares:
cat /etc/unicorn/unicorn_simple.json | jq .shares
Which returns something like:
{
  "1": {
    "path": "/shares/Public",
    "volume_id": 1,
    "external": false,
    "name": "Public",
    "status": true,
    "comment": null
  },
  "2": {
    "path": "/shares/admin",
    "volume_id": 1,
    "external": false,
    "name": "admin",
    "status": true,
    "comment": null
  }
}
If you simply want the shares paths, you could do:
cat /etc/unicorn/unicorn_simple.json | jq .shares[].path
And get:
"/shares/Public"
"/shares/admin"
You can look at the jq tutorial or manual for more advanced usage.
You can also use any language binding to parse the JSON, for example with python:
import sys, json
config = json.load(open('/etc/unicorn/unicorn_simple.json'))
shares = config['shares']
print '\n'.join(s['path'] for s in shares.values())
Which would yield the same result as the example above.
Changes
When the file changes, the /scripts/notify script is executed in the app’s
context. It allows notifying the app of the changes, so the app can parse the
JSON file again and update accordingly.
The /scripts/notify script is given as arguments the list of updated sections
within the JSON file.
A sample notify script would be:
#!/bin/sh

for e in $@; do
    jq .$e /etc/unicorn/unicorn_simple.json >> /var/log/simple.log
done
This would log each section whenever a change happens. This is only for demonstration purpose.
If you need to react to changes for your app, create the notify script and
put it in the scripts directory of your project.
Available Information
The file contains the following sections:
network
- Description: This section contains the list of network interfaces and their configuration
- Example value:
{
  "network": {
    "interfaces": {
      "eth0": {
        "ipv4": "10.21.59.100",
        "WAN": true
      }
    }
  }
}
users-access
- Description: This section contains, for each user id, the list of shares it has access with detailed information
- Example value:
{
  "users-access": {
    "0": {
      "1": {
        "volume_id": 1,
        "external": false,
        "name": "Public",
        "path": "/shares/Public",
        "access": "full"
      }
    },
    "1": {
      "2": {
        "volume_id": 1,
        "external": false,
        "name": "admin",
        "path": "/shares/admin",
        "access": "full"
      },
      "1": {
        "volume_id": 1,
        "external": false,
        "name": "Public",
        "path": "/shares/Public",
        "access": "full"
      }
    }
  }
}
Note
Note that the user with id 0 doesn’t actually exists, and is here to list
the shares that have public access.
users
- Description: This section list of available users, by ID
- Example value:
{
  "users": {
    "1": {
      "email": "admin@admin.com",
      "login": "admin",
      "is_admin": true,
      "system_id": 500,
      "lastname": null,
      "firstname": null,
      "status": true,
      "comment": null
    }
  }
}
disks
- Description: This section lists the available disks, by ID
- Example value:
{
  "disks": {
    "1": {
      "size": 3995745648640,
      "model": "",
      "revision": "",
      "serial": "",
      "raid": false,
      "vendor": "",
      "ublocks_path": "/com/lacie/Ublocks/devices/vg_lv",
      "bus": "scsi",
      "enabled": true,
      "ublocks_short_udi": "",
      "ublocks_udi": "filesystem_b23f59e6-0e9d-4212-8cc2-848427f3cf7d",
      "external": false,
      "device": "/dev/dm-0"
    }
  }
}
smtp
- Description: This section lists the current SMTP configuration
- Example value:
{
  "smtp": {
    "port": 25,
    "user": "",
    "enabled": true,
    "server": "",
    "pwd": ""
  }
}
shares
- Description: This section lists the available shares, by ID
- Example value:
{
  "shares": {
    "1": {
      "path": "/shares/Public",
      "volume_id": 1,
      "external": false,
      "name": "Public",
      "status": true,
      "comment": null
    },
    "2": {
      "path": "/shares/admin",
      "volume_id": 1,
      "external": false,
      "name": "admin",
      "status": true,
      "comment": null
    }
  }
}
smtp
- Description: This section lists the current proxy configuration
- Example value:
{
  "proxy": {
    "address": "",
    "port": 3128,
    "pwd": "",
    "login": ""
  }
}
groups
- Description: This section lists the available groups, by ID
- Example value:
{
  "groups": {
    "1": {
      "name": "nas_users",
      "type": "local",
      "comment": null,
      "status": true
    },
    "2": {
      "name": "nas_admins",
      "type": "local",
      "comment": null,
      "status": true
    }
  }
}
system-infos
- Description: This section lists the current system info
- Example value:
{
  "system-infos": {
    "product_name": "Personal Cloud",
    "hostname": "PersonalCloud-8",
    "timezone": "Europe/Paris"
  }
}
volumes
- Description: This section lists the available volumes, by ID
- Example value:
{
  "volumes": {
    "1": {
      "is_crypted": false,
      "status": 1,
      "enabled": true,
      "mount_options": "usrjquota=aquota.user,relatime,rw,grpjquota=aquota.group,jqfmt=vfsv1,data=ordered",
      "anyraid_volume": "lv",
      "size": 3932891152384,
      "mount_point": "/media/internal_1",
      "uuid": "b23f59e6-0e9d-4212-8cc2-848427f3cf7d",
      "ublocks_path": "/com/lacie/Ublocks/devices/vg_lv",
      "disk_id": 1,
      "label": "",
      "ublocks_udi": "filesystem_b23f59e6-0e9d-4212-8cc2-848427f3cf7d",
      "real_size": 3995745648640,
      "available": 3930081329152,
      "used": 2809823232,
      "raid": false,
      "percent_usage": 0,
      "fstype": "ext4",
      "is_mounted": true,
      "is_read_only": false,
      "external": false,
      "device": "/dev/dm-0",
      "is_locked": false,
      "friendly_name": "Volume 1",
      "loop_device": false,
      "is_filesystem": true,
      "parent_udi": "filesystem_b23f59e6-0e9d-4212-8cc2-848427f3cf7d",
      "anyraid_pool": "vg"
    }
  }
}
In the next section, we’ll cover the NAS API, which offers access to most of the NAS resources and features, through an extensive HTTP API.