Debugging your App
Once you have built your app, you need to test it to see if it works as expected.
In the Getting Started section, we briefly showed you how you can install an app in the SDK Virtual Machine for quick testing. This can be useful for development, but at some point, the app has to be tested on an actual device.
In this section, we’ll show you how to install and test you app. This can either be done using the NAS Webboard, or by using the command line on a NAS device or directly inside the NASOS SDK VM.
This information should allow you to learn how to test your app, and fix the issues you might encounter.
Managing Apps from the Webboard
From the Webboard of a NASOS device, the app manager can be accessed by clicking the App Manager icon:

The App Manager allows the following operations:
- Browsing the apps currently available on the app store
- Installing or updating an app from the app store
- Manually installing or updating an app using a
.rbwfile - Starting / Stopping an installed app
- Uninstalling an app
Installing an App
To install an app available on the app store, locate it by browsing the
categories listed in the left column, and simply click the Install button next
to the app’s description:

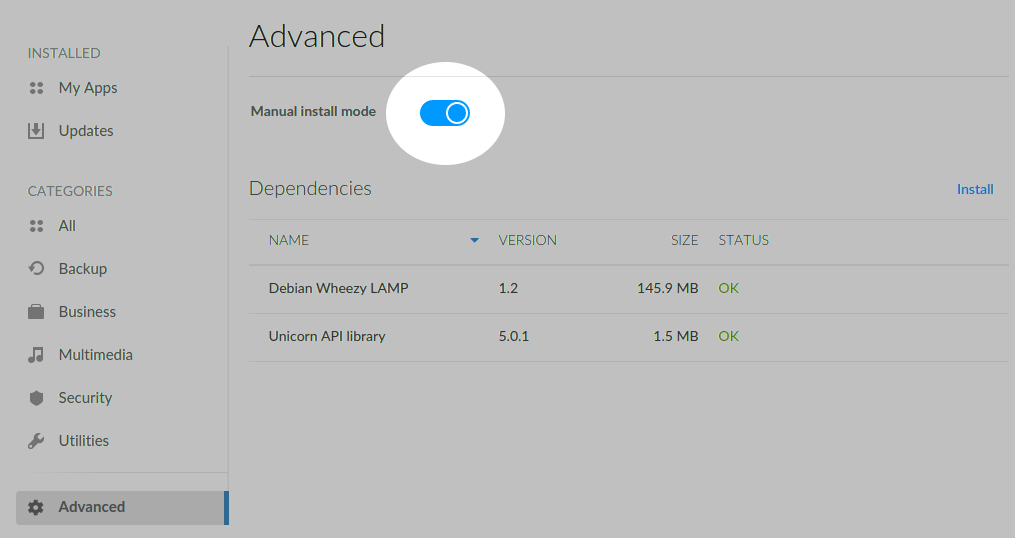
To directly install a .rbw file, you first need to enable the Manual Install
mode in the Advanced settings section:
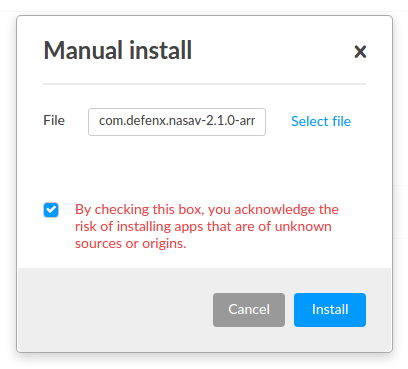
Then click on the Manual Install button from the My Apps section

You can then locate the .rbw file using the Select file button, check the
disclaimer box, and click on Install:
Note
When installing an app (manually or from the store), if the device has more than one user volume, you will be prompted to select the volume for your app. If a single volume is present, it will be silently used.
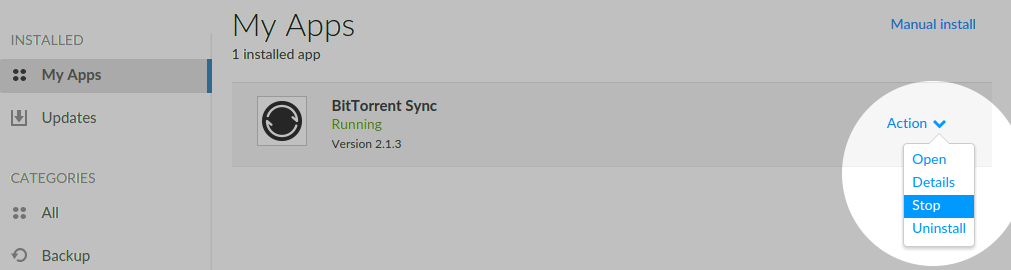
App Actions
From My Apps, click on the app’s Action menu, and select the desired action.
Note
To open an app, you can choose the Open app action, or click its icon
from the home App Board.
Updating an App
To update an app from the app store, simply click the update button when an update is available.
To manually update an app using a .rbw file, proceed exactly as for a manual
installation, with a .rbw file for the same app with a newer version.
Note
See the Understanding Apps section for more details on what happens under the hood during app startup/shutdown/update, etc.
Managing Apps from the Command Line
As seen in earlier sections of this documentation, the command line tool to
create and manage apps is called rainbow. It is available inside the NASOS SDK
VM, as well as on every NASOS device.
The same tool is used for app creation and app runtime, though the typical workflow is actually as follows:
- The
rainbowtool is used from the NASOS SDK to build and package the app - It is then used on the NAS device to install and debug the app
There can be an exception to this workflow, since in fact an app can be installed inside the NASOS SDK VM, with some restrictions:
- Withing the NASOS SDK VM, the NAS API won’t be available, so the app using the API cannot be really tested that way
- The VM architecture is
x86_64, so it is recommended to limit your testing inside the VM tox86_64builds of your app. When installing anarmapp inside the VM, it is actually run through theqemuemulator, which can lead to unexpected issues - The VM tries to behave like a NASOS device. For example, it implements a reverse proxy, just like NASOS, in order to be able to access apps via their transparent URL. However, other aspects of the app could experience issues due to the difference of context between the SDK and an actual device
Apart from those restrictions, using the rainbow tool works exactly the same
inside the VM or when connecting to a device. Inside the VM, you just need to
click on the Terminal Emulator on the desktop to get a command line prompt.
To connect to a NAS device, you will first need to enable the SSH service.
Connecting to a NAS Device using SSH
Enabling the SSH service
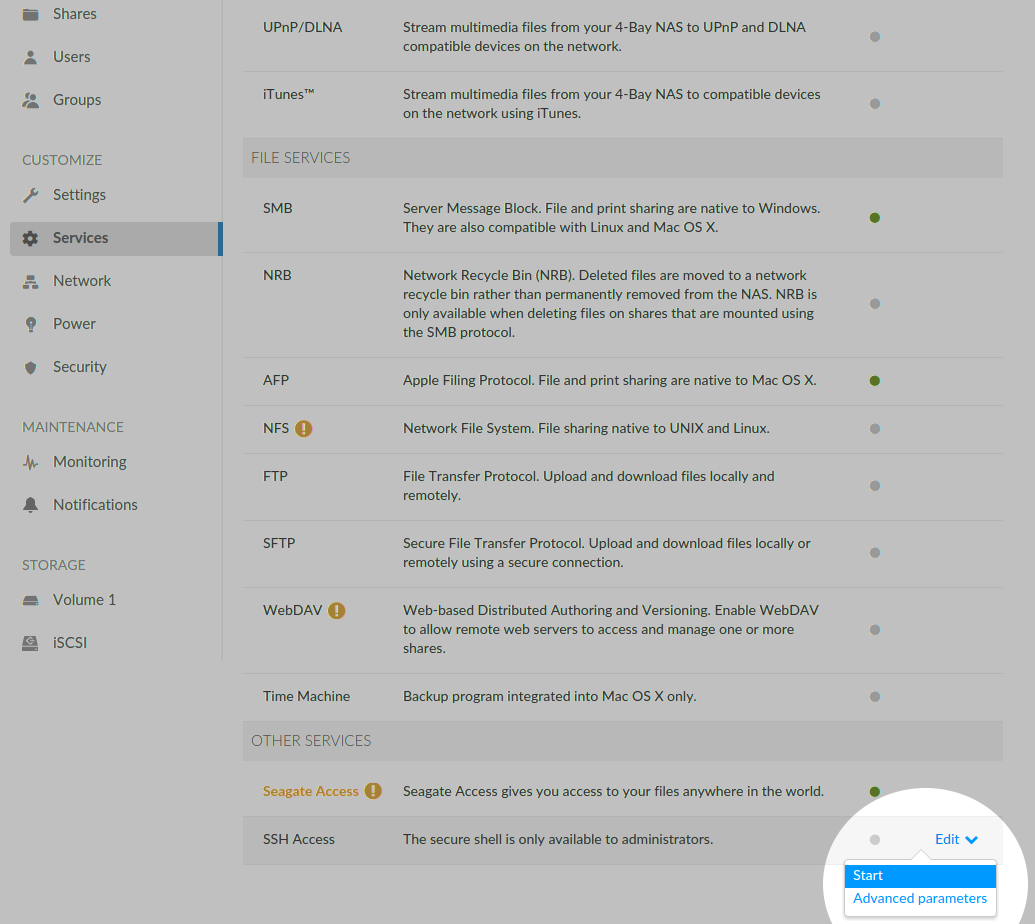
To activate the SSH service on your NAS device, go to the NASOS App Board and choose the Device Manager icon.
Within the Device Manager Services section, select the SSH Access Edit button
and choose Start:
Warning
On some devices, the SSH service isn’t available by default and won’t appear
in the service list. In order to enable the SSH service on those devices,
you will need to add the appdev=1 parameter to the NAS URL in your browser.
For example, if your NAS IP is 192.168.0.10, you should enter the URL
http://192.168.0.10/?appdev=1
Connecting via SSH
With SSH enabled, you can connect to your device using an administrator account.
For example, from a Mac/Linux client, if you user is admin and your NAS the IP
192.168.0.10:
ssh admin@192.168.0.10
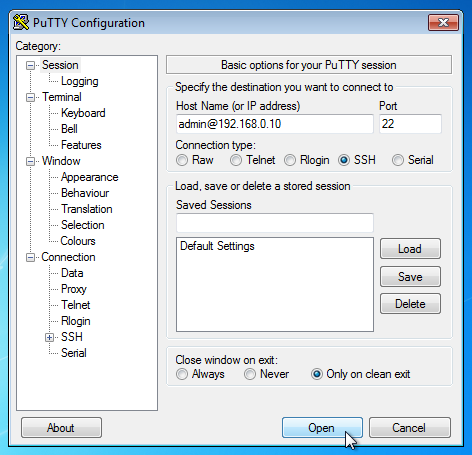
If you’re on a Windows, using the
putty client
, enter admin@192.168.0.10 in the Host Name (or IP address) field, and click
the Open button:
You will be prompted for your password, and once connected, you will get an interactive command prompt, which should look like this:
[admin@Seagate-D4 ~]$
Note
You have to wait for the NAS device to be fully started before connecting via SSH. Make sure the main LED for the device isn’t blinking and the NAS App Board is accessible.
Using the rainbow Command Line
The rainbow command line requires root privileges, so it must always
be used with the sudo utility. Simply prefix every rainbow command by
sudo, and enter your password when prompted.
Note
Inside the NASOS SDK VM, the sudo utility is configured to never prompt for a password.
Listing Installed Packages
The --list (or short -l) can be used to list the currently installed
packages:
sudo rainbow --list
All the packages are listed, which means containers, utilities and actual apps. Here is a typical output:
org.buildroot.buildroot-1.2             (stopped, not_blocked, auto)
com.seagate.sdrive                      (running: http://10.21.59.100/apps/sdrive)
com.seagate.sma                         (running: http://10.21.59.100/apps/sma)
com.seagate.filebrowser                 (running: http://10.21.59.100/apps/filebrowser)
com.nasos.unicorn_api-5.0.1             (stopped, not_blocked, auto)
org.debian.wheezy-lamp-1.2              (stopped, not_blocked, auto)
com.bittorrent.bittorrentsync           (running: http://10.21.59.100:10001/)
On each line we find the following information:
<app_id> (<app_state>, <app_url>)
In the example above, we have:
- 2 containers:
- org.debian.wheezy-lamp-1.2
- org.buildroot.buildroot-1.2
- The API utility package
- com.nasos.unicorn_api-5.0.1
- 3 internal Seagate apps
- com.seagate.sdrive
- com.seagate.sma
- com.seagate.filebrowser
- 1 third-party app
- com.bittorrent.bittorrentsync
The status for a package can be:
- stopped: the default status. Packages of type
containerandutilityare always stopped - running: the app is currently running
- processing: the app is currently starting, stopping, updating or being removed
- install_error: an error occurred duting the app install
- update_error: an error occurred duting the app update
- remove_error: an error occurred duting the app uninstall
- start_error: an error occurred duting the app startup
- stop_error: an error occurred duting the app shutdown
- broken: the package cannot be accessed. It happen when it’s installed on a broken or crypted volume.
Showing Package Details
The --list option can show more information about an installed package, when
given the package’s ID as an argument:
sudo rainbow --list <package_id>
Here is a typical output:
sudo rainbow -l com.bittorrent.bittorrentsync

-- com.bittorrent.bittorrentsync: Bittorrentsync
    version                         : 2.1.3
    architecture                    : armv7
    install_path                    : /media/internal_1/rainbow/bittorrentsync-667e813
    state                           : running
    blocking_state                  : not_blocked
    startup_mode                    : auto
    install_id                      : bittorrentsync-667e813
    public_key_hash                 : None
    nasos_min_version               : 4.0
    nasos_max_version               : None
    url                             : http://10.21.59.100:10001/
    PIDS:
      \- 21299 : /opt/btsync/btsync --config /opt/btsync/config.json
    NETWORK PORTS:
      WEB_UI                        : 10001
      BTSYNC_COM                    : 11500
Interesting information include
install_path: the install path for the app, contains all the app filesurl: the URL to access the app’s web pagePIDS: the list of running processed for the appNETWORK_PORTS: the assigned ports for the app (see Network) for details
Installing an App
To install an app provided its .rbw file, use the --install option:
sudo rainbow --install <filename>.rbw
If you’re on a NAS device, you will be prompted for the volume on which you
wish to install the app. You can also use the --root option to specify
an alternative root install directory for your app.
Note
By default, in the NASOS SDK VM, the root install path for apps is
/opt/rainbow
Updating an App
To update an app provided its .rbw file, use the --update option:
sudo rainbow --update <filename>.rbw
The app must already be installed in an older version for it to work correctly.
Starting an App
To start a stopped app, use:
sudo rainbow --start <app_id> (app_id ...)
Restarting an App
To restart a running app, use:
sudo rainbow --restart <app_id> (app_id ...)
Stopping an App
To stop a running app, use:
sudo rainbow --stop <app_id> (app_id ...)
Uninstalling an App
To uninstall an app, use:
sudo rainbow --remove <app_id> (app_id ...)
Note
The --list, --start, --restart, --stop, --remove options can take several
app_ids as argument.
Debugging Tools
“Entering” an App
“Entering” an app means enter in an interactive session that is placed in the
same chroot context as the app. This allows accessing app files at their
location as seen by the app
Without entering the app, you can access to app files using the app’s
install_path. When you enter the app, the install_path becomes the new
root directory.
To enter an app, make sure it is running, and then use the --enter option:
sudo rainbow --enter <app_id>
You will get an interactive command prompt inside the app’s chroot:
root@Seagate-D4:/#
When you are done finished, type the exit to leave the app:
root@Seagate-D4:/# exit
[root@Seagate-D4 ~]$
When inside an app, you are fully in the app’s container context, not in the
NASOS one anymore. This means every tool available in the app’s container
are accessible directly. For example, in a Debian based container, you can use
apt-get to install additional packages.
Warning
The rainbow utility uses a lock mechanism which is global to the NASOS system. It allows only one app operation at a time. Entering an app counts as an app operation, which means you won’t be able to perform other app operations ( e.g. from the Webboard, or another shell) while entering an app. Similarly, you won’t be able to enter an app while another operation (install, update) is undergoing.
Log Files
You will find detailed log for every operation performed by the rainbow
utility at the following location:
/var/log/rainbow.log
Note
This log file is not inside the app, but in the context of the system it is installed in (NASOS or the SDK VM).
When using the rainbow utility, you can use the --verbose (or short -v)
option to display the log output on the console.
If an app itself implements a logging mechanism, the log files will usually
be found in the /var/log directory inside the app. You will be able to inspect
the app logs by taking a look at <install_path>/var/log/* or you can
enter the app and then access them from /var/log.
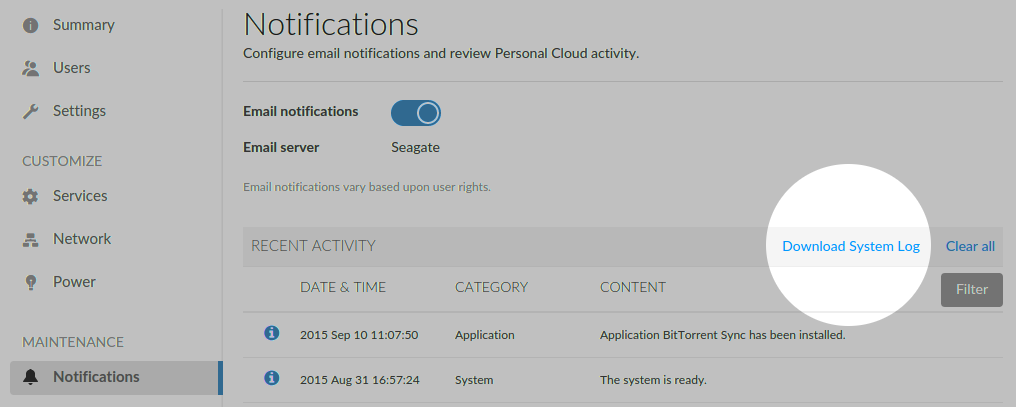
The NASOS Device Manager allows downloading the system log, which includes the log for all the installed apps (new since NASOS 4.2).
To retrieve the system log, in the Notification section of the Device Manager,
click on the Download System Log button:
After a few seconds, a .tar.gz
file will be downloaded. Inside this file, the /var/log content for each app
is found under the /var/log/<app_id> path.
Inspect Processes
To make sure an app is correctly running, it’s important to check its processes.
The rainbow tool is able to list all the processes for an app when using the
--list <app_id> command.
When your app is running, you should have at least one process listed in the
PIDS section when displaying the app’s details. If it’s not the case,
something must be wrong with the app’s startup script. In that case you
can enter the app, and try to manually run the startup script to see what
happens:
[root@Seagate-D4 ~]$ sudo rainbow --enter <app_id>

root@Seagate-D4:/# /etc/rc.local start

...
You can use tools such as top or ps in order to inspect your processes.
The lsof tool can also be useful in order to list the files open by the app.
NASOS also includes the pgrep and pkill tools which can prove useful for process inspection/control.
As seen in the app startup section, the recommended way to start an app that doesn’t natively support daemonizing is to use the start-stop-daemon. Have a look at the start-stop-daemon manual for detailed information about this tool’s usage.
Warning
The startup script is quite critical for an app to run properly. Most app
runtime issues come from issues in the rc.local script.
Another important aspect is making sure the app stops properly. This means, after stopping your app:
sudo rainbow --stop <app_id>
There should be no more processes running for the app. This is crucial, as if there are remaining processes, then it won’t be possible to remove the app, and issues might occur the next time the app is started.
Again, use top and ps to make sure no more processes are running. Also, in
the rc.local script, it can be necessary to wait for the processes to
terminate before exiting. Here is an example that uses pgrep and pkill:
# rc.local
MAIN_PROCESS="my_process"

case "$1" in
...
stop)
    while pgrep -f $MAIN_PROCESS; do
        pkill -f $MAIN_PROCESS
        sleep 1
    done
    ;;
...
This is just a snippet and not an actual working example, but it shows the
general idea that the rc.local script should always wait for the app to fully
stop.
Network Issues
When displaying the details for an app, the NETWORK PORTS section shows
the ports currently assigned to the app.
Note
Those are just the port values that have been assigned to the apps, they are not necessarily the ports used/opened by the app
You have to make sure the app is actually using those ports. See the Network section for details on port management.
To inspect the network ports currently opened, a useful tool is netstat.
You can for example use:
netstat -anpe
Which will display all the currently opened connections, with port and process information.
Make sure the ports for your app appear in the list.
Also, make sure that every port used by the app are listed in the network_ports setting. If it’s not the case and the app is using some hardcoded port that is already in use on the device, it will fail and the app won’t work properly.
The lsof tool mentioned above can also be used to inspect network issues.
In the next section, we’ll cover multi-arch support in the NASOS SDK.