


Prerequisites:
- Update the BlackArmor NAS to the latest firmware ver. 4000.1211
- Check the NAS firmware version by logging into the NAS Manager page as Admin.
- The System Status page opens by default and the Firmware Version will be listed.
- Click here to download firmware version 4000.1211 if necessary.
- Follow the update procedure listed on that page to update the firmware.
Remember to backup any critical data before updating the firmware.
- The iSCSI feature is only available for the BlackArmor NAS 400 Series.
- iSCSI cannot be used with encrypted volume on the BlackArmor NAS.
The BlackArmor NAS Manager page is used to setup an iSCSI Target and Device.
- Enabling the iSCSI Service using the BlackArmor NAS Manager page
- Log in to the NAS Manager page.
- In the menu bar, highlight Storage and then click iSCSI Manager.
- Click Enable next to iSCSI Target Service.
- Communication to and from the server is made through the default port 3260. A different port may be used if desired. If the port is changed, confirm it is within the specified port range.
- (Optional - These instructions do not use this option.)
The Internet Storage Name Service (iSNS) is used for automated discovery of an iSCSI drive over your network. Click Enable next to iSNS Service if you want to set up this optional service.
If you enable the iSNS Service, the BlackArmor server is used by default as the iSNS server. If you would rather use a different server, enter its IP address instead.
- Click Submit.

The iSCSI Setup Wizard should begin.
A setup wizard is available in the BlackArmor Manager Web UI to assist in setting up iSCSI. The setup process includes the steps to create the device and target.
- Using the iSCSI Setup Wizard
The LUN ID (Logical Unit Number) is set to 0 by default for each target you create. A LUN is a logical volume that is mapped to the iSCSI target.
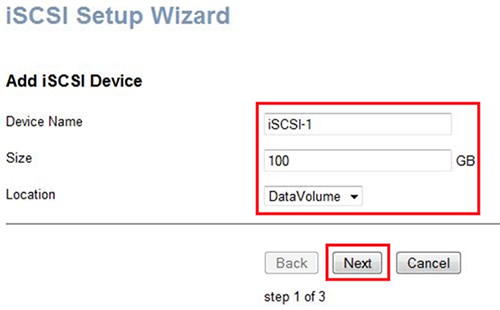
The Add iSCSI Device page displays. Complete the page as follows:- Device Name: Enter a name for the device.
 The iSCSI device name can have a maximum of 16 characters, and only alphanumeric characters and hyphens are allowed. The iSCSI device name must begin with an alphanumeric character.
 - Size: Enter the amount of storage space to allocate for this device.
See the * at the end of this article for information concerning iSCSI Device size.
- Location: Choose the volume in which the device will reside.
- Click Next.
- Device Name: Enter a name for the device.
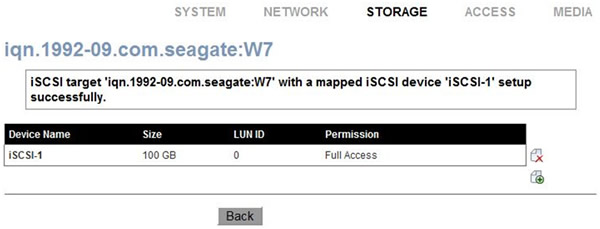
- Creating an iSCSI Target
After creating the device, the target Add iSCSI Target page displays.
Complete the page as follows:- IQN (iSCSI Qualified Name): Enter the name that you want to call the target. The full name, including the information preceded by the name you provide, is what the client will see from the Microsoft iSCSI Initiator.
The iSCSI target name can have a maximum of 32 characters and only alphanumeric characters, decimal points, colons, and hyphens are allowed. The iSCSI target name must begin with an alphanumeric character. - Header and Data Digest: Enable the optional Header and/or Data Digest options to verify the iSCSI Initiator when it attempts to connect to the target.
- Optional:
One-way and Mutual CHAP: The optional Challenge Handshake Authentication Protocol is used for authentication between the iSCSI Initiator and the iSCSI target. If you use One-way CHAP, only the iSCSI target authenticates the Initiator. Enable Mutual CHAP if you want the client to perform an additional check to ensure that it is accessing the correct target. Create a user name and password for the CHAP settings you enable.
- Optional:
- Click Next when you are finished.

- Review your settings on the Summary page and then click Back to make any changes, or Submit to complete iSCSI setup.

The iSCSI Target and Device is now setup.
- IQN (iSCSI Qualified Name): Enter the name that you want to call the target. The full name, including the information preceded by the name you provide, is what the client will see from the Microsoft iSCSI Initiator.
Basic setup of the iSCSI Initiator built in to Windows
For additional or advanced iSCSI Initiator help, contact Microsoft or see Windows help or online Microsoft documentation for instructions on connecting to an iSCSI target.
- Enable and configure the iSCSI Initiator Windows
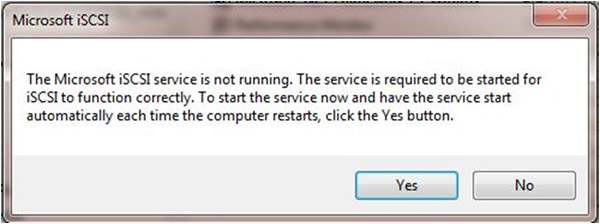
- Go to Start and open the Control Panel. Open Administrative Tools.
- Double-click the iSCSI Initiator shortcut.

- Click Yes to start the Microsoft iSCSI service, if needed.
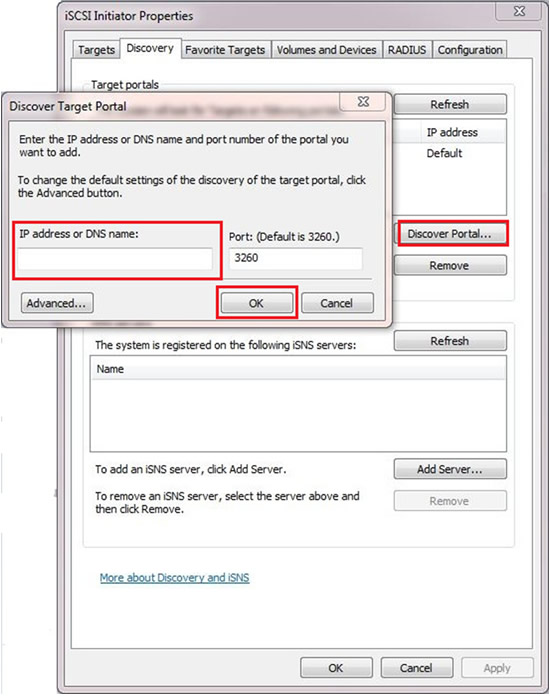
- The iSCSI Initiator Properties will open. Choose the Discovery tab.
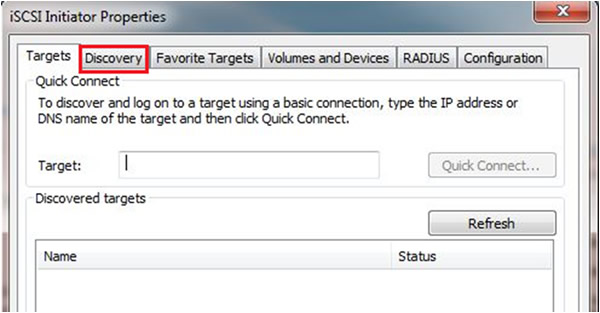
- Click the Discover Portal... button.
- Enter the BlackArmor NAS unit's IP address and confirm that the port matches the default port 3260 as seen when the iSCSI service was enabled in the NAS Manager page.
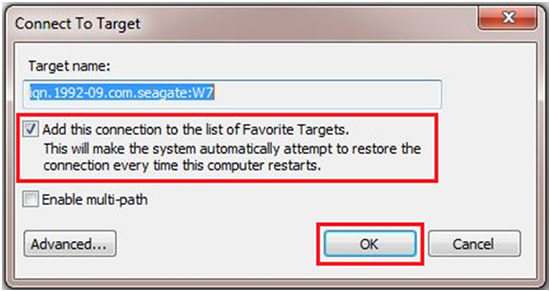
- Click the Targets tab and click on the iqn name (iSCSI Qualified Name) then click Connect.

- The Connect To Target box opens. Check Add this connection to the list of Favorite Targets.
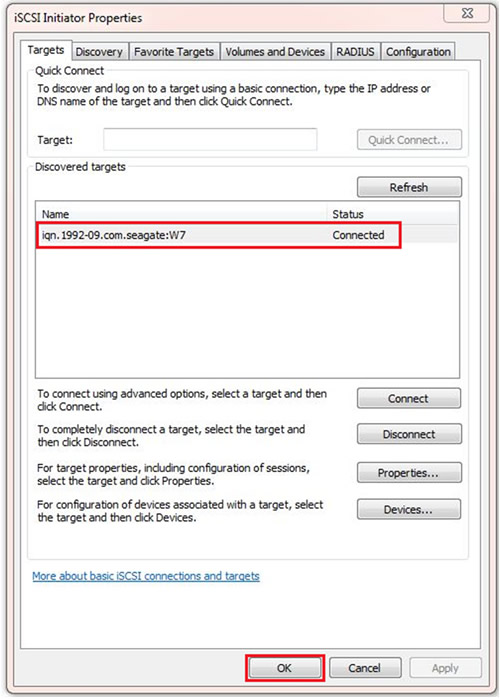
- The Discovered targets now show Connected. Click OK.
- How to show the iSCSI device in Computer with a drive letter
- Go to Start on the Taskbar.
Right-click Computer and choose Manage. - Computer Management will open. Select Disk Management.
The Initialize Disk box will open. - Choose MBR or GPT as needed and click OK.

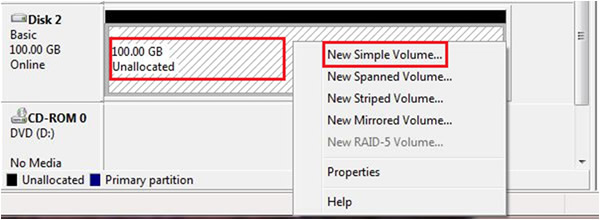
The iSCSI disk now shows as Basic and Unallocated. - Right-click Unallocated and choose New Simple Volume. Follow the New Simple Volume Wizard to partition and format the iSCSI drive.
When the format has completed, the iSCSI drive shows Healthy.

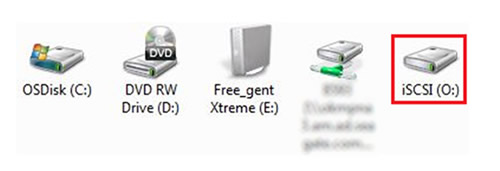
The iSCSI drive is now available in Computer with a drive letter.
- Go to Start on the Taskbar.
*The iSCSI device should not be larger than the available free space on the NAS. A percentage of used space and the volume size can be found in the NAS Manager page, under Storage and Volumes. This can be used to calculate the free space of the NAS.
iSCSI devices and additional iSCSI devices that exceed the free space on the NAS can be created on the NAS without triggering a warning. This is not recommended.
The ability to create iSCSI drives larger than the available free space on the NAS is by design. It is the NAS Administrator's responsibility to avoid exceeding the available volume when setting up iSCSI device(s). The Windows iSCSI Initiator does not have the ability to distinguish what shares exist on the volume of the NAS. The administrator of the NAS needs to set these limits on the NAS when setting up the various iSCSI devices.
In reality, the best practice would be not to have normal shares on a volume with iSCSI devices. If it is decided to use a mix of iSCSI devices and User Shares on the same volume, free space can be controlled by setting up Quotas on the shares, and the iSCSI Targets can be created based on the free space on the NAS and the Quotas that are set.
When the NAS is full, Windows may show free space on an iSCSI drive, but when trying to add more data, Windows will report CRC or Delayed Write errors.
Additional Information:
Click here to download Microsoft iSCSI Software Initiator Version 2.8 for Windows XP SP2 or above. Instructions, overview and other information are also available on this page.
See Document ID: 219651 for more information about iSCSI.