Topics in this article
The benefits of upgrading PS5 with a M.2 SSD
Storage capacity and speed. It’s no secret that PS5 games are faster, better, and bigger—an PCIe Gen4 x4 M.2 NVMe SSD increases your available storage space, while allowing you to maintain the next gen speeds that you expect from PS5.
That means more games, more apps, and less time waiting. Easily move your games between the internal PS5 storage, a connected USB extended storage device, and an installed M.2 SSD storage.
Which M.2 SSDs can be installed in a PS5?
To match the speed and power of the PS5, compatibility starts with a PCIe Gen4 x4 M.2 NVMe SSD with sequential read speed of 5500MB/s or faster. The PS5 M.2 expansion slot handles SSDs with a capacity range of 250GB up to 4TB. The most common compatible form factor size is 2280, but the PS5 M.2 expansion slot also takes sizes including 2230, 2243, 2260, and up to as high as 22110.
To ensure your M.2 SSD is running at optimal speeds, it needs to be running at optimal temperatures.
When running at full speed, a M.2 SSD generates a lot of heat. When that heat gets high enough to potentially damage the drive itself, a M.2 SSD will activate thermal throttling to prevent damage to the drive. This will protect the drive and ensure its longevity, but it will also slow down its overall processing capabilities.
For this reason, PlayStation recommends using a cooling structure to properly and effectively manage SSD temperatures.
Where can I get full M.2 SSD compatibility requirements?
Head to Sony PlayStation to get a full breakdown on M.2 SSD requirements for upgrading your PS5.
FireCuda 530 with heatsink is ready for your PS5
The Seagate FireCuda 530 with heatsink is a high-speed PCIe Gen4 x4 M.2 NVMe SSD that PS5 users can install to upgrade the storage capacity of their PS5 console or PS5 Digital Edition console.
Equipped with a capacity of up to 4TB and sequential read speed of up to 7300MB/s, the FireCuda 530 with heatsink comes ready to play. Our heatsink, developed in partnership with EKWB, regulates temperatures so you won’t have to worry about thermal throttling when you are in the middle of a session.
The Seagate FireCuda 530 with heatsink meets all requirements for upgrading your PS5, all you need to do is install it.
How to Install FireCuda 530 into Your PS5 Console
Before installing your FireCuda 530, you’ll need:
- A well-lit room with a table or flat surface to work on.
- A #1 Phillips or cross-head screwdriver.
- A small flashlight (optional).
Step 1.
Make sure your system software is up to date. Head to Settings > System > System Software > System Software Update and Settings > Update System Software. Select Update Using Internet.
Step 2.
Once your system software is up to date, press and hold the power button for three seconds to turn off your PS5 console.
Step 3.
Remove all cables and devices from the console. Then wait a while for the PS5 console to cool down.
Step 4.
Touch a metal-grounded object to remove any static electricity from your body. Failure to do so may cause damage to your FireCuda 530 or PS5 console.
Step 5.
Place the console on a soft cloth on a flat surface and remove the base.
Step 6.
Position the console so that the screw hole for the base is facing you, the PS logo is facedown, and the power button is on your left side.
Step 7.
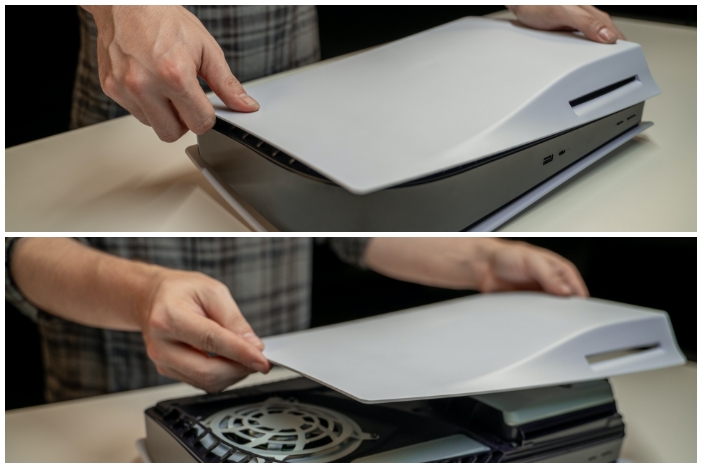
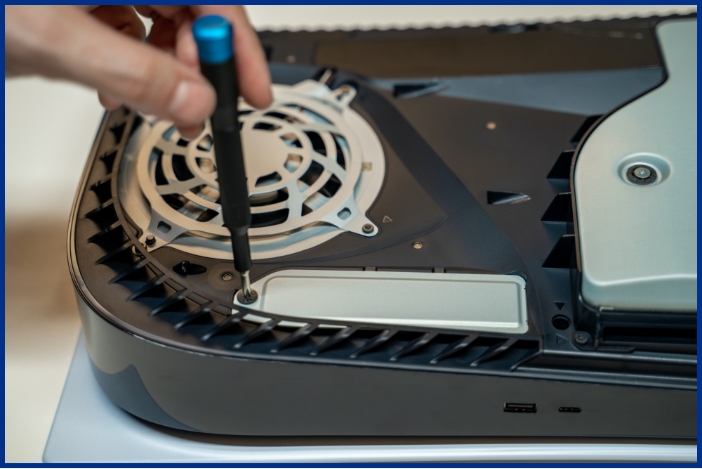
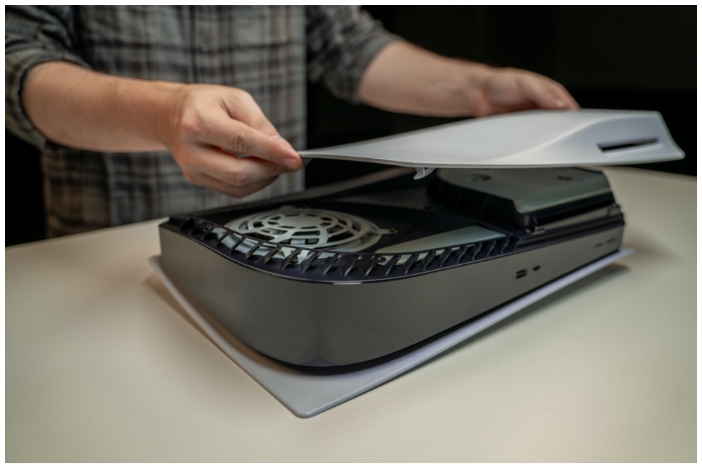
Place your palms near the top corners and grip the edge of the PS5 cover. Gently pull the PS5 cover up and towards yourself. You may hear a click as the PS5 cover lifts away. There is another long rectangular cover over the expansion slot, secured with one screw at the top.
Step 8.
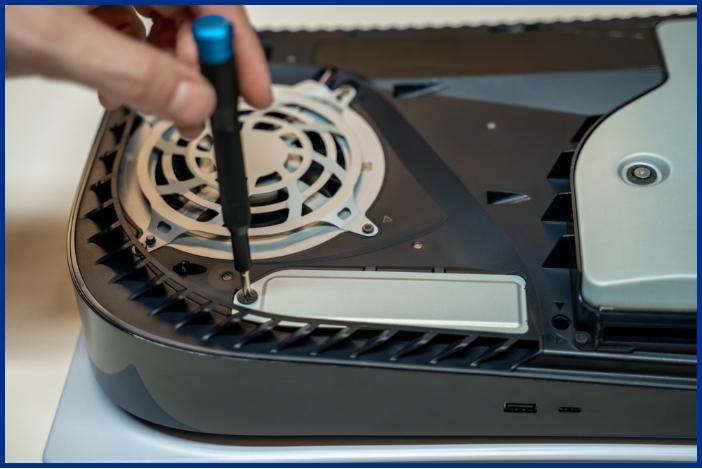
Remove the screw from the expansion slot cover and then remove the expansion slot cover.
Step 9.
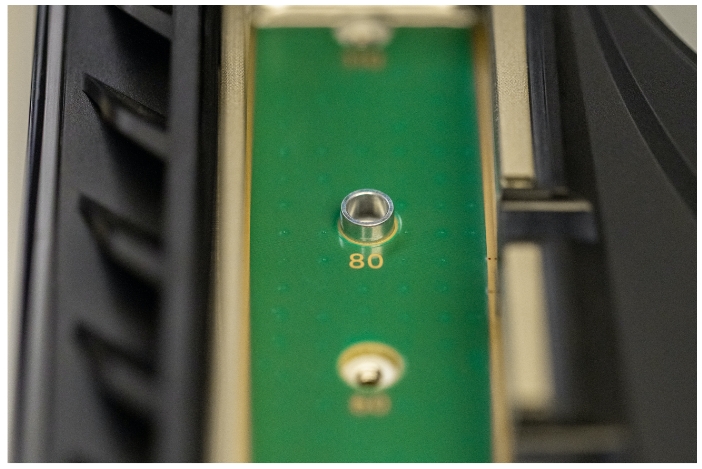
Remove the screw and spacer, and then adjust the spacer to the size of the FireCuda 530.
Step 10.
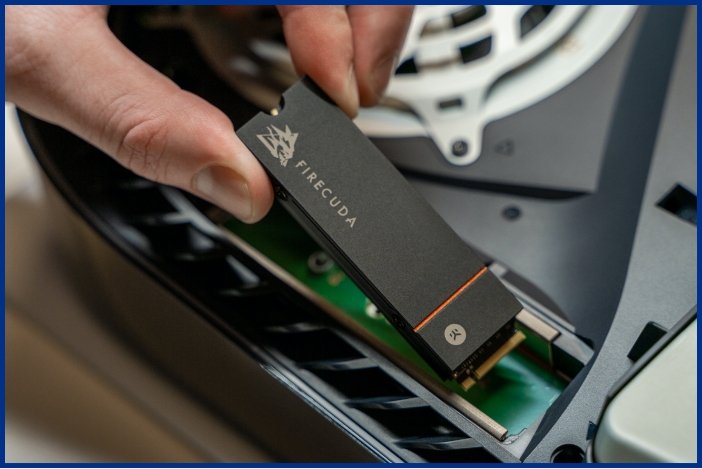
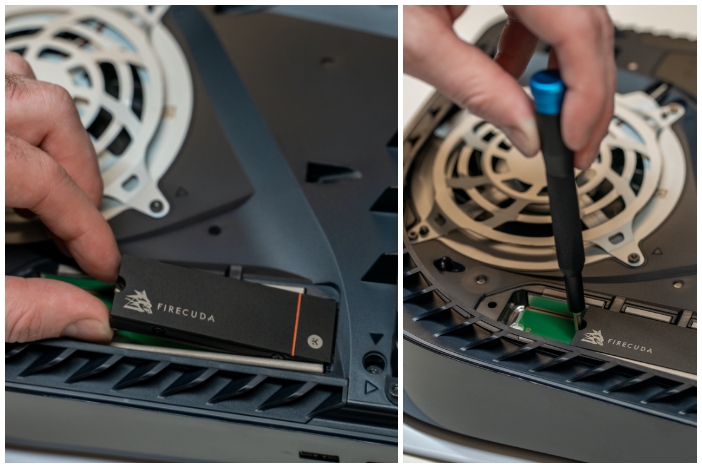
Hold the edge of your FireCuda 530, align it with the notch on the expansion connector, and then starting from diagonally upward position, firmly insert it all the way into the slot.
Note: If you proceed to the next step while your FireCuda 530 is incorrectly inserted or not firmly inserted all the way in, it may cause damage to the terminal and your PS5 console.
Step 11.
Gently tilt your FireCuda 530 down and fasten it with screws.
Step 12.
Attach the expansion slot cover and fasten the screw.
Step 13.
Replace the PS5 cover by positioning it slightly away (about 2 cm or 3/4 inch) from the top edge and sliding it back into place. You’ll hear a click when the PS5 cover is secured.
Step 14.
Connect the AC power cord, cables, and base, and then turn on the power.
Step 15.
When your PS5 console turns on, the formatting guide will appear. Follow the on-screen instructions to format your FireCuda 530.
Note:
Don't power on or play on your console while the cover is off.
If it is the first time using your FireCuda 530 with your PS5 console, you'll need to format it after installing. When you format your FireCuda 530, any data saved on the drive is erased. Data erased this way can't be recovered, so be careful and make sure you don't erase important data.
Do not turn off the power while saving data or while your FireCuda 530 is being formatted. Doing so may cause data loss, corruption, or damage to your FireCuda 530 or PS5 console.
Do not use an M.2 SSD without a heat-dissipation mechanism, such as a heatsink or heat transfer sheet. The FireCuda 530 with heatsink satisfies this requirement.
You’re set for more gaming with FireCuda 530
With an M.2 SSD installed, your PS5 is ready to bring even more ultra-high-speed gaming into your home. Learn more about FireCuda 530 and its advantages here. And as always, happy gaming.
Frequently asked questions
Can I play PS5 games from the expansion drive?
Yes. Expansion storage can be used for PS5, PS4, and media—all of which can play directly from the M.2 SSD without having to move to console storage.
Can I move games off the expansion storage to external storage?
Yes. Games and media can be moved back and forth from the M.2 SSD to both external USB storage devices and the console’s internal SSD.
How do i install games and apps to the FireCuda 530 storage on my PS5 console?
You can download games from the PlayStation Store directly to your FireCuda 530. Go to the home screen and select Settings > Storage > Installation Location to set this up.
To move games and apps already installed on your console storage:
Step 1.
Go to your games home and select Game Library.
Step 2.
Highlight the data you want to move, press the Options button, and then select Move Games and Apps. When you're using both a FireCuda 530 and a USB extended storage drive, go to the Items You Can Move to M.2 SSD Storage tab.
Step 3.
Select the checkboxes for any other games and apps you want to move and select Move.
Step 4.
To check your storage space and to move or delete data on your FireCuda 530, go to the home screen and select Settings > Storage > M.2 SSD Storage
Can I use a SATA M.2 drive into the PS5 console?
No. The PS5 expansion slot is only compatible with PCIe Gen4 x4 M.2 NVMe SSDs.
How do I remove FireCuda 530 from a PS5 console?
Step 1.
Press and hold the power button for three seconds to turn off your PS5 console, then remove all cables and devices from the console. Wait a while for the PS5 console to cool down.
Step 2.
Touch a metal-grounded object to remove any static electricity from your body. Failure to do so may cause damage to your FireCuda 530 or PS5 console.
Step 3.
Place the console on a soft cloth on a flat surface and remove the base.
Step 4.
Position the console so that the screw hole for the base is facing you, the PS logo is facedown, and the power button is on your left side.
Step 5.
Place your palms near the top corners and grip the edge of the PS5 cover. Gently pull the PS5 cover up and towards yourself. You may hear a click as the PS5 cover lifts away. There is another long rectangular cover over the expansion slot, secured with one screw at the top.
Step 6.
Remove the screw from the expansion slot cover and then remove the expansion slot cover.
Step 7.
Remove the FireCuda 530 storage drive screws.
Step 8.
Gently lift up your FireCuda 530 storage drive, and then hold the edge and pull diagonally upward.
Step 9.
Fasten the screws back on the spacers.
Step 10.
Attach the expansion slot cover and fasten the screw.
Step 11.
Replace the PS5 cover by positioning it slightly away (about 2 cm or 3/4 inch) from the top edge and sliding it back into place. You’ll hear a click when the PS5 cover is secured.
Step 12.
Connect the AC power cord, cables, and base, and then turn on the power.
Can I use a standard FireCuda 530 drive without a heatsink in my PS5 console?
Yes, however, it is strongly recommended that an additional cooling structure, such as a heatsink, is used when upgrading the PS5 console. If you have a FireCuda 530 without a heatsink, Seagate recommends using a third-party heatsink that meets the PS5 dimension requirements.
Should I remove the FireCuda 530 if I send my PS5 console for repair?
Yes. Please remove the FireCuda 530 before sending it for repair.
Can I format part of the FireCuda 530 for use on the PS5 console?
No, you must format the entire FireCuda 530.
Is it okay to install an additional heatsink on the FireCuda 530 with heatsink?
No. If using FireCuda 530 with heatsink, we do not recommend adding any additional heatsinks. Doing so may reduce the effectiveness of the built-in heatsink.
How is an M.2 SSD different to USB extended storage on PS5 consoles?
PS5 games can be played, downloaded, and upgraded with the FireCuda 530 M.2 SSD storage. USB extended storage can only be used for downloading and storing games, but they lack the speed and processing to play PS5 games.
Is it possible to store part of a game on FireCuda 530 storage?
No.
What should I do if I experience gameplay issues when I play games stored on a FireCuda 530?
Step 1.
Press the PS button on your controller to go to the control center, and then select Downloads/Uploads. Pause any ongoing downloads.
Step 2.
If you are trying to play a game on disc, please wait for the full installation to finish.
Step 3.
If you are still having issues, please move the game from FireCuda 530 M.2 SSD storage to internal ultra-high speed console storage.
Do PS5 consoles support Host Memory Buffer?
No. Additionally, M.2 SSD devices that support HMB (Host Memory Buffer) may see slower-than-expected performance because the PS5 does not support HMB.


