


Most laptop computers are designed to give the owner the ability to replace the internal drive. Consult the computer manufacturer’s site for information such as locating and accessing the drive, warranty policy, and supported drives specifications.
This covers the basic installation for a new drive in a notebook computer. These steps can be used for any internal drive, M.2 or SATA, SSD or HDD.
Considerations:
- 2.5 inch drives come in multiple heights
- 7 MM, 9.5 MM, and 15 MM
- Spacers may be considered if the original drive is larger than the replacement
- 15 MM will be too big for a 7 or 9.5 MM bay
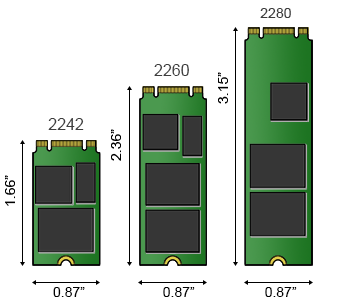
- M.2 drives come in multiple lengths
- 2230, 2242, 2260, 2280, and 22110
- 2230, 2242, 2260, 2280, and 22110
- Make sure the M.2 is compatible with the system
- M.2 drives can be keyed differently

- M.2 drives can be keyed differently
- The new drive comes unformatted without an operating system (e.g. macOS, Windows, etc.)
- Have operating system installation media and/or computer recovery media available
- Migrating existing data requires special software for cloning or imaging the original drive. See the DiscWizard support page for more information.
Electrostatic discharge:
This is a risk to electronic components. To help prevent static discharge, observe the following precautions:
- Before handling any components, put on a grounded wrist strap.
- Use antistatic padding on all work surfaces.
- Avoid static-inducing carpeted areas.
- Keep the drive in its static-shielded bag until you are ready to complete the installation. Do not attach any cables to the drive while it is in its static-shielded bag.
- Handle the drive by its edges or frame.
- Do not touch the I/O connector pins or the circuit board.
To replace the original drive:
- Shut down the computer
- Disconnect power and battery
- Consult computer manual precautions and procedures
- Drain any residual electrical charge
- For most laptops holding down the power button for 15 seconds will work but consult the manual to make sure.
- Locate the existing drive or storage location
- Carefully remove the existing drive
- Remove any hardware from the original drive if necessary
- Carefully connect the new drive to the system
- Reassemble the computer
- Reconnect computer battery
- Power on the computer
- Reinstall the operating system or restore image
- If the original drive was cloned to the new one it should boot up normally