


This article provides the requirements and procedures to use your Thunderbolt 3 devices on Windows PC.
Our Thunderbolt 3 storage devices are certified for use with Windows PCs that have a Thunderbolt 3 port. However, you may experience connectivity issues between the storage device and the Thunderbolt 3 port on a Windows PC. Therefore, before setting up your Thunderbolt 3 storage device, please visit your PC manufacturer’s website to update your Windows PC to the latest versions of:
-
BIOS
-
Thunderbolt 3 firmware
-
Thunderbolt 3 driver
Also, make sure that your PC has the most recent version of Windows 10.
For questions regarding your PC, please contact the PC manufacturer or for custom computer builds, please contact the motherboard manufacturer. You can also review the following website for additional information: https://thunderbolttechnology.net/updates
Note: This issue pertains to the Thunderbolt 3 port and does not affect USB ports.
Important: It’s recommended to use the original Thunderbolt 3 cable to ensure maximum data transfer performance when used with compatible ports.
Connecting your Thunderbolt 3 device for the first time
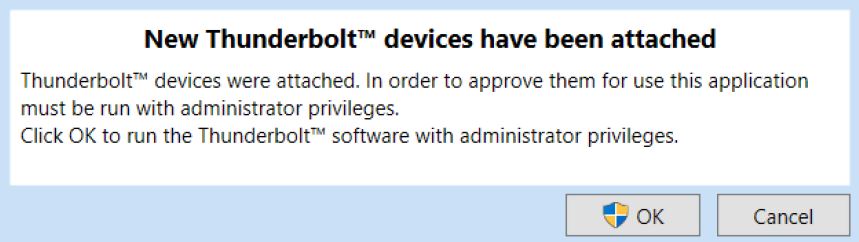
When you first connect a Thunderbolt 3 device to a Windows PC that supports Thunderbolt 3, you may see a prompt requesting to authenticate the recently connected device. A dialog box appears informing “New Thunderbolt devices have been attached”. See Image:
Follow these steps to authenticate the device:
-
Click OK in the dialog box
-
Click Yes on the Windows User Account Control pop-up
-
Another dialog box appears listing the device’s name along with a drop-down menu with options to Do Not Connect, Connect Only Once or Always Connect. Select the desired option then click OK.
If your computer does not prompt you that a new Thunderbolt device has been attached, you can still use the Thunderbolt Software or Thunderbolt Control Center (newer systems) to approve your device. See below:
Approving a device using the Intel’s Thunderbolt Software (Older systems)
-
Connect your Thunderbolt 3 device to your computer
-
Right-click on Thunderbolt icon in the system tray
-
Click Approve Attached Devices
-
On the device’s drop-down, select Always Connect
-
Click OK
Approving a device using the Intel’s Thunderbolt Control Center (Newer systems)
-
Connect your Thunderbolt 3 device to your computer
-
Go to Search and then type Thunderbolt Control Center and click open
-
Click on the menu
-
Click on Approve Thunderbolt devices
-
On the device’s drop-down, select Always Connect

-
Click OK
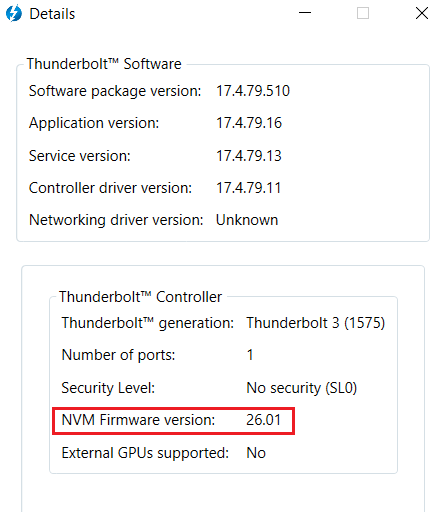
How to check which version of the Thunderbolt 3 firmware (NVM) is currently running on your computer:
| ...using the Intel’s Thunderbolt Software (Older systems) | ...using the Intel’s Thunderbolt Control Center (Newer systems) |
|
|
|
|
|
.png)