


In order to create a RAID array, begin by opening the LaCie RAID Manager from your Applications list. Once open, select the Adaptor 0 line from the left hand column. From here, go to the Operation tab on the right hand side and select Create Array.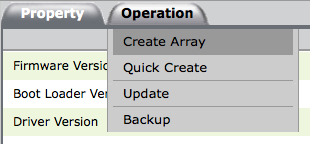
On the next page, you are required to select which drives you wish to add to the RAID. You can do this by clicking on the icon for each drive you wish to add. Once selected, move on to verifying the settings at the bottom of the page.
The RAID Level pull down shows the available RAID configurations. The second pull down allows you to choose whether to enable or disable disk cache. The third pull down menu allows you to select the Stripe Size. 32K is generally the default, however you may want to choose a higher stripe size if you will be working with larger files (i.e. HD video and audio). Once this had been selected, fill in a title for the RAID in the Name box. Once all these steps have been completed, press the Submit button to create the RAID.
Now that the RAID has been created, we need to create a virtual disk. To do this, select the Array 0 line from the left hand column and go to the tab Create VD.
In this window, fill in a title for the VD in the Name box. Next, choose whether to turn Cache Mode on (for greater performance) or off (for greater reliability). The rest can be left at default unless you have specific preferences for Initialization, Stripe Size, and Gigabyte Rounding. Once this is completed, select the Submit button to create the VD.
Products
Knowledge Base
Support Downloads
Articles
suggested searches
Log in

Seagate Partner Program Portal
Provides access to product training, sales and marketing resources, deal registration, and more to our VARs, Integrators, Resellers and other channel partners.

Seagate Direct Customer Portal
Provides Direct customers with B2B Self Service tools such as Pricing, Programs, Ordering, Returns and Billing.

Seagate Supplier Portal
Provides Suppliers with self-service tools targeted to the needs of their business.