Due to the fact that more and more computers do not have optical (ie, CDROM or DVDROM) drives, it is sometimes necessary to use a flash drive (sometimes called a "thumb drive") to boot into the Replica full system restoration function instead of booting from a CD.
This option will only be supported for users that do not have access to a CD drive. The bootable CD is the preferred method of recovery, as this is where most testing was focused.
Before you begin, you will need a few items.
- A blank USB flash drive (thumb drive) formatted FAT/FAT32. 256MB minimum capacity
- An ISO image file of the Replica recovery CD (downloadable here)
- A computer capable of booting from a USB drive (review your computer/motherboard manual or contact the manufacturer to determine if your computer can do this)
Here is the procedure:
- Plug the flash drive into a USB port on your computer.
- Download UNetbootin, a program that allows the creation of bootable USB drives.
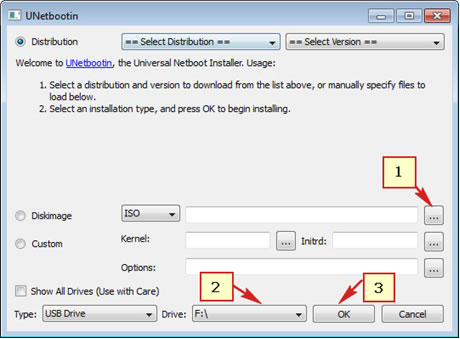
Additional information about UNetbootin can be found here. - Once UNetbootin is downloaded, double-click it to run it. You will see a Window that looks like this:

- Click the "..." button next to ISO and browse to the Replica Recovery ISO image and select it.
- Click the Drive dropdown menu and select your USB flash drive.
- Click OK to start the process of loading the ISO to the flash drive.
- Select EXIT on the next screen. Some files need to be changed before you can boot from the drive.
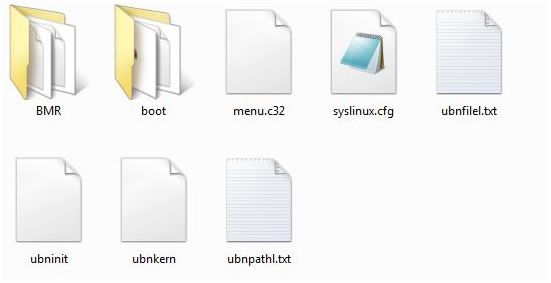
Note: Windows 7 may prompt you with a window stating "This program might not have installed correctly". Click Cancel in that case. That window does not apply since the program was not being installed. - Open the flash drive by double-clicking on the drive letter in your Computer/My Computer window. You will see the following files:

- Now make the following changes:
- Rename menu.c32 to 1menu.c32
- Rename syslinux.cfg to 1syslinux.cfg
- Copy menu.c32 from the \boot folder on the flash drive into the root of the USB flash drive
- Copy USB:\boot\isolinux\isolinux.cfg into the root of the USB flash drive
- In the root of the flash drive, rename menu.c32 to vesamenu.c32
- In the root of the flash drive, rename isolinux.cfg to syslinux.cfg
- Keep the flash drive connected to your computer, and boot from the flash drive to verify successful completion. The USB flash drive will need to be connected during the boot process to set the boot options.
Note: It may be necessary to change to boot order in the computer BIOS (setup) to boot from USB. Consult your computer/motherboard manual or contact the manufacturer to determine how to do this.


