


It is always considered a safe removal to shut down/reboot the computer and turn off/disconnect the drive while the computer's power is down, but that is not always a convenient solution. This document will explore several possible resolutions for the problem.
Step 1: Try the drive on another computer so as to attempt to isolate the problem. If the problem does not repeat itself on the second computer, then it might well be system-related. If the problem follows the drive, then continue troubleshooting.
Step 2: A process that can hold up the drive is explorer.exe. This is because of the Windows Recycle Bin.
The Recycle Bin may need to be disabled.
- Right-click on the Recycle Bin on the desktop.
- Select Properties.
- Select the Global tab.
- Select Configure drives independently (instead of Use one setting for all drives).
- Select the USB drive letter tab on the top.
- Put a check in the Do not move files to the Recycle Bin checkbox.
- Click OK.
 Disabling the Recycle Bin will cause deleted files to be permanently deleted immediately.
 This option may not be available in Windows Vista or Windows 7.
Step 3: If you have Norton System Works installed, the Safely Remove Hardware icon in the System Tray will not work with the external drive because of the Norton Protected Recycle Bin. If your Windows Recycle bin on the desktop has an "N" with a shield, then Norton is running a special software on your system.
This is a known issue.
Step 4: Other software like antivirus programs, or any programs or image files that remain open on the drive (even Windows Explorer if its window is open and displaying the contents of the external drive) can prevent safe removal. Close all programs and any open files or windows displaying the drive contents and attempt to remove the drive again.
Step 5: In Windows 7/Vista/XP/2000, please follow these directions:
- Right-click on (My) Computer.
- Select Manage.
- Select Device Manager.
- Open Disk Drives.
- Double-click on the hard drive's model number.
- Go to the Policies tab.
- Check whether the drive is set to Optimize for Quick Removal.
If so, the hard drive does not need to be Safely Removed manually from the system. Just turn off the hard drive or disconnect it at your convenience whenever the hard drive is not busy transferring data.
This way there is only a slim chance that the partition will be corrupted by a removal. This carries no risk for the drive hardware, but it does put your data at a small risk. Please remember that you would be very unwise to put yourself in a situation where that is a concern for you. If this drive were to experience a sudden mechanical or electronic failure or if it should fall, or if the drive's partition should become corrupted, your data could be lost and data recovery is very expensive. Remember that this is a backup drive, and a backup is defined as "a second copy of data in a second storage media".
Whether on a second external hard drive, a CD or DVD, an internal hard drive, a network hard drive, or tape, make a 2nd copy of your data today and keep it.
If not, please continue.
Step 6: If the Windows Media Player Library is configured to monitor a folder on the external drive for new content it will not allow a Safe Remove. Instructions may vary depending on the version of Media Player.
- Open Media Player.
- From the top menu, choose Tools, then Options.
- Choose the Library tab.
- Click the Monitor Folders button.
- View the Advanced Options.
- Remove items that point to the drive letter used by the external drive (ie, E: or F:).
Other multimedia applications may have similar issues if they automatically add new music to their library by monitoring file locations, specifically on the external drive.
Step 7: If Windows Media Center is set to record shows, podcasts, etc. to the external drive, Windows may not allow the removal of the external drive.
Step 8: If Windows Indexing Service is turned on, Windows may not allow the removal of the external drive, since it causes Windows to constantly watch the drive.
For Windows 7/Vista:
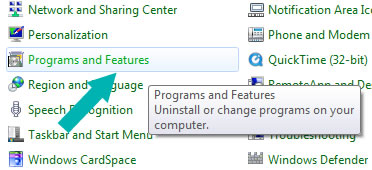
- Click the Windows start button in the bottom left of your screen. Select Control Panel, and then Programs and Features.
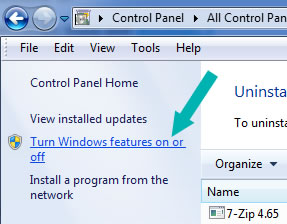
- Select Turn Windows features on or off.
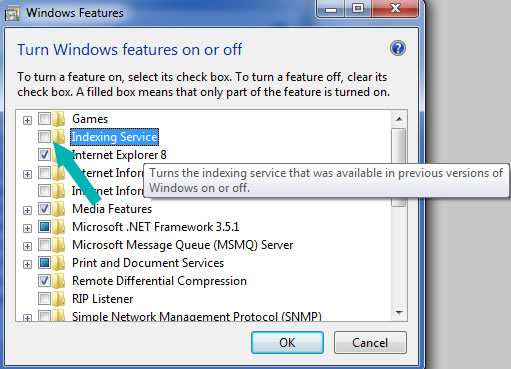
- Confirm that the Indexing Service is unchecked. If it is checked, uncheck it and click OK.
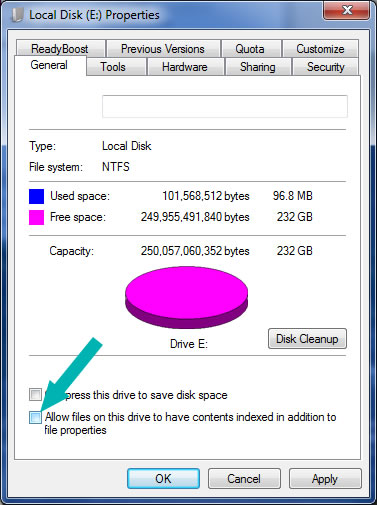
- Double-click on Computer to open it, then right-click on the external drive's drive letter (for example, E:) and select Properties.
- Uncheck the Allow files on this drive to have contents indexed in addition to file properties box.
- Then retry the Safe Removal.
For Windows XP:
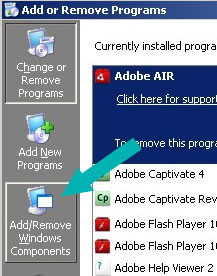
- Click on the Start menu on the bottom left of your screen. Select Control Panel and then Add/Remove Windows Components.
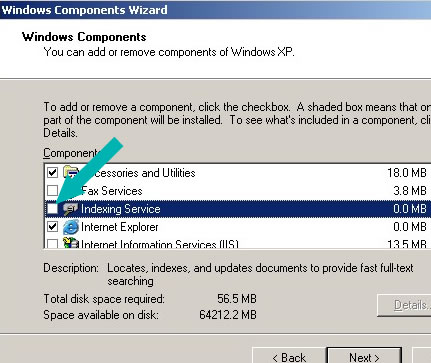
- Confirm that the Indexing Service is unchecked. If it is checked, uncheck it and click OK.
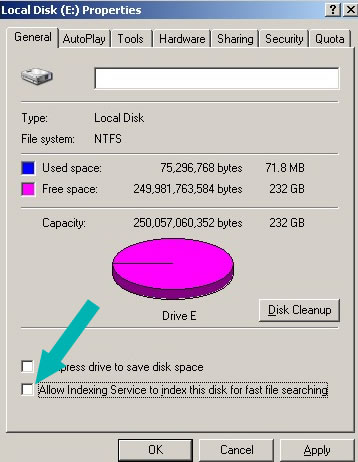
- Double-click on My Computer to open it, then right-click on the external drive's drive letter (for example, E:) and select Properties.
- Uncheck the Allow Indexing Service to index this disk for fast file searching box.
- Then retry the Safe Removal.
Step 9: For the Seagate Pocket drive - The Pocket drive Toolkit is constantly updating the free space of the drive and other information in order to display it to the user.
You can use the Eject option in the Toolkit or exit the Toolkit software:
- Right-click on the Toolkit icon in the System Tray
- Choose Exit.
This will release the drive and may allow you to safely remove the drive.
Also, please see the linked-to Microsoft Support article on this topic.
 REFERENCE TO THIRD PARTIES AND THIRD PARTY WEB SITES. Seagate references third parties and third party products as an informational service only, it is not an endorsement or recommendation - implied or otherwise - of any of the listed companies. Seagate makes no warranty - implied or otherwise - regarding the performance or reliability of these companies or products. Each company listed is independent from Seagate and is not under the control of Seagate; therefore, Seagate accepts no responsibility for and disclaims any liability from the actions or products of the listed companies. You should make your own independent evaluation before conducting business with any company. To obtain product specifications and warranty information, please contact the respective vendor directly. There are links in this document that will permit you to connect to third-party web sites over which Seagate has no control. These links are provided for your convenience only and your use of them is at your own risk. Seagate makes no representations whatsoever about the content of any of these web sites. Seagate does not endorse or accept any responsibility for the content, or use, of any such web sites.