From a PC:
From a Mac:
Please follow this procedure to load content onto your Seagate Central in Windows:
Top of the page:
-
Set up your Seagate Central by opening the Public folder and clicking on the “Manage the Seagate Central” link.
-
Before you decide to transfer a large amount of files to your Seagate Central, Seagate recommends you make sure you have the most up-to-date firmware. See the instructions at the end of this article on how to check and update firmware.
-
Open the Start menu, then open (My) Computer or Windows/File Explorer. (In Windows 8: Press the Windows key ( ) + D, then select File Explorer (
 )
)
-
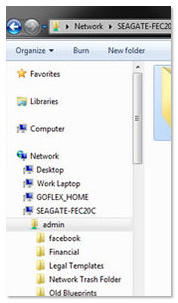
In the left sidebar, click on the triangle icon next to Network to expand the menu

-
Find the Seagate Central and click on it.
-
The Seagate Central will appear with the hostname.
-
Example: Seagate-123456. The Public folder will appear. You may also see folders with titles that correspond with your username and other users you have set up. If you plan to view your content outside of your home using the Seagate Media app, this content must be placed in the Public folder.
-
Open another Windows/File Explorer or (My) Computer window and navigate to the files you would like to add to your Seagate Central.
-
Select the content you would like to copy and drag and drop the content to the folder of your choice. The private folder’s title is your username. That folder will always require a login and should be used to store files you don't want readily available on your local network. You can add files to this folder by double-clicking on the folder and providing your credentials. Once you're logged in, you can manually transfer files to that folder.
How to verify and update firmware
To verify whether you have the latest version of the firmware on the Seagate Central, open the Public folder and click on the “Manage the Seagate Central” link. Once logged in, go to “Settings” and then click on “Advanced” and “Firmware Update”. On the right-hand side, click on “Check for update” and apply any updates it may find.
Please follow this procedure to load content onto your Seagate Central from a Mac computer:
Top of the page:
-
Set up your Seagate Central by opening the Seagate Central’s Public folder and clicking on the “Manage the Seagate Central” link.
-
Before you decide to transfer a large amount of files to your Seagate Central, Seagate recommends you make sure you have the most up-to-date firmware. Check the bottom of this article to see how to verify the firmware on your drive.
-
Open Finder from the Mac desktop.
-
In the left sidebar under Shared, find your Seagate Central device listed as Seagate-XXXXXX(where Seagate-XXXXXX is the host name).
-
The public folder will be displayed. You can access it from here if that's where you want to copy your data. If you want to access your private folder, you will need to click on Connect As, then type in your credentials. Note: The username that is displayed by default is not the username of your Central. You will need to clear out that username and then type in the username that you gave the drive during setup.
-
Once you are connected, the private share (titled according to your username) and the public share will display in the left sidebar. Double-click on the desired folder to drag and drop data to it.
If you would like to view your content while outside of your home through the Seagate Media app, please drag and drop your content to the Public folder. The Seagate Media app has a limitation that will only allow you access to your Public Folder.
How to verify and apply firmware on the Seagate Central
To verify which version of the firmware is on your Seagate Central, open the Seagate Central’s Public folder and click on the “Manage the Seagate Central” link. Once logged in, click on the “Settings” tab, then click on "Avanced" on the left-hand side of the window. Click on “Firmware Update.” Click on “Check for update” on the right-hand side and apply any updates it finds.


 ) + D, then select File Explorer (
 )
)