


There are six main reasons why a system BIOS will not detect the presence of an internal hard drive. Here is a list of them. They are not in any particular order, but you can follow these steps one by one to troubleshoot this problem:
- Drive not enabled in the BIOS
- Serial ATA drivers are not properly installed
- Faulty or unplugged data cable
- Drive is not spinning up
- Incorrect jumper settings on the drive
- Faulty hard drive
Note: Sections 3, 4,5 and 6 pertain to PC or Mac systems. Sections 1 and 2 pertain only to PC systems.
After verifying that your ATA or SATA port is set to Auto-Detect or is enabled, if you find that your disk drive is not being detected (auto-detected) by the system BIOS, try the following steps to try and isolate/troubleshoot the problem.
Most personal computers display a brief message about entering System Setup soon after the power is turned on. System Setup is also called the "system BIOS" or sometimes the "CMOS Setup" - each is a name for the same thing.
For example, on Dell systems you will see "F2=Setup" in the upper right hand corner during the computer boot-up. This means to press the F2 key to enter Setup (the BIOS). Different computer manufactures have different methods to enter Setup, so please check your system documentation for specifics.
If your drive is not detected it may be because it is turned OFF in System Setup. Some motherboard manufactures disable unused ports in the BIOS by default. You will need to enter the the BIOS setup in order to verify their current state.
When you add a second drive to the system, it may be need to be enabled by turning it ON in System Setup.
- The Serial ATA motherboard drivers are not properly loaded.
When you install older versions of Windows on a drive that will be the boot drive (ie, the C: drive), when it comes time to install Windows, the drive may not be detected. You might need to update the driver for your computer storage controller.
Windows 2000 and XP required additional drivers to be loaded.
Note: These drivers do not come from Seagate; they come from the motherboard manufacturer.
- Faulty or Unplugged Data Cable
- Always inspect the motherboard and hard disk connections for bent or misaligned pins. Folding, crimping, pinching, or creasing data cables can cause the wires to break inside the insulation, leaving the exterior of the cable looking normal. When in doubt of data cable condition, replace it.
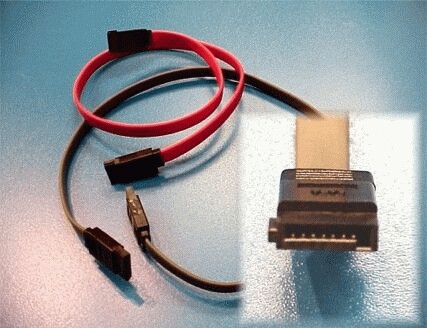
- For SATA cables, Seagate recommends using cables shorter than 39.37 inches (1 meter). For further information, please see Document ID: 182453.
Here are some images of Serial ATA cables. Click to expand.

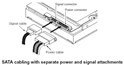
- The BIOS will not detect a hard disk if the data cable is damaged or the connection is incorrect.
Serial ATA cables, in particular, can sometimes fall out of their connection. Be sure to check your SATA cables are tightly connected to the SATA port connection. - The easiest way to test a cable is to replace it with another cable. If the problem persists, then the cable was not the cause of the problem.
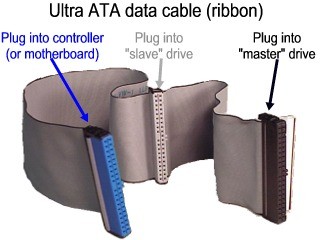
- For ATA drives, Seagate recommends using UDMA cabling with a maximum length of 18 inches. UDMA cables have color coded connections which require proper orientation when connecting.
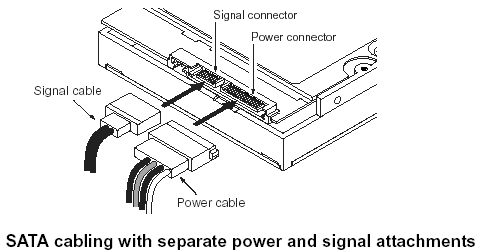
See this image:
(Click to expand)

- Blue connector - always connects to the motherboard.
- Grey (middle) connector - is used for slave devices on the cable.
- Black connector - is used for master device connection.
- Drive is not spinning up
If the drive is not receiving power or receiving an incorrect level of power, it will not spin up. To check to see if this is the cause of the BIOS not detecting the hard drive, follow these steps:- Power off the computer.
- Open the computer case and remove the data cable from the hard drive. This will stop any power saving commands from being sent.
- Turn on the system. Check to see if the hard drive is spinning. If you touch the side of the drive you should feel a slight vibration. If you do not hear or feel the hard drive spinning, the drive did not start.
If you cannot determine whether the drive is spinning:
- Boot the computer and listen carefully.
- Shut the computer down.
- Disconnect the power cord from the computer itself.
- Disconnect the power cable from the hard drive in question.
- Reconnect the power cord to the computer itself.
- Boot the computer up to see if the drive sound was audible before. And,
- Then repeat, only reconnect the hard drive and listen for it to spin up.
- Switch power cables with a device like a CDROM or DVDROM drive, so that you are using a known-good power cable.
- Check the power supply on your computer to determine whether it is providing sufficient electrical power to operate the drives and devices you have in your computer.
- If the drive is still not spinning, connect it in another computer if possible.
- Connect the drive in a SATA-USB enclosure or something similar if possible.
- If the drive does not spin up after all of these steps, please visit the Warranty page to begin a warranty replacement order.
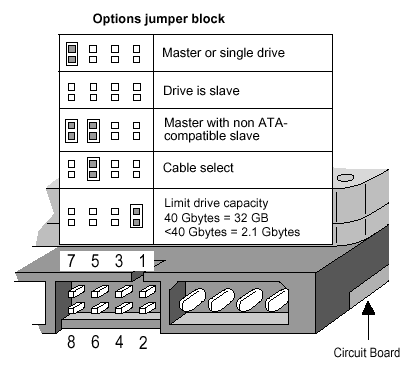
ATA: It is recommended that all Seagate ATA hard disks supporting the Cable Select jumper option be configured as Cable Select. If your computer system was built prior to October 1998 and does not support UDMA 66 or greater you will be required to use the Master/Slave jumper settings.
- -- (Click to expand) Jumper settings for Seagate ATA drives
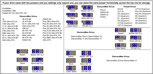
 -- (Click to expand) Jumper settings for Seagate ATA drives
- -- (Click to expand) Jumper settings for Maxtor-brand ATA drives
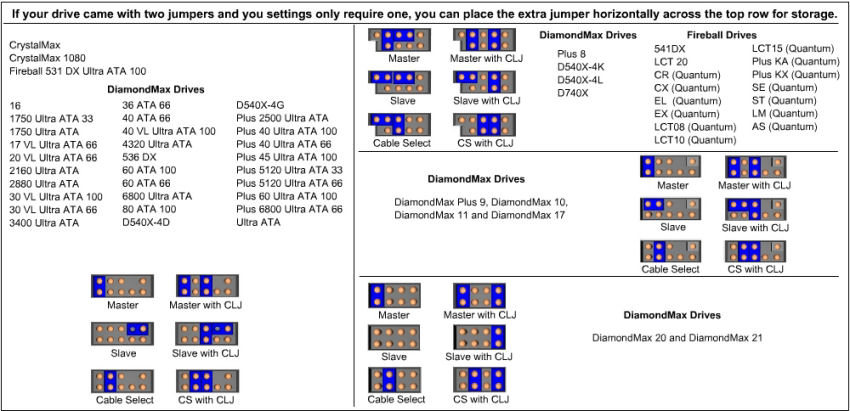 -- (Click to expand) Jumper settings for Maxtor-brand ATA drives
When using Cable Select jumper settings on your ATA drive, all devices connected to the UDMA cable must also use the Cable Select setting. The cable decides master/slave device detection when the cable select jumper settings are used.
If you have completed the above checks and procedures and the drive is still not properly detected, please attempt to use SeaTools for DOS (see the tutorial here) to test the drive. If SeaTools does not detect the drive after the steps followed above, or an error code that signifies drive failure displays, please proceed to the our Warranty Services page to begin a warranty replacement order.
Note: For more detailed step-by-step troubleshooting, please see the Serial ATA Troubleshooter