Electrostatic Discharge (ESD)
Static electricity is an electric charge caused by an imbalance of electrons on the surface of a material. When you touch an object and are shocked, this is the transfer of the static charge or the balancing of your charge to that of the object. This exchange is called Electrostatic Discharge or ESD. ESD can cause two different types of damage to computers and peripherals: (1) Catastrophic, which is the complete loss of device functionality, and (2) Latent Defect, where the device is only partially effected, and the device loses part of its productivity and longevity. Because we cannot eliminate the generation of static electricity, it is extremely important to follow the proper steps to ground yourself before handling your LaCie PCI Card or touching any internal component of your computer. This can be accomplished by proper grounding in conjunction with the use of ESD safe mats, wrist or shoe straps. Consult your computer supply specialist for more details on the correct ESD dissipative device to fit your needs.
Inserting Your LaCie PCI Card
Required Tools
- Philips-head and/or flat-head screw driver
- Computer System Manual
- Turn off your computer and disconnect all external peripheral devices and cables, i.e. power cord, modem/fax line, monitor, etc.
- Remove your computer’s cover. For most computers, several screws will need to be unseated before you can remove the computer’s cover. These screws are usually located at the rear of the computer, along the edge of the cover. However, placement of these screws and cover attachment may vary by manufacturer, so please refer to your computer’s manual for specific details.
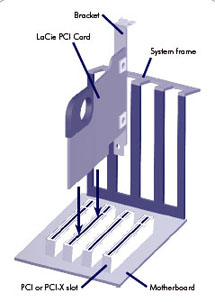
- Once you have removed the cover, you will need to locate the PCI slots on the motherboard. The PCI slots are generally located in the back of the computer, with the slots built into the side-wall of the computer (please refer to your computer system’s manual for the exact location of your PCI slots – the LaCie PCI Card may be installed in either a 32 or 64-bit PCI card slot). If necessary, you may need to remove the expansion slot cover, and you may also need to remove any add-in boards which block access to the PCI slots.

- Take the LaCie PCI Card out of its anti-static blister package and, being careful to touch only the anti-static gripping pad, push the card into the empty PCI card slot. There is only way to mount the card, so if you are having problems inserting the card into the PCI slot, make sure that it is oriented correctly. Be sure that the gold contact pins of the PCI card are seated completely inside your computer’s PCI slot. Be aware that it may take some force to get the card fully seated in the slot.
- Once the PCI card is seated correctly, tighten with a screw.
- If necessary, replace any add-in boards that you removed in Step 3.
- Now you are ready to put the computer’s cover back on and reconnect all of your external peripheral devices and cables.
- Power on your computer. After the start up procedure has finished, you should be able to connect devices through the available ports.


